Yealink Room User's Guide
Introduction Yealink RoomPanel is a multi-functional meeting room schedule panel that provides an omnidirectional and instant display of the meeting room status. RoomPanel can be linked with Yealink RoomSensor to realize real-time status monitoring of the meeting room. Users can check the availability of meeting rooms and schedule meetings directly through RoomPanel.
Related Documents In addition to the RoomPanel User Guide, we also provide the following documents:
RoomPanel Quick Start Guide: Introduces the installation and deployment of RoomPanel. RoomPanel Installation and Deployment Video: Introduces the installation and deployment of RoomPanel. RoomPanel Quick Use Guide: Introduces how to use RoomPanel quickly, including login, creating a meeting room, binding a meeting room, scheduling a meeting, pairing sensors, etc. Yealink Workspace Management Platform Administrator Guide: introduces the use of Yealink Workspace Management Platform(YWMP).
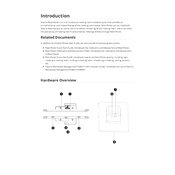
Hardware Overview
Number Interface Name
Description
1 Microphone /
2 Speaker It is used for audio output.
3 USB-C Port The administrator uses it to debug the device.
4 Reset Key It is used to restore factory settings.
5 LED Bar
It used to indicate the status of the meeting room: Idle: green; Occupied: red Upcoming: orange.
6 Internet Port It is used to connect network devices. Power connection via PoE.
7 DC12V Port It is used to connect the power supply through the power adapter.
LED Indicator Status Description
Green RoomPanel is starting up. The meeting room is idle.
Red The meeting room is occupied.
Orange The meeting is about to start.
Off No account is logged in. RoomPanel is powered off.
LED Indicator Introduction
Interface Introduction Home Page Idle Status Interface:
Busy Status Interface:
Number Description
1 Display the time and date.
2 Enter the meeting schedule page.
3 Enter the settings page.
4 Display the meeting room name.
5 Display the meeting room status.
6 Display information about the next meeting room.
7 Display today's schedule.
8 Click to schedule a meeting.
9 Display the meeting name.
10
Click to check in. If the automatic release of "abandoned meetings" feature has been enabled in YWMP, the meeting will be canceled if you do not check in within a certain period of time. Note: You can enable/disable the Automatic check-in feature in YWMP. If the RoomPanel is paired with the RoomSensor and the sensor detects that there are people in the meeting room within a certain period of time, the meeting room will automatically check in.
11 Click to end the meeting early. Note: You need to enable this function in YWMP.
Reserve Interface
Number Description
1 Display the meeting room location.
2 Select the date of the meeting schedule.
3 Select the duration of the meeting schedule.
4 Timeline. Drag the timeline to adjust the meeting duration.
5 Edit the meeting subject.
6 Click to book a meeting.
7 Cancel the booking and return to the home page.
8 When the currently bound meeting room is occupied, click to book meetings in other meeting rooms.
Logging in to the Account and Connecting the Meeting Room
Before you start using RoomPanel, you need to log in to the YWMP account on RoomPanel and connect a meeting room to RoomPanel.
Logging in to an Account You can log in directly by inputting your account and password on RoomPanel.
Note: Please contact the system administrator to obtain an account.
Connecting to a Meeting Room
After successful login, a list of meeting rooms is displayed and you can select the meeting rooms you want to connect.
Note: A RoomPanel can only be connected to one meeting room; if you want to change the meeting room, you can log out of your account and log in again to re-connect.
Adding a Meeting Room You can choose to add a meeting room when no meeting room has been created in YWMP or when there is no meeting room you want to connect.
Procedure
1. On the meeting room connecting page, click Click to Add a New Room to create a new meeting room.
2. After filling in the meeting room information, tap Confirm.
3. Select the meeting room you created and tap Confirm to connect the meeting room.
Parameter Description
Name Fill in the name of the meeting room. Note: The text format is not limited, and the length is less than 50 characters.
Location Select the spatial location of the meeting room.
Capacity Select the capacity of the meeting room. Note: The maximum optional capacity of the RoomPanel is 99 persons. Please create a meeting room with larger capacities in the YWMP.
Type Select the type of meeting room to classify the meeting room.
Note Fill in the introduction of the meeting room.
Facility Select the facilities in the meeting room.
Meeting Reservation You can book a meeting in the connected meeting room. When the meeting room connected to RoomPanel is occupied, you can select other meeting rooms to make a booking.
Note: If you cannot book a meeting, please contact your administrator to enable the reserving function in YWMP. For more meeting settings, please operate in YWMP. For more information, please refer to the chapter Setting up a Meeting Room Policy in the Yealink Workspace Management Platform Administrator Guide.
Scheduling a Meeting Procedure
1. Tap Book on the main page.
2. Select the date of the meeting.
3. Do one of the following:
Slide the timeline to select the meeting duration. Click on the time slot to select the meeting duration.
4. Enter Meeting Subject and click Book to schedule the meeting successfully.
Note: When you select the period, if RP "Length of a meeting is limited to XX minute", please contact your administrator to modify or cancel this configuration. For more information, please refer to the chapter Setting up a Meeting Room Policy in the Yealink Workspace Management Platform Administrator Guide.
Scheduling a Meeting in Other Meeting Rooms When the meeting room connected to RoomPanel is occupied, you can choose another idle meeting room to make a booking.
Before you begin: Please make sure that the login account has created a meeting room available for booking and the function of booking other meeting rooms has been enabled.
Procedure
1. Click Book on the main page.
2. Click Find Another Room.
3. Select the meeting room you want to book and tap Schedule Meeting or tap Book on the right side of the meeting room.
You can filter the meeting rooms by location, capacity, type, status, or meeting room facilities.
4. Select the date of the meeting.
5. Do one of the following:
Slide the timeline to select the meeting duration. Click on the time slot to select the meeting duration.
6. Enter Meeting Subject, and click Book to schedule the meeting successfully.
Note: When you select the period, if the interface prompts "Length of a meeting is limited to XX minute", please contact your administrator to modify or cancel this configuration. For more information, please refer to the chapter Setting up a Meeting Room Policy in the Yealink Workspace Management Platform Administrator Guide.
Sensor RoomPanel can be linked with Yealink RoomSensor to achieve real-time status monitoring of meeting rooms: meeting room occupancy status, temperature and humidity conditions. One RoomPanel can be paired with up to 4 RoomSensor.
Pairing Sensor Procedure
1. Click to enter the settings interface.
2. Click Sensor (Default admin password: 0000) > Add, and start searching for nearby sensors.
3. Select the sensor and click OK to complete the pairing.
Information about the paired RoomSensor will appear on the screen.
Unbinding Sensor Procedure
1. Click > Sensor (Default admin password: 0000) to enter the sensor interface.
2. Select the sensor you want to unbind and click Details > Delete Sensor.
Screen prompt "Are you sure to unpair the device?".
3. Click OK.
Adjusting Sensor Sensitivity RoomSenor supports adjusting the sensitivity when detecting occupancy status.
Procedure
1. Click > Sensor (Default admin password: 0000) to enter the sensor interface.
2. Select the sensor and click Detection Sensitivity to adjust.
3. Select the sensitivity:
Low Middle High
System Settings System settings support basic settings for RoomPanel: language, date, LED indicator and power saving mode, etc.
For more information on setting up the panel, please operate on YWMP. For more information, please refer to the Yealink Workspace Management Platform Administrator Guide.
Setting the Language Procedure
1. Click > Basic (Default admin password: 0000) > Language. 2. Select the desired language and tap Save.
Setting the Time and Date You can manually set the current time and date. The time and date format are also configurable.
Customizing the Time and Date
If the system does not automatically get the exact time, you can manually input the current time and date.
Procedure
1. Click > Date & Time (Default admin password: 0000). 2. Select the Manual Setting in the Time Type field. 3. Update time and date and tap Save.
Modifying the Time and Date Formats
You can change the time display format to 12-hour or 24-hour format. Also, you can change the date format, including the date, month and year.
The built-in date format is shown as below:
Date Format Example (2020-10-28)
WWW MMM DD Wed Oct 28
DD-MMM-YY 28-Oct-20
YYYY-MM-DD 2020-Oct-28
DD/MM/YYYY 28/10/2020
MM/DD/YY Oct/28/20
DD MMM YYYY 28 Oct 2020
WWW DD MMM Wed 28 Oct
Procedure
1. Click > Date & Time (Default admin password: 0000) > Time Format & Date Format.
LED Settings LED settings support enabling or disabling the LED indicator and adjusting the brightness of the LED indicator.
Turning on/off LED Indicator
Procedure
1. Click > Basic (Default admin password: 0000). 2. Turn on/off LED Light.
LED Brightness
Procedure
1. Click > Basic (Default admin password: 0000) > LED Brightness. 2. Drag the brightness bar to select the brightness.
Power Saving Mode After turning on the power saving mode, RoomPanel will automatically go to sleep after a certain period of inactive during non-working hours. You can set the working hours RoomPanel can enter standby mode during non-working hours.
Turning on/off Power Saving Mode
Procedure
1. Click > Display (Default admin password: 0000) > Power Saving Mode. 2. Set the day and time in the Working Hours field tap OK to save.
Note: You can add up to five working hour, and multiple settings take into effect at the same time.
Standby Mode
Before you begin
Please make sure the power saving mode is enabled.
Procedure
1. Click > Display (Default admin password: 0000) > Power Saving Timeout. 2. Select the standby time.
Accessing Web User Interface
After powering on the RoomPanel, open a browser on the computer to log into the web user interface. The default admin username is admin and the password is "0000".
Note: We recommend that you use Chrome or Internet Explorer 11 to access the web user interface. Some features may not work properly if you are using other or older browsers.
1. Open a web browser and enter the RoomPanel IP address in the address bar. For example, http(s)://10.82.24.11/, and press Enter.
The RoomPanel IP address can be obtained in > Status > RoomPanel > IPv4.
2. Enter the administrator username and the password.
3. Click Login.
Network Configuration This chapter introduces how to configure the network of the RoomPanel.
Configuring IPv4 or IPv6 Network RoomPanel supports IPv4 and IPv6 modes, and you can also choose to use IPv4&IPv6 dual-stack addressing mode.
Selecting a Network Mode
Procedure
1. Click > Network (Default admin password: 0000) > Network Setting > IP Mode.
Parameter Description
IPv4/IPv6/IPv4 & IPv6 Configure the network mode of RoomPanel.
2. Configure and save the following settings:
Configuring IPv4 Network
RoomPanel supports the automatic acquisition of network parameters via DHCPv4. You can also choose to configure the IPv4 network manually.
Before you begin
Please make sure that the network mode is set to IPv4 or IPv4&IPv6.
Procedure
1. Click > Network (Default admin password: 0000) > Network Setting > IPv4.
2. Configure and save the following settings:
Parameter Description
DHCP Enable or disable RoomPanel to obtain network settings using DHCP. Note: It defaults to enabled.
IP Address Configure the static IP address of RoomPanel. Note: It is configurable only when you disable the DHCP.
IPv4 Subnet Mask Configure the subnet mask of RoomPanel. Note: It is configurable only when you disable the DHCP.
Gateway Configure the gateway of RoomPanel. Note: It is configurable only when you disable the DHCP.
Static DNS Enable or disable the DNS feature. Note: It defaults to disabled.
Pri.DNS Configure the IP address of the primary DNS server. Note: In the DHCP environment, you can configure this parameter only when you enable the IPv4 Static DNS feature.
Sec.DNS Configure the IP address of the secondary DNS server. Note: In the DHCP environment, you can configure this parameter only when you enable the IPv4 Static DNS feature.
Configuring IPv6 Network
RoomPanel supports the automatic acquisition of network parameters via DHCPv6. You can also choose to configure the IPv6 network manually. Please make sure your network environment supports IPv6 before configuration.
Before you begin
Please make sure that the network mode is set to IPv6 or IPv4&IPv6.
Procedure
1. Click > Network (Default admin password: 0000) > Network Setting > IPv6.
2. Configure and save the following settings:
Parameter Description
DHCP Enable or disable RoomPanel to obtain network settings using DHCP. Note: It defaults to enabled.
IP Address Configure the static IP address of RoomPanel. Note: It is configurable only when you disable the DHCP.
IPv6 Prefix Configure a static IPv6 prefix for RoomPanel. Note: It is configurable only when you disable the DHCP.
Gateway Configure the gateway of RoomPanel. Note: It is configurable only when you disable the DHCP.
Static DNS Enable or disable the DNS feature. Note: It defaults to disabled.
Pri.DNS Configure the IP address of the primary DNS server. Note: In the DHCP environment, you can configure this parameter only when you enable the IPv4 Static DNS feature.
Sec.DNS Configure the IP address of the secondary DNS server. Note: In the DHCP environment, you can configure this parameter only when you enable the IPv4 Static DNS feature.
Connecting to the Wireless Network RoomPanel supports the use of wireless networks.
Procedure
1. Click > Wi-Fi (Default admin password: 0000). 2. Turn on the Wi-Fi. 3. Select the appropriate wireless network (SSID) and connect to it.
If the network is secured, enter its password to connect to the network.
Firmware Update We support two ways to upgrade RoomPanel and RoomSensor: automatic update and web update.
Note: The RoomSensor needs to be paired with the RoomPanel first and then it can be updated.
Web User Interface After RoomPanel is powered on, log in the web user interface in the browser. Default user name is "admin", default password "0000".
Note: It is recommended that you use Chrome or IE11 to log in to the web user interface. If you use another browser or an older browser, some functions may not work properly.
Procedure
1. Enter the IP address of the RoomPanel in the browser, e.g. http(s)://10.82.24.11/, and press the Enter.
Click > Status > IPv4 to get the IP address of RoomPanel.
2. Enter the userame and password, then click Login.
Automatic Update When automatic update function is enabled, RoomPanel will automatically detect whether a new version is available and update the firmware at a fixed time.
RoomPanel
1. Click > System > System Update.
2. Turn on Automatic Update.
RoomPanel Web User Interface
1. Enter the IP address of the RoomPanel in the browser, e.g. http(s)://10.82.24.11/, and press the Enter.
Click > Status > IPv4 to get the IP address of RoomPanel.
2. Enter the userame and password (Default user name: admin, default password: 0000), then click Login.
3. Click System > Update > Update Schedule.
4. Turn on Automati