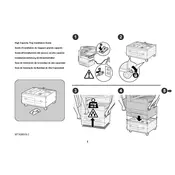
Xerox WorkCentre M123 High Capacity Tray Installation Guide

To load paper into the High Capacity Tray, first pull out the tray from the printer. Adjust the paper guides to fit the size of the paper you are using. Load the paper stack into the tray, ensuring that it does not exceed the maximum fill line. Slide the tray back into the printer and ensure it is securely closed.
If a paper jam error occurs, first turn off the printer and unplug it. Open all access doors and carefully remove any jammed paper, ensuring no pieces are left inside. Close the doors, plug the printer back in, and turn it on. If the error persists, consult the user manual for further instructions or contact support.
To troubleshoot poor print quality, ensure that you are using the correct type and size of paper. Check the toner levels and replace the toner cartridge if necessary. Clean the print heads and perform a print quality test. If the issue persists, recalibrate the printer or contact support for assistance.
To update the firmware, download the latest firmware version from the Xerox website. Connect your printer to a computer via USB or network. Use the Xerox firmware update tool to upload the new firmware to the printer. Follow the on-screen instructions to complete the update process.
Regular maintenance includes cleaning the exterior and interior of the printer, inspecting and cleaning the paper path, checking for and replacing worn parts like rollers, and running diagnostic tests. Regularly update the firmware and software to ensure optimal performance.
To configure network printing, connect the printer to your network via Ethernet cable. Access the printer's control panel, navigate to network settings, and configure the IP address either manually or automatically. Install the necessary drivers on all computers that will access the printer over the network.
Check the paper type and quality to ensure compatibility with the printer. Inspect the paper tray for overloading and adjust the guides to fit the paper correctly. Clean the feed rollers to remove dust or debris that may be causing the issue. Replace damaged rollers if necessary.
Ensure that all cables are securely connected and that the printer is powered on. Check the network settings and verify the printer's IP address. Reinstall the printer drivers on your computer and ensure that your computer and printer are on the same network. Restart both devices if necessary.
Open the front cover of the printer. Remove the old toner cartridge by pulling it out. Unpack the new toner cartridge, gently shake it to distribute the toner, and insert it into the printer. Close the front cover and dispose of the old cartridge according to local regulations.
Check the toner cartridge to ensure it is installed correctly and has sufficient toner. Verify that the print job settings are correct and that the document contains printable content. Run a printer self-test to check for hardware issues. If the problem persists, contact technical support.