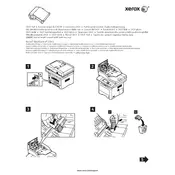
Xerox WorkCentre 3335 DADF Pad Installation Guide

Xerox WorkCentre 3335 DADF Pad Printer manual cover
Pages 3
Year 0
Language(s)
Arabic ar
Catalan; Valencian ca
Czech cs
German de
English en
Finnish fi
French fr
Hungarian hu
Italian it
Norwegian Nynorsk; Nynorsk, Norwegian nn
Romanian; Moldavian; Moldovan ro
Russian ru
Swedish sv
Turkish tr
Danish dk
Spanish sp
Dutch; Flemish nl
Polish pl
Greek el
Portuguese pt

Xerox WorkCentre 3335 DADF Pad Printer Specification

The Xerox WorkCentre 3335 DADF Pad Printer is a versatile multifunction device designed to meet the needs of small to medium-sized businesses. It combines robust printing, scanning, copying, and faxing capabilities in a compact design. The printer supports a print resolution of up to 1200 x 1200 dpi, ensuring high-quality output with sharp text and clear graphics. It boasts a print speed of up to 35 pages per minute, facilitating efficient handling of large document workloads.

Equipped with a 1 GHz processor and 1.5 GB of memory, the WorkCentre 3335 ensures smooth multitasking and quick processing of complex tasks. Its paper capacity includes a 250-sheet main tray and a 50-sheet automatic document feeder, enabling uninterrupted workflow and reduced need for frequent paper replenishment. The device supports a variety of media sizes and types, providing flexibility for diverse printing projects.

The WorkCentre 3335 offers a range of connectivity options such as USB, Ethernet, and Wi-Fi, allowing seamless integration into existing office networks and enabling mobile printing through solutions like Apple AirPrint, Google Cloud Print, and Xerox Print Service Plug-in for Android. The printer is equipped with a 4.3-inch color touchscreen interface, simplifying operation and providing easy access to device settings and functions.

Security features are robust, including secure print, IP filtering, and network authentication, ensuring that sensitive information is protected. Energy-efficient, the WorkCentre 3335 is designed to minimize power consumption, aligning with energy-saving standards. Overall, the Xerox WorkCentre 3335 DADF Pad Printer is a reliable and efficient solution for businesses seeking to enhance productivity and document management capabilities.

Xerox WorkCentre 3335 DADF Pad Printer F.A.Q.

How do I load paper into the Xerox WorkCentre 3335 printer?

To load paper into the Xerox WorkCentre 3335, open the paper tray by pulling it out. Adjust the paper guides to fit the size of the paper you're loading. Place the paper into the tray and ensure that it is aligned properly and under the maximum fill line. Push the tray back into the printer until it locks into place.

What should I do if my Xerox WorkCentre 3335 is printing blank pages?

First, check if the toner cartridge is empty or not installed correctly. If the cartridge is fine, make sure the paper is loaded correctly and not jammed. Also, verify the print job settings and ensure that the correct printer is selected. If the issue persists, try printing a test page from the printer's control panel.

How can I connect my Xerox WorkCentre 3335 to a wireless network?

To connect the Xerox WorkCentre 3335 to a wireless network, press the Menu button on the printer's control panel. Navigate to 'Network', then 'Wi-Fi', and select 'Wi-Fi Setup Wizard'. Choose your network from the list of available networks, and enter the network password if prompted. Confirm the connection and print a configuration report to verify the connection.

What maintenance should I perform regularly on my Xerox WorkCentre 3335?

Regular maintenance for the Xerox WorkCentre 3335 includes cleaning the scanner glass, checking and replacing the toner cartridge when necessary, and occasionally cleaning the paper feed rollers to prevent jams. It is also important to perform a firmware update when available and ensure that the printer is kept in a dust-free environment.

How do I clear a paper jam in the Xerox WorkCentre 3335?

To clear a paper jam in the Xerox WorkCentre 3335, first turn off the printer. Open the printer cover and remove any visible jammed paper. Gently pull the paper out in the direction of the paper path to avoid tearing. Check the paper tray and the back of the printer for any remaining paper pieces. Once cleared, close the cover and turn the printer back on.

What steps do I need to follow to replace the toner cartridge on the Xerox WorkCentre 3335?

To replace the toner cartridge, open the front cover of the printer. Carefully remove the used toner cartridge by pulling it straight out. Unpack the new toner cartridge and gently shake it to distribute the toner evenly. Insert the new cartridge into the printer until it clicks into place and close the front cover.

Why is my Xerox WorkCentre 3335 producing streaked or faded prints?

Streaked or faded prints can occur if the toner cartridge is low or the drum is dirty. First, try redistributing the toner by gently rocking the cartridge back and forth. If the issue continues, inspect the drum for any signs of damage or contamination, and clean it if necessary. Replace the toner cartridge if it is near the end of its life.

How can I scan a document to my computer using the Xerox WorkCentre 3335?

To scan a document, place it on the scanner glass or in the document feeder. On the printer's control panel, press the Scan button. Select the destination for the scan, such as a connected computer. Adjust the scan settings as needed, then press Start to begin the scan. Ensure the computer is set to receive the scan via the Xerox software.

What should I do if my Xerox WorkCentre 3335 is not recognizing the installed toner cartridge?

If the printer does not recognize the toner cartridge, make sure it is properly seated in the printer. Remove and reinstall the cartridge to ensure proper connection. Verify that the cartridge is a genuine Xerox product compatible with the WorkCentre 3335. If the problem persists, try cleaning the cartridge contacts and the printer's contact points.

How do I update the firmware on my Xerox WorkCentre 3335?

To update the firmware, download the latest firmware version from the Xerox website. Connect your printer to the computer using a USB cable or ensure it's connected to the network. Run the firmware update utility and follow the on-screen instructions to complete the update process. Ensure the printer remains powered on during the update.