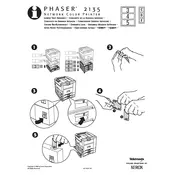
Xerox Tektronix Phaser 2135 Install Lower Tray Assembly Guide

Xerox Tektronix Phaser 2135 Install Lower Tray Assembly Printer manual cover
Pages 2
Year 2000
Language(s)
German de
English en
French fr
Italian it
Russian ru
Swedish sv
Spanish sp
Chinese zh
Portuguese pt

Xerox Tektronix Phaser 2135 Install Lower Tray Assembly Printer Specification

The Xerox Tektronix Phaser 2135 is a robust color laser printer designed for high-performance office use. This document outlines the technical specifications for the installation of the Lower Tray Assembly, an essential component that enhances the printer's paper handling capacity. The Lower Tray Assembly is engineered to support a variety of paper sizes and types, accommodating standard sizes such as A4, Letter, Legal, and custom dimensions to increase the printer's versatility in handling diverse print jobs. The assembly increases the paper input capacity significantly, reducing the need for frequent paper refills, thus optimizing workflow efficiency.

Constructed from durable materials, the Lower Tray Assembly is designed for long-term use and reliability. It integrates seamlessly with the existing printer hardware, ensuring a stable and secure fit. Installation is user-friendly, requiring minimal technical expertise. It involves aligning the tray with the designated slots at the printer's base and ensuring that all connections are firmly secured to maintain operational integrity. The tray's design includes intuitive paper guides and markings to assist in correct paper loading, minimizing the risk of paper jams and misfeeds.

The addition of the Lower Tray Assembly supports the Phaser 2135's high monthly duty cycle, which is suitable for demanding office environments. It maintains compatibility with the printer's drivers and firmware, allowing for seamless operation without the need for extensive configuration. The assembly's design adheres to Xerox's standards for energy efficiency and environmental compliance, contributing to sustainable office practices. This enhancement to the Phaser 2135 not only boosts productivity but also extends the printer's functionality, making it a valuable investment for businesses seeking reliable and scalable printing solutions.

Xerox Tektronix Phaser 2135 Install Lower Tray Assembly Printer F.A.Q.

How do I install the lower tray assembly on the Xerox Tektronix Phaser 2135 printer?

To install the lower tray assembly, first power off the printer and unplug it. Next, align the tray with the slots on the bottom of the printer and firmly push it in until it clicks into place. Then, connect any necessary cables and power the printer back on.

What should I do if the lower tray is not recognized by the printer?

Ensure the tray is properly installed and seated. Check for any debris or obstructions in the tray slots. Restart the printer to see if it recognizes the tray. If the issue persists, update the printer's firmware or consult the user manual for further troubleshooting.

How can I troubleshoot paper jams occurring in the lower tray?

First, gently remove the paper from the tray. Check for any torn pieces and clear any obstructing debris. Adjust the paper guides to fit the paper snugly but not too tight. Reinsert the paper and try printing again. If jams continue, inspect the rollers for wear and clean them if necessary.

How do I clean the lower tray assembly?

Remove the tray from the printer and take out all paper. Use a lint-free cloth slightly dampened with water to wipe the inside of the tray, removing dust and debris. Ensure the tray is completely dry before reinserting it into the printer.

Can I use different paper sizes in the lower tray assembly?

Yes, the lower tray assembly can accommodate different paper sizes. Adjust the paper guides within the tray to match the size of the paper you intend to use, ensuring a snug fit to prevent jams.

What maintenance is required for the lower tray assembly?

Regular maintenance involves cleaning the tray to remove dust and debris, checking for paper jams, and ensuring the paper guides are set correctly. Periodically inspect the rollers for signs of wear and replace them if necessary.

How do I adjust the paper guides in the lower tray?

To adjust the paper guides, remove the paper from the tray, then squeeze the guide levers and slide them to fit the size of the paper you are using. Ensure the guides are snug against the paper without bending it.

Why is my printer not picking up paper from the lower tray?

Check if the paper is loaded correctly and the guides are adjusted properly. Inspect the rollers for dust and clean them if needed. Ensure the tray is fully inserted and check the printer settings to confirm the correct tray is selected for the print job.

What should I do if the lower tray assembly is physically damaged?

If the tray has minor damage, you may attempt to repair it using suitable adhesive or parts if available. For significant damage, it's recommended to replace the tray assembly. Contact Xerox support or an authorized service provider for assistance.

How do I ensure proper alignment of the lower tray assembly during installation?

Ensure the printer is on a flat surface. Align the tray with the guide rails at the bottom of the printer. Slide the tray in gently until you hear a click, indicating it is securely in place. Recheck alignment if the printer does not recognize the tray.