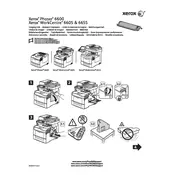
Xerox Phaser 6600 Imaging Unit Installation Guide

Xerox Phaser 6600 Imaging Unit Printer manual cover
Pages 2
Year 2012
Language(s)
Czech cs
German de
English en
Finnish fi
French fr
Hungarian hu
Italian it
Norwegian Nynorsk; Nynorsk, Norwegian nn
Russian ru
Swedish sv
Turkish tr
Danish dk
Spanish sp
Dutch; Flemish nl
Polish pl
Greek el
Portuguese pt

Xerox Phaser 6600 Imaging Unit Printer Specification

The Xerox Phaser 6600 Imaging Unit is a crucial component designed to enhance the performance and print quality of the Xerox Phaser 6600 color printer. Engineered to deliver consistent, high-quality printing, this imaging unit ensures vibrant color reproduction and sharp text output, making it ideal for professional business environments that demand precision and reliability. The unit has a substantial yield capacity, capable of producing up to 60,000 pages, which translates to reduced downtime and increased productivity for office workflows.

The imaging unit is designed to be easily replaceable, minimizing the need for technical support and reducing maintenance time. Its robust construction ensures durability, allowing it to withstand the demands of high-volume printing tasks. The unit integrates seamlessly with the printer's existing system, requiring no additional adjustments or configurations, ensuring a hassle-free installation process. It supports a wide range of media types and sizes, maintaining consistent quality across various printing applications.

The Xerox Phaser 6600 Imaging Unit utilizes advanced imaging technology to enhance print accuracy and color consistency, contributing to the overall efficiency and cost-effectiveness of the printing process. It is manufactured under strict quality control standards to ensure reliability and compatibility with the Xerox Phaser 6600 printer model. With its focus on delivering superior print quality and reliability, the imaging unit helps businesses maintain a professional image while optimizing their printing operations. This component is an essential investment for businesses seeking to maximize their printer's performance and longevity.

Xerox Phaser 6600 Imaging Unit Printer F.A.Q.

How do I replace the imaging unit in the Xerox Phaser 6600 Printer?

To replace the imaging unit, open the front cover of the printer, remove the toner cartridges, and then carefully pull out the old imaging unit. Insert the new imaging unit by aligning it with the guides and push it firmly into place. Reinstall the toner cartridges and close the cover.

What should I do if there are streaks on printed documents?

First, check if the toner cartridges are properly installed. If the problem persists, remove and inspect the imaging unit for any toner spills or damage. Clean the imaging unit using a soft, lint-free cloth if necessary. If streaks continue, consider replacing the imaging unit.

How can I troubleshoot paper jams in the Xerox Phaser 6600?

Open the printer's front cover and gently remove any jammed paper, ensuring not to tear it. Check the paper tray for misaligned paper and adjust if needed. Also, inspect the paper path and remove any obstructions or remaining pieces of paper.

What maintenance tasks should I regularly perform on the Xerox Phaser 6600?

Regular maintenance tasks include cleaning the printer exterior and interior with a soft cloth, checking and replacing the toner cartridges as needed, and inspecting the imaging unit for wear or damage. It is also important to update the printer's firmware periodically.

How do I improve print quality on the Xerox Phaser 6600?

To improve print quality, ensure that you are using the correct paper type and that the paper is loaded correctly. Clean the imaging unit and check for any toner buildup. Adjust the print settings in the printer driver for higher quality output.

What steps should I take if the printer is not recognizing the imaging unit?

Ensure that the imaging unit is installed correctly by removing and reinserting it. Check for any debris or obstructions in the imaging unit slot. If the issue persists, reset the printer by turning it off and on. Consider updating the printer firmware if necessary.

How can I check the status and lifespan of the imaging unit in my printer?

Access the printer's control panel and navigate to the Supplies Status menu. Here, you will find information about the imaging unit's remaining lifespan and usage statistics. Replace the imaging unit when it reaches the end of its lifespan.

What should I do if the printer displays an "Imaging Unit Error"?

First, ensure that the imaging unit is properly seated and that there are no obstructions in the unit's slot. Perform a printer reset by turning it off and then back on. If the error persists, consider replacing the imaging unit with a new one.

Can I continue printing if the imaging unit is near the end of its life?

Yes, you can continue printing, but print quality may degrade as the imaging unit nears the end of its life. It is advisable to have a replacement unit ready to avoid any interruptions in printing tasks.

Is it possible to clean the imaging unit to extend its life?

While you can gently clean the imaging unit using a soft, lint-free cloth to remove any toner buildup or debris, it will not significantly extend its life. The imaging unit has a fixed lifespan, after which it should be replaced for optimal performance.