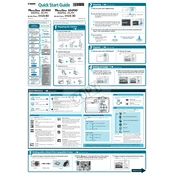
Canon Digital IXUS 30 Quick Start Guide
![Canon Digital IXUS 30 manual cover](/images/yawCDtwSiVAtwZuUqFDgrMIv/thumbs/thumb175x175.webp)
To transfer photos, connect the camera to your computer using the USB cable provided. Turn on the camera, and your computer should recognize it as a removable drive. You can then copy the photos to your desired location on your computer.
First, ensure that the battery is fully charged. If the camera still does not turn on, try removing and reinserting the battery. If the issue persists, consult the user manual or contact Canon support.
To reset the camera settings, navigate to the menu, select 'Tools' and then choose 'Reset All'. Confirm the reset when prompted. This will restore the camera to its factory settings.
Blurry pictures can result from camera shake or incorrect focus. Ensure that you are holding the camera steady and using appropriate focus settings. You might also want to enable image stabilization if available.
Press the 'Menu' button, navigate to 'Setup', and then select 'Date/Time'. Use the directional buttons to adjust the date and time, and press 'OK' to save the settings.
The Canon Digital IXUS 30 is compatible with SD and MMC memory cards. Ensure the card is properly inserted and formatted before use.
To prolong battery life, turn off the camera when not in use, reduce the use of the LCD screen, and avoid using the flash unnecessarily. Also, store the battery in a cool, dry place when not in use.
If the lens is stuck, try gently turning the camera off and on. Ensure there is no debris blocking the lens mechanism. If the problem persists, consult with a professional repair service.
To change the shooting mode, press the 'Mode' button on the back of the camera. Use the navigation buttons to select your desired mode, such as Auto, Manual, or Scene, and press 'OK' to confirm.
Firmware updates for the Canon Digital IXUS 30 can be downloaded from the Canon website. Follow the instructions provided with the update to install it on your camera via the memory card.