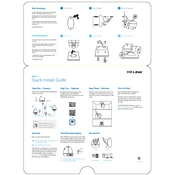
Connect the camera and your smartphone to the same router.
Place the camera where you want it. You can place it on a flat surface, or mount it as shown on the mounting section of this guide.
Download the tpCamera app. Once installed, open it and follow the instructions to add the camera to your TP-LINK Cloud account.
View live video using the tpCamera app or TP-LINK Cloud website.
Via tpCamera: On the "My Cam" screen, tap your camera to view video. Change the camera angle using the pan and tilt controls.
Via TP-LINK Cloud website: Log in at https://www.tplinkcloud.com and select your camera to view live video.
Quick Install Guide
Flashing red: System starting
Solid red: Network not connected
Solid green: Network connected
System LED
OR
2016 TP-LINK
Short Press to trigger WPS and Press and hold for 5 seconds to trigger Reset.
Get More More functions with tpCamera
View all of your cameras on one screen by downloading the TP-LINK Camera Control utility. See the Camera Control User Guide for more details. Or visit us online at www.tp-link.com for Camera Control utility , Firmware, and other support.
Get notications when motion is detected, and view alerts history.
Stay in touch with 2-way audio.
Step One Connect Step Two Register
WPS (Wi-Fi Protected Setup): If your Wi-Fi router supports WPS, you can connect the camera to your Wi-Fi network using WPS. For details, see the cameras User Guide.
The WPS/Reset Button
Step Three Relocate View and Enjoy
Mounting Kit
A) Place the paper drill guide where you want the camera. Check the alignment using a level.
B) Using a(n) 0.24 inch (6mm) drill bit, drill holes through the two circles on the guide. Remove the paper.
C) Insert the two anchors into the holes. Place the camera mount over the anchor and use the screws to secure it
D) Attach the camera.
2 Mount Base 3 Secure Camera1 Drill HolesWall Mounting
32 Mount Base Secure Camera
Camera
Ceiling mount kit
Base
Wall mount kit
A) Place the paper drill guide where you want the camera*
*Camera placement can affect viewing angle. For best results, place the camera near a wall or corner.
B) Using a(n) 0.24 inch (6mm) drill bit, drill holes through the two circles on the guide. Remove the paper.
C) Attach the camera mount using the screws, washers, and wingnuts.
D) Attach the camera.
Ceiling Mounting 1 Drill Holes
WPS/ RESET
Smartphone
Camera
Passive POE Injector
Outlet
Wireless Router LANWAN
Internet
Camera Outlet
 en
en