tp-link RE450 V2 Quick Installation Guide
Both extended networks share the same Wi-Fi passwords as those of your host networks, but may have different wireless network names (SSIDs) if you have customized them during the configuration.
Plug the extender into a power outlet about halfway between your router and the Wi-Fi dead zone. The location you choose must be within the range of your host network.
1
2
Relocate
Wait until the LED is lit and solid blue. If not, relocate it closer to the router to achieve better signal quality.
Ideal extender PlacementRouter Device Red Too far away
Blue Ideal location
Extended NetworkHost Network
Enjoy!
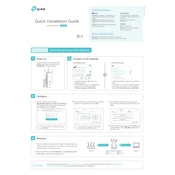
Method ONE Quick Setup Using a Web Browser
7106507633 R E
V 2.0.1
Plug the extender into a power outlet next to your router, and wait until the POWER LED is lit and solid blue.
Power on
or
Connect to the extender
1. Unplug the Ethernet cable from your Mac (if any).
2. Click the Wi-Fi icon in the top right corner of the screen, and connect to the extenders network TP-LINK_Extender_2.4GHz/5GHz.
For Mac OS X UsersFor Windows Users
1. Unplug the Ethernet cable from your computer (if any).
2. Click the Wi-Fi icon on your taskbar and connect to the extenders network TP-LINK_Extender_2.4GHz/5GHz.
Connection are available
Wireless Network Connection
TP-LINK_Extender_2.4GHz
TP-LINK_Extender_5GHz Connect automatically Connect
Wi-Fi: On Turn Wi-Fi Off
TP-LINK_Extender_5GHz
Join Other Network... Create Network... Open Network Preferences...
TP-LINK_Extender_2.4GHz
Configure
2
If your router does not support 5GHz wireless network, please click Skip to continue.
Select your router's 2.4GHz/5GHz host network and enter its password. Then click Next.
Exit Other... Rescan Skip
Next
Please select 2.4GHz Host network or skip this network.
SSIDID
1
2
Signal MAC Address Security
Your routers wireless name 30:B5:C1:33:99:76
Host 2.4GHz Password:
TP_LINK_123456 23:B5:C0:30:90:06
2.4GHz Host Network
5GHz Host Network
Wireless Settings
Summary
12345678
3
4 Verify your wireless settings and click Save. The corresponding LED(s) ( / ) should turn on and stay solid.
2.4GHz Host Network
5GHz Host Network
Wireless Settings
Summary
Extended 2.4GHz SSID: Your network name Copy Host SSID
Hide SSID broadcast The extended 2.4GHz password is the same as your Host password.
Extended 5GHz SSID: Your network name_5G Copy Host SSID
Hide SSID broadcast The extended 5GHz password is the same as your Host password.
Back Next
Either keep the default SSIDs or customize them for the extended networks, and then click Next.
Launch a web browser and enter http://tplinkrepeater.net or http://192.168.0.254 in the address bar. Create a password for future login attempts, and click Start.
1
http://tplinkrepeater.net
Start
Confirm Password
Create Password
If the login window does not appear, please refer to the FAQ > Q1.
Button Explanation LED button: To turn all LEDs on or off, press the LED button. Power button: To turn on or off the extender, press the Power button.
2.4GHz/5GHz On: The extender is connected to the 2.4GHz/5GHz wireless network of your host router. Off: No wireless connection is established.
POWER On: The extender is on. Flashing: The extender is starting up. Off: The extender is off.
Solid blue: The extender is connected to your routers wireless network, and is in a suitable location. Solid red: The extender is experiencing poor signal strength. Try relocating it closer to your router. Flashing: WPS connection is being established. Off: No active connection.
(RE)
LED Explanation
Applicable Model:
Quick Installation Guide RE450
2017 TP-Link
For technical support and other information, please visit http://www.tp-link.com/support
TP-Link hereby declares that this device is in compliance with the essential requirements and other relevant provisions of directives 2014/53/EU, 2009/125/EC and 2011/65/EU. The original EU declaration of conformity may be found at http://www.tp-link.com/en/ce.
WPS is an easier way to extend your host network. You are recommended to use this method if your host router has a WPS button. The button might look like one of these: . Otherwise, please refer to Method ONE.
Router Device
Quick Setup Using the WPS ButttonMethod TWO
Connect Press the WPS button on your router, and then press the button on the extender within 2 minutes.1
The LED should change from blinking to a solid state, indicating a successful WPS connection. If not, please refer to Method ONE.
2 If you are connecting the extender to a dual-band router but only the or LED is on, repeat Step 1 to connect to the other band.
1. For more information about using WPS on your router, please refer to the router manufacturer's user guide. 2. Some ISP gateways disable the WPS function by default. If the WPS method fails, please refer to Method ONE.
Plug the extender into a power outlet next to your router, and wait until the POWER LED is lit and solid blue.
Power on
Both extended networks share the same wireless network names (SSIDs) and passwords as those of your host networks.Enjoy!
Entertainment Adapter The extender can be used as a wireless adapter to connect any Ethernet-only device such as a Blu-ray player, game console, DVR, or smart TV to your Wi-Fi network. First, connect the extender to your router using Method ONE or Method TWO. Then connect your Ethernet-only device to the extender via an Ethernet cable.
Router DesktopGame ConsoleSmart TV
Tether provides a simple, intuitive way to access and manage your extender from your iOS or Android devices.
TP-Link Tether App
1. Download the Tether app from the Apple App Store or Google Play Store. 2. Ensure your device is wirelessly connected to the extender or to the host router. 3. Launch the app and start managing your extended network.
How to begin?
Scan to download
Tether Block unwelcome devicesTurn on/off the LEDs
Modify wireless settingsSet up the extender
Frequently Asked Questions (FAQ) Q3. What should I do if the LED does not become solid after completing
Method ONE? You may have entered the incorrect Wi-Fi password for your host network during the configuration. Please log in to the extender's web management page to check the password and try again. If the LED still doesnt become solid, please reset the extender and go through the configuration again.
Q2. How do I restore the extender to its factory default settings? With the extender powered on, use a pin to press and hold the Reset button until all the LEDs turn on momentarily, and then release the button.
Q1. What should I do if I cannot access the extenders web management page? If your computer is wirelessly connected, make sure that you have connected to the extenders SSID. If your computer is connected via an Ethernet cable, please make sure that the connection is stable. Make sure your computer is set to obtain an IP address and DNS server address automatically. Verify that http://tplinkrepeater.net or http://192.168.0.254 is correctly entered in the web browser and press Enter. Reset the extender and try again.
Q4. I have enabled a wireless MAC filter, wireless access control, or access control list (ACL) on my router. What should I do before configuring the extender? If you have enabled those features of your host router, you may need to disable them first, and then follow Method ONE or Method TWO to complete the configuration.
Plug the extender into a power outlet about halfway between your router and the Wi-Fi dead zone. The location you choose must be within the range of your host network.
1
2
Relocate
Wait until the LED is lit and solid blue. If not, relocate it closer to the router to achieve better si