Nikon AF-S Nikkor 70-200mm f/2.8E FL ED VR v2 User's Manual
#0
@7
q
@9@8
ew r t uy !3!1!2 !5!4
@1 @2 @3 @0y !8 !9!7!6
i o !0
@4 @5 @6
English
Before using this product, please carefully read both these instructions and the camera
manual.
Note: This lens does not support D2- or D1-series, D200, D100, D90, D80, D70-series, D60,
D50, D40-series, or D3000 digital SLR cameras or lm SLR cameras.
For Your Safety To prevent damage to property or injury to yourself or to others, read For Your Safety in its entirety before using this product.
Keep these safety instructions where all those who use this product will read them.
A WARNING: Failure to observe the precautions marked with this icon could result in death or severe injury.
A CAUTION: Failure to observe the precautions marked with this icon could result in injury or property damage.
A WARNING
Do not disassemble or modify this product. Do not touch internal parts that become exposed as the result of a fall or other accident. Failure to observe these precautions could result in electric shock or other injury.
Should you notice any abnormalities such as the product producing smoke, heat, or unusual odors, immediately disconnect the camera power source. Continued operation could result in re, burns or other injury.
Keep dry. Do not handle with wet hands. Failure to observe these precautions could result in re or electric shock.
Do not use this product in the presence of ammable dust or gas such as propane, gasoline or aerosols. Failure to observe this precaution could result in explosion or re.
Do not directly view the sun or other bright light source through the lens or camera. Failure to observe this precaution could result in visual impairment.
Keep this product out of reach of children. Failure to observe this precaution could result in injury or product malfunction. In addition, note that small parts constitute a choking hazard. Should a child swallow any part of this product, seek immediate medical attention.
Do not handle with bare hands in locations exposed to extremely high or low temperatures. Failure to observe this precaution could result in burns or frostbite.
A CAUTION
Do not leave the lens pointed at the sun or other strong light sources. Light focused by the lens is a source of re and damage to the products internal parts.
Do not leave the product where it will be exposed to extremely high temperatures, for an extended period such as in an enclosed automobile or in direct sunlight. Failure to observe this precaution could result in re or product malfunction.
Notice for Customers in Europe This symbol indicates that electrical and electronic equipment is to be col-
lected separately.
The following apply only to users in European countries:
This product is designated for separate collection at an appropriate collection
point. Do not dispose of as household waste.
Separate collection and recycling helps conserve natural resources and
prevent negative consequences for human health and the environment that might re-
sult from incorrect disposal.
For more information, contact the retailer or the local authorities in charge of waste
management.
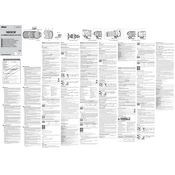
Parts of the Lens (Figure 1) q Lens hood mounting mark
w Rubber grip
e Zoom ring
r Focal length scale
t Focal length mark
y Focus function buttons (focus lock/AF start)
u Focus ring
i Focus distance indicator
o Focus distance mark
!0 Lens rotation index
!1 Tripod collar ring rotation index
!2 Tripod collar ring rotation index (90)
!3 Lens mounting mark
!4 Rubber lens-mount gasket
!5 CPU contacts
!6 Focus-mode switch
!7 Focus limit switch
!8 Vibration reduction switch
!9 Focus function selector (AF-L/OFF/AF-ON)
@0 Lens rotation index (90)
@1 Tripod collar ring fastening screw
@2 Tripod collar ring
@3 Tripod collar mounting foot
@4 Lens hood
@5 Lens hood lock mark
@6 Lens hood lock release button
@7 Lens hood alignment mark
@8 Tripod collar lock release
@9 Tripod collar lock screw
#0 Tripod collar
Focus Supported focus modes are shown in the following table (for information on camera focus
modes, see the camera manual).
Camera focus mode
Lens focus mode
A/M M/A M
AF
Autofocus with
manual override
(AF priority)
Autofocus with
manual override
(manual priority)
Manual focus with
electronic range nder
MF Manual focus with electronic range nder
A/M and M/A Modes
M/A: Autofocus can be over-ridden by rotating the lens focus ring.
A/M: As above, except that the focus ring must be rotated farther before
the autofocus is over-ridden, preventing accidental changes to focus
caused by unintended operation of the focus ring.
z Slide the lens focus-mode switch to A/M or M/A.
x Focus.
If desired, autofocus can be over-ridden by rotating the lens focus ring
while the shutter-release button is pressed halfway (or, if the camera is
equipped with an AF-ON button, while the AF-ON button is pressed, or if the
focus function selector is set to AF-ON, while pressing a focus function but-
ton). To refocus using autofocus, press the shutter-release button halfway
or press the AF-ON or focus function button again.
The Focus Limit Switch
This switch determines the focus distance limits for autofocus.
FULL: Select this option to use the entire focus range.
5 m: If your subject will always be at distance of at least 5 m (16.5 ft),
select this option for faster focusing.
The Focus Function Buttons and Selector The function assigned to the focus function buttons can be selected using the focus func-
tion selector.
Focus function selector Focus function button
AF-L Focus lock
OFF
AF-ON Lens AF start
The assigned function can be performed by pressing any of the four
function buttons.
Focus Lock (AF-L)
Focus lock is only available with autofocus.
z Slide the lens focus-mode switch to A/M or M/A.
x Slide the focus function selector to AF-L.
c Lock focus.
Focus can be locked by pressing any of the focus function buttons and re-
mains locked while the button is pressed. Focus can also be locked using
camera controls.
Lens AF Start (AF-ON)
z Slide the lens focus-mode switch to A/M or M/A.
x Slide the focus function selector to AF-ON.
c Focus.
Press any of the focus function buttons to focus using autofocus. You can also
focus using camera controls.
Zoom Before focusing, rotate the zoom ring to adjust the focal length and frame the photograph.
Depth of Field Depth of eld can be previewed using the cameras depth-of- eld preview feature.
Note that the focus distance indicator is intended only as a guide and may not accurately show
the distance to the subject and may, due to depth of eld or other factors, not show when the
camera is focused on a distant object.
Aperture Aperture is adjusted using camera controls. The frame rate may drop at some apertures.
Built-in Flash Units When using the built-in ash on cameras equipped with a built-in ash unit, remove the
lens hood to prevent vignetting (shadows created where the end of the lens blocks the
light from the built-in ash).
Vibration Reduction (VR) Vibration reduction (VR) reduces blur caused by camera shake, allowing shutter speeds up to 4.0
stops slower than would otherwise be the case, increasing the range of shutter speeds available. The
e ects of VR on shutter speed are measured in NORMAL mode according to Camera and Imaging
Products Association (CIPA) standards; FX-format lenses are measured using FX-format digital cam-
eras, DX-format lenses using DX-format cameras. Zoom lenses are measured at maximum zoom.
Using the Vibration Reduction Switch
Select OFF to turn vibration reduction o .
Select NORMAL for enhanced vibration reduction when photographing
stationary subjects. Vibration reduction takes e ect when the shutter-
release button is pressed halfway.
Select SPORT for photographing athletes and other subjects that are
moving rapidly and unpredictably. Vibration reduction takes e ect
when the shutter-release button is pressed halfway.
Using Vibration Reduction: Notes
When using vibration reduction, press the shutter-release button halfway and wait for
the image in the view nder to stabilize before pressing the shutter-release button the
rest of the way down.
When vibration reduction is active, the image in the view nder may jiggle after the shut-
ter is released. This does not indicate a malfunction.
SPORT is recommended for panning shots, although NORMAL is also supported.
In NORMAL and SPORT modes, vibration reduction applies only to motion that is not part
of a pan (if the camera is panned horizontally, for example, vibration reduction will be
applied only to vertical shake).
Do not turn the camera o or remove the lens while vibration reduction is in e ect. If power
to the lens is cut while vibration reduction is on, the lens may rattle when shaken. This is not
a malfunction, and can be corrected by reattaching the lens and turning the camera on.
If the camera is equipped with a built-in ash, vibration reduction will be disabled while
the ash charges.
NORMAL and SPORT vibration reduction can reduce blur when the camera is mounted on
a tripod. OFF may however produce better results in some cases depending on the type
of tripod and on shooting conditions.
NORMAL and SPORT are recommended if the camera is mounted on a monopod.
The Lens Hood The lens hoods protect the lens and block stray light that would otherwise cause are or
ghosting.
Attaching the Hood
Align the lens hood mounting mark () with the lens hood alignment mark ( ) and then
rotate the hood (w) until the mark is aligned
with the lens hood lock mark ( ).
When attaching or removing the hood, hold it near the symbol on its base and avoid grip-
ping it too tightly. Vignetting may occur if the hood is not correctly attached. The hood can be
reversed and mounted on the lens when not in use.
Detaching the Hood
Press the lens hood lock release button (q), ro- tate the hood in the direction shown by the ar- row (w), and remove it as shown (e).
Using a Tripod If the lens is mounted on a camera, attach tripods to the lens tripod collar, not the camera.
Be sure to secure the tripod collar lock screw, as otherwise the lens may unexpectedly slip
from the collar, causing injury.
Attaching the Tripod Collar (Figure 2)
Slide the tripod collar mounting foot all the way into the tripod collar (q) and keep it in this
position while fully tightening the tripod collar lock screw (w).
Rotating the Camera (Figure 3)
Slightly loosen the tripod collar ring fastening screw (q) and rotate the camera to wide
(landscape) or tall (portrait) orientation using the rotation indices as guides (w). Tighten
the tripod collar ring fastening screw (e).
Removing the Tripod Collar (Figure 4)
Fully loosen the tripod collar lock screw (q), depress the tripod collar lock release (w), and
slide the tripod collar mounting foot from the tripod collar (e).
Lens Care The lens returns to maximum aperture when removed from the camera. To protect the interior
of the lens, store it out of direct sunlight or replace the lens caps.
Always support the lens when holding the camera. Failure to observe this precaution
could damage the lens mount.
Do not pick up or hold the lens or camera using only the lens hood.
Keep the CPU contacts clean.
Should the rubber lens-mount gasket be damaged, cease use immediately and take the
lens to a Nikon-authorized service center for repair.
Removing dust is normally su cient to clean the glass surfaces of the lens.
The uorine-coated front element can be cleaned simply by wiping it with a dry cloth.
Fingerprints and other stains can be removed using a soft, clean cotton cloth or lens
cleaning tissue; clean from the center outwards using a circular motion, taking care not
to leave smears or touch the glass surface with your ngers. To remove stubborn stains,
wipe gently using a soft cloth dampened with a small amount of distilled water, ethanol,
or lens cleaner. Drop-shaped stains on the water- and oil-repellent uorine-coated ele-
ment can be removed with a dry cloth.
To remove smudges and ngerprints from the rear lens element (the element at the
mount end of the lens), apply a small amount of ethanol or lens cleaner to a soft, clean
cotton cloth or lens-cleaning tissue and clean from the center outwards using a circular
motion, taking care not to leave smears or touch the glass with your ngers.
Never use organic solvents such as paint thinner or benzene to clean the lens.
The lens hood or Neutral Color (NC) lters can be used to protect the front lens element.
Attach the front and rear caps before placing the lens in its case.
If the lens will not be used for an extended period, store it in a cool, dry location to
prevent mold and rust. Do not store in direct sunlight or with naphtha or camphor moth
balls.
Keep the lens dry. Rusting of the internal mechanism can cause irreparable damage.
Leaving the lens in extremely hot locations could damage or warp parts made from
reinforced plastic.
Rapid changes in temperature may cause damaging condensation inside and outside the lens.
Before taking the lens from a warm to a cold environment or vice versa, place it in its case or a
plastic bag to slow the change in temperature.
Supplied Accessories LC-77 77 mm snap-on Front Lens Cap
LF-4 Rear Lens Cap
HB-78 Bayonet Hood
CL-M2 Lens Case
Compatible Accessories 77 mm screw-on lters
TC-14E/TC-14E II/TC-14E III/TC-17E II/TC-20E/TC-20E II/TC-20E III AF-I/AF-S Teleconverters
Speci cations Type Type E AF-S lens with built-in CPU and F mount
Focal length 70 200 mm
Maximum aperture f/2.8
Lens construction 22 elements in 18 groups (including 6 ED lens elements, 1 uorite element,
1 HRI element, and lens elements with Nano-Crystal and uorine coatings)
Angle of view Nikon FX-format D-SLR cameras: 34 20 12 20
Nikon DX-format D-SLR cameras: 22 50 8 00
Focal length scale Graduated in millimeters (70, 85, 105, 135, 200)
Zoom Manual zoom using independent zoom ring
Focusing Nikon Internal Focusing (IF) System with autofocus controlled
by Silent Wave Motor and separate focus ring for manual focus
Vibration reduction Lens shift using voice coil motors (VCMs)
Focus distance indicator 1.1 m
Minimum focus distance 1.1 m (3.61 ft) from focal plane at all zoom positions
Diaphragm blades 9 (rounded diaphragm opening)
Diaphragm Automatic electronic aperture control
Aperture range f/2.8 22
Focus limit switch Two positions: FULL ( 1.1 m) and 5 m
Filter-attachment size 77 mm (P = 0.75 mm)
Dimensions Approx. 88.5 mm maximum diameter 202.5 mm
(distance from camera lens mount ange)
Weight Approx. 1430 g (3 lb 2.5 oz)
Nikon reserves the right to change the appearance, speci cations, and performance of this
product at any time and without prior notice.
Franais
Avant dutiliser ce produit, veuillez lire attentivement ces instructions et le manuel de lappareil photo. Remarque : cet objectif nest pas compatible avec les re ex argentiques ou avec les re ex numriques de gamme D2, gamme D1, D200, D100, D90, D80, gamme D70, D60, D50, gamme D40 ou D3000.
Pour votre scurit A n dviter de provoquer des dommages matriels ou de vous blesser ou de blesser un tiers, lisez intgralement Pour votre scurit avant dutiliser ce produit.
Conservez ces consignes de scurit dans un endroit facilement accessible tous ceux qui pourraient se servir de ce produit.
A AVERTISSEMENT : le non-respect des consignes indiques par cette icne peut vous exposer un danger de mort ou de graves blessures.
A ATTENTION : le non-respect des consignes indiques par cette icne peut vous exposer des blessures ou provoquer des dommages matriels.
A AVERTISSEMENT
Ne dmontez pas ou ne modi ez pas ce produit. Ne touchez pas les composants internes qui sont exposs suite une chute ou un autre accident. Le non-respect de ces consignes peut provoquer un choc lectrique ou dautres blessures.
Si vous observez des anomalies provenant du produit comme de la fume, de la chaleur ou des odeurs inhabituelles, dbranchez immdiatement la source dalimentation de lappareil photo. Continuer dutiliser le matriel risque de provoquer un incendie, des brlures ou dautres blessures.
Gardez votre matriel au sec. Ne le manipulez pas avec les mains mouilles. Le non-respect de ces consignes de scurit peut provoquer un incendie ou un choc lectrique.
Nutilisez pas ce produit en prsence de poussires ou de gaz in ammables comme du propane, de lessence ou des arosols. Le non-respect de cette consigne peut provoquer une explosion ou un incendie.
Nobservez pas directement le soleil ou autre source lumineuse puissante travers lobjectif ou lappareil photo. Le non-respect de cette consigne peut provoquer des troubles visuels.
Conservez ce produit hors de porte des enfants. Le non-respect de cette consigne peut provoquer des blessures ou le dysfonctionnement du produit. En outre, notez que les petites pices prsentent un risque dtou ement. Si jamais un enfant avalait une pice de ce produit, consultez immdiatement un mdecin.
Ne manipulez pas le matriel mains nues dans des lieux exposs des tempratures extrmement basses ou leves. Le non-respect de cette consigne peut provoquer des brlures ou des engelures.
A ATTENTION
Ne pointez pas lobjectif en direction du soleil ou dautres sources trs lumineuses. La lumire focalise par lobjectif est une source dincendie et peut endommager les composants internes du produit.
Ne laissez pas le produit expos des tempratures excessivement chaudes pendant une priode prolonge, comme dans une voiture ferme ou en plein soleil. Le non-respect de cette consigne peut provoquer un incendie ou le dysfonctionnement du produit.
Avis pour les clients en Europe Ce symbole indique que le matriel lectrique et lectronique doit tre jet dans les conteneurs appropris.
Les mentions suivantes sappliquent uniquement aux utilisateurs situs dans les pays europens : Ce produit doit tre jet dans un point de collecte appropri. Il ne doit pas
tre jet avec les dchets mnagers. Le tri slectif et le recyclage permettent de prserver les ressources naturelles et dviter
les consquences ngatives pour la sant humaine et lenvironnement, qui peuvent tre provoques par une limination incorrecte.
Pour plus dinformations, contactez votre revendeur ou les autorits locales charges de la gestion des dchets.
Avis pour les clients en France LE PRODUIT ET SON EMBALLAGE RELVENT DUNE CONSIGNE DE TRI
Parties de lobjectif (Figure 1) q Repre de montage du parasoleil
w Grip en caoutchouc
e Bague de zoom
r chelle des focales
t Repre de lchelle des focales
y Commandes de fonction MAP [Mise
Au Point] (mmorisation de la mise au
point/activation de lAF)
u Bague de mise au point
i Indicateur de distance de mise au point
o Repre de distance de mise au point
!0 Repre de rotation de lobjectif
!1 Repre de rotation du collier pour trpied
!2 Repre de rotation du collier pour
trpied (90)
!3 Repre de montage de lobjectif
!4 Joint en caoutchouc de la monture dobjectif
!5 Contacts du microprocesseur
!6 Commutateur du mode de mise au point
!7 Commutateur de la limite de mise au point
!8 Commutateur de rduction de vibration
!9 Slecteur de fonction MAP [Mise Au
Point] (AF-L/OFF/AF-ON)
@0 Repre de rotation de lobjectif (90)
@1 Vis de xation du collier pour trpied
@2 Collier pour trpied
@3 Sabot de xation du collier pour trpied
@4 Parasoleil
@5 Repre de verrouillage du parasoleil
@6 Bouton de dverrouillage du parasoleil
@7 Repre dalignement du parasoleil
@8 Bouton de dverrouillage du collier pour
trpied
@9 Vis de verrouillage du collier pour trpied
#0 Collier pour trpied
Mise au point Les modes de mise au point pris en charge sont indiqus dans le tableau suivant (pour en savoir plus sur les modes de mise au point de lappareil photo, consultez le manuel de ce dernier).
Mode de mise au point de lappareil photo
Mode de mise au point de lobjectif
A/M M/A M
AF
Autofocus priorit
manuelle
(priorit AF)
Autofocus priorit
manuelle
(priorit manuelle)
Mise au point
manuelle avec
tlmtre
lectronique
MF Mise au point manuelle avec tlmtre lectronique
Modes M/A et A/M
M/A : vous pouvez annuler lautofocus en tournant la bague de mise au
point de lobjectif.
A/M : comme ci-dessus, sauf que vous devez tourner plus longtemps
la bague pour annuler lautofocus, ce qui empche les changements
accidentels de mise au point provoqus par une manipulation
involontaire de la bague de mise au point.
z Positionnez le commutateur du mode de mise au point sur A/M ou M/A.
x E ectuez la mise au point. Si vous le souhaitez, vous pouvez annuler lautofocus en tournant la bague de mise au point tout en appuyant sur le dclencheur mi-course (ou si lappareil photo est quip dune commande AF-ON, tout en appuyant sur la commande AF-ON ou si le slecteur de fonction MAP est positionn sur AF-ON, tout en appuyant sur lune des commandes de fonction MAP). Pour refaire le point laide de lautofocus, appuyez nouveau sur le dclencheur mi- course ou sur la commande AF-ON ou la commande de fonction MAP.
Commutateur de la limite de mise au point Ce commutateur permet de d nir les limites de la distance de mise au point en mode autofocus.
FULL : slectionnez cette option a n dutiliser lintgralit de la plage
de mise au point.
5 m : si votre sujet se situe toujours une distance gale ou
suprieure 5 m, slectionnez cette option pour e ectuer la mise au
point plus rapidement.
Slecteur et commandes de fonction MAP La fonction attribue aux commandes de fonction MAP peut tre slectionne laide du slecteur de fonction MAP.
Slecteur de fonction MAP Commande de fonction MAP
AF-L Mmorisation de la mise au point
OFF
AF-ON Activation de lAF de lobjectif
Pour utiliser la fonction programme, appuyez sur lune des quatre commandes de fonction.
Mmorisation de la mise au point (AF-L) La mmorisation de la mise au point est uniquement disponible avec lautofocus.
z Positionnez le commutateur du mode de mise au point sur A/M ou M/A.
x Positionnez le slecteur de fonction MAP sur AF-L.
c Mmorisez la mise au point. La mise au point peut tre mmorise laide de nimporte quelle commande de fonction MAP et le reste tant que vous appuyez sur cette commande. Il est galement possible de mmoriser la mise au point laide des commandes de lappareil photo.
Activation de lAF de lobjectif (AF-ON)
z Positionnez le commutateur du mode de mise au point sur A/M ou M/A.
x Positionnez le slecteur de fonction MAP sur AF-ON.
c E ectuez la mise au point. Appuyez sur nimporte quelle commande de fonction MAP pour effectuer la mise au point laide de lautofocus. Vous pouvez galement faire le point laide des commandes de lappareil photo.
Zoom Avant de faire la mise au point, tournez la bague de zoom pour rgler la focale et cadrer la photographie.
Profondeur de champ Vous pouvez avoir un aperu de la profondeur de champ laide de la fonction daperu de la profondeur de champ de lappareil photo.
Remarquez que la distance a che par lindicateur de distance de mise au point nest donne
qu titre indicatif et peut ne pas correspondre prcisment la distance relle du sujet, et peut,
en raison de la profondeur de champ ou dautres facteurs, ne pas a cher alors que le sujet
mis au point est loign.
Ouverture Pour rgler louverture, utilisez les commandes de lappareil photo. La cadence de prise de vue peut ralentir certaines ouvertures.
Flash intgr Lorsque vous utilisez le ash intgr dun appareil photo qui en est quip, retirez le parasoleil pour viter le vignettage (ombres cres lorsque lextrmit de lobjectif bloque la lumire mise par le ash intgr).
Rduction de vibration (VR) La fonction de rduction de vibration (VR) attnue les phnomnes de ou provoqus par le boug de lappareil photo, ce qui permet de recourir des vitesses dobturation jusqu 4,0 fois plus lentes que celles normalement utilises et daugmenter ainsi le nombre de vitesses possibles. Les e ets de la fonction VR sur la vitesse dobturation sont mesurs en mode NORMAL selon les normes de la CIPA (Camera and Imaging Products Association) ; les mesures des objectifs de format FX sont e ectues laide dappareils photo numriques de format FX, celles des objectifs de format DX laide dappareils photo de format DX. Les mesures des zooms sont e ectues en position de zoom maximale.
Utilisation du commutateur de rduction de vibration
Slectionnez OFF pour dsactiver la rduction de vibration.
Slectionnez NORMAL pour optimiser la rduction de vibration lorsque
vous photographiez des sujets immobiles. La rduction de vibration
sactive lorsque vous appuyez sur le dclencheur mi-course.
Slectionnez SPORT lorsque vous photographiez des athltes et dautres
sujets qui se dplacent rapidement et de faon imprvisible. La
rduction de vibration sactive lorsque vous appuyez sur le dclencheur
mi-course.
Utiliser la rduction de vibration : remarques Lorsque vous utilisez la rduction de vibration, appuyez sur le dclencheur mi-course
et attendez que limage se stabilise dans le viseur avant dappuyer sur le dclencheur jusquen n de course.
Lorsque la rduction de vibration est active, limage de vise peut tre instable aprs la pression du dclencheur. Cela nindique pas un dysfonctionnement.
Le rglage SPORT est recommand pour e ectuer des ls panoramiques, bien quil soit aussi possible dutiliser le rglage NORMAL .
En modes NORMAL et SPORT, la rduction de vibration sapplique uniquement au mouvement ne faisant pas partie du l (par exemple, si lappareil photo est utilis pour faire un l horizontal, la rduction de vibration ne sapplique quau tremblement vertical).
Ne mettez pas lappareil photo hors tension et ne retirez pas lobjectif pendant que la rduction de vibration est active. Si lalimentation de lobjectif est coupe alors que la rduction de vibration est active, lobjectif peut vibrer sil est secou. Il ne sagit pas dun dysfonctionnement et cela peut tre corrig en re xant lobjectif et en mettant lappareil photo sous tension.
Si lappareil photo est quip dun ash intgr, la rduction de vibration est dsactive pendant que le ash se charge.
Les rglages NORMAL et SPORT peuvent attnuer le et de ou observ lorsque lappareil photo est x sur un trpied. Le rglage OFF peut nanmoins produire de meilleurs rsultats dans certains cas, selon le type de trpied et les conditions de prise de vue.
Les rglages NORMAL et SPORT sont recommands si lappareil photo est x sur un monopode.
Parasoleil Le parasoleil protge lobjectif et bloque la lumire di use pouvant causer de la lumire parasite ou une image fantme.
Fixation du parasoleil
Alignez le repre de montage du parasoleil
() sur le repre dalignement du parasoleil ( ), puis tournez le parasoleil (w) jusqu ce que
le repre soit align sur le repre de verrouillage
du parasoleil ( ).
Lors de la xation ou du retrait du parasoleil, tenez-le prs du symbole sur sa base, et vitez de le serrer trop fermement. Un vignettage peut se produire si le parasoleil nest pas correctement attach. Le parasoleil peut tre retourn et mont sur lobjectif lorsquil nest pas utilis.
Retrait du parasoleil Appuyez sur le bouton de dverrouillage du parasoleil (q), tournez ce dernier dans le sens indiqu par la che (w) et retirez-le comme le montre lillustration (e).
En User's Manual (with Warranty)
De Benutzerhandbuch (inkl. Garantiebeleg)
Fr Manuel d'utilisation (avec garantie)
Nl Gebruikshandleiding (met garantie)
It Manuale d'uso (con garanzia)
Es Manual del usuario (con garanta)
Pt Manual do Utilizador (com Garantia)
AF-S NIKKOR 70-200mm f/2.8E FL ED VR
Printed in Japan
SB0F04(7E)
7MA0387E-04
Deutsch
Figure 1/Abbildung 1/Figure 1 Figure 2/Abbildung 2/Figure 2 Figure 4/Abbildung 4/Figure 4Figure 3/Abbildung 3/Figure 3
Bitte lesen Sie sorgfltig diese Anleitung und das Kamerahandbuch, bevor Sie dieses Produkt verwenden. Hinweis: Dieses Objektiv ist weder mit Spiegelre exkameras fr Film noch mit folgenden D-SLR-Kameramodellen kompatibel: D2- und D1-Serie, D200, D100, D90, D80, D70-Serie, D60, D50, D40-Serie und D3000.
Sicherheitshinweise Lesen Sie die Sicherheitshinweise vor der Inbetriebnahme dieses Produkts vollstndig durch, um Sach- oder Personenschden zu verhten.
Bewahren Sie diese Hinweise gri bereit fr alle Personen auf, die das Produkt benutzen.
A WARNUNG: Das Missachten der Warnhinweise, die so gekennzeichnet sind, knnte zu schweren Verletzungen oder zum Tod fhren.
A VORSICHT: Das Missachten der Warnhinweise, die so gekennzeichnet sind, knnte zu Sach- oder Personenschden fhren.
A WARNUNG Das Produkt nicht auseinandernehmen oder modi zieren. Berhren Sie keine
Teile aus dem Gerteinnern, die infolge eines Sturzes oder eines anderen Unfallereignisses freiliegen. Das Missachten dieser Vorsichtsmanahmen kann einen Stromschlag oder andere Verletzungen verursachen.
Sollte das Produkt qualmen, sich berhitzen oder ungewhnliche Gerche absondern, trennen Sie sofort die Kamera-Stromversorgung. Die fortgesetzte Verwendung kann Brandgefahr, Verbrennungen oder andere Verletzungen zur Folge haben.
Vor Nsse schtzen. Nicht mit nassen Hnden anfassen. Das Missachten dieser Vorsichtsmanahmen kann einen Brand oder Stromschlag verursachen.
Verwenden Sie dieses Produkt nicht in der Gegenwart von ent ammbarem Staub oder Gas (wie z. B. Propangas, Benzin oder Aerosole). Das Missachten dieser Vorsichtsmanahme kann eine Explosion oder einen Brand verursachen.
Blicken Sie nicht durch das Objektiv oder den Kamerasucher direkt in die Sonne oder eine andere sehr helle Lichtquelle. Das Missachten dieser Vorsichtsmanahme kann bleibende Schden am Auge verursachen.
Das Produkt von Kindern fernhalten. Das Missachten dieser Vorsichtsmanahme kann zu Verletzungen oder zur Beschdigung des Produkts fhren. Beachten Sie auerdem, dass Kleinteile ein Erstickungsrisiko darstellen. Sollte ein Kind irgendein Teil dieses Produkts verschlucken, konsultieren Sie sofort einen Arzt.
An Orten mit extrem hohen oder niedrigen Temperaturen nicht mit bloen Hnden handhaben. Das Missachten dieser Vorsichtsmanahme kann zu Verbrennungen oder Erfrierungen fhren.
A VORSICHT Das Objektiv nicht auf die Sonne oder andere sehr helle Lichtquellen richten.
Das vom Objektiv gebndelte Licht kann eine Brandursache darstellen oder innere Teile des Produkts beschdigen.
Bewahren Sie das Produkt nicht lngere Zeit an Orten auf, an denen es extrem hohen Temperaturen ausgesetzt ist, wie in einem geschlossenen Auto oder direkt in der Sonne. Das Missachten dieser Vorsichtsmanahme kann einen Brand oder Produktschden verursachen.
Hinweis fr Kunden in Europa Durch dieses Symbol wird angezeigt, dass elektrische und elektronische Gerte getrennt entsorgt werden mssen.
Folgendes gilt fr Verbraucher in europischen Lndern: Dieses Produkt muss an einer geeigneten Sammelstelle separat entsorgt
werden. Eine Entsorgung ber den Hausmll ist unzulssig. Durch getrennte Entsorgung und Recycling knnen natrliche Rohsto e
bewahrt und durch falsche Entsorgung verursachte, schdliche Folgen fr die menschliche Gesundheit und Umwelt verhindert werden.
Weitere Informationen erhalten Sie bei Ihrem Fachhndler oder bei den fr die Abfallentsorgung zustndigen Behrden bzw. Unternehmen.
Objektivteile (Abbildung 1) q Markierung fr das Ansetzen der Gegenlichtblende
w Gummi-Gri che
e Zoomring
r Brennweitenskala
t Markierung fr Brennweitenskala
y Fokusfunktionstasten (Fokusspeicher/AF-Start)
u Fokussierring
i Entfernungsskala
o Markierung fr Entfernungseinstellung
!0 Positionsmarkierung fr Objektivdrehung
!1 Drehindex des Stativrings
!2 Drehindex (90) des Stativrings
!3 Markierung fr die Ausrichtung des Objektivs
!4 Dichtungsmanschette
!5 CPU-Kontakte
!6 Fokusmodusschalter
!7 Fokusbegrenzungsschalter
!8 Bildstabilisatorschalter
!9 Fokusfunktionsschalter (AF-L/OFF/
AF-ON)
@0 Marke fr Objektivdrehung (90)
@1 Feststellschraube des Stativrings
@2 Stativring
@3 Befestigungsfu des Stativrings
@4 Gegenlichtblende
@5 Markierung fr die Arretierung der
Gegenlichtblende
@6 Entriegelungstaste der
Gegenlichtblende
@7 Markierung fr die Ausrichtung
der Gegenlichtblende
@8 Stativadapter-Entriegelung
@9 Sicherungsschraube am Stativadapter
#0 Stativadapter
Scharfeinstellung Untersttzte Fokusmodi werden in der folgenden Tabelle aufgefhrt (beachten Sie das Handbuch der Kamera fr Informationen zu den Fokusmodi der Kamera).
Kamera-Fokusmodus
Objektiv-Fokusmodus
A/M M/A M
AF Autofokus mit
AF-Prioritt
Autofokus mit Prioritt
der manuellen
Scharfstellung
Manuelle Fokussierung
mit elektronischer
Einstellhilfe
MF Manuelle Fokussierung mit elektronischer Einstellhilfe
A/M- und M/A-Modus
M/A: Die automatische Scharfeinstellung (Autofokus) kann durch
Drehen des Fokussierrings auer Kraft gesetzt werden.
A/M: Wie oben, nur muss der Fokussierring weiter gedreht werden, bevor der
Autofokus auer Kraft gesetzt wird. Auf diese Weise wird verhindert, dass ein
unbeabsichtigtes Drehen am Fokussierring die Scharfeinstellung verndert.
z Schieben Sie den Fokusmodusschalter des Objektivs in die Position A/M oder M/A.
x Stellen Sie scharf. Bei Bedarf kann durch Drehen des Fokussierrings am Objektiv in den Autofokus eingegriff en werden, whrend der Auslser bis zum ersten Druckpunkt gedrckt wird (oder, falls die Kamera mit einer AF-ON-Taste ausgestattet ist, whrend die AF-ON-Taste gedrckt wird; oder, falls der Fokusfunktionsschalter auf AF-ON steht, whrend eine Fokusfunktionstaste gedrckt wird). Um mit dem Autofokus neu zu fokussieren, drcken Sie wieder den Auslser bis zum ersten Druckpunkt oder die AF-ON-Taste oder die Fokusfunktionstaste.
Der Fokusbegrenzungsschalter Dieser Schalter bestimmt die Begrenzung der Entfernungseinstellung fr den Autofokus.
FULL: Whlen Sie diese Einstellung, um den kompletten Fokusbereich
nutzen zu knnen.
5m: Whlen Sie diese Option fr schnelleres Scharfstellen, wenn sich
Ihr Objekt stets in einer Entfernung von mindestens 5 Metern be ndet.
Die Fokusfunktionstasten und der Fokusfunktionsschalter Mit dem Fokusfunktionschalter knnen Sie den Fokusfunktionstasten eine Funktion zuordnen.
Fokusfunktionsschalter Fokusfunktionstaste
AF-L Fokusspeicher
OFF
AF-ON Autofokus starten
Die zugewiesene Funktion kann ausgefhrt werden, indem eine der vier Fokusfunktionstasten gedrckt wird.
Fokusspeicher (AF-L) Der Fokusspeicher steht nur beim Autofokus zur Verfgung.
z Schieben Sie den Fokusmodusschalter des Objektivs auf A/M oder M/A.
x Schieben Sie den Fokusfunktionsschalter auf AF-L.
c Speichern Sie die Scharfeinstellung. Mit einer beliebigen Fokusfunktionstaste knnen Sie die Scharfeinstellung speichern. Die Scharfeinstellung bleibt gespeichert, solange die Taste gedrckt gehalten wird. Die Scharfeinstellung kann auch mithilfe der entsprechenden Bedienelemente der Kamera gespeichert werden.
AF am Objektiv starten (AF-ON)
z Schieben Sie den Fokusmodusschalter des Objektivs in die Position A/M oder M/A.
x Schieben Sie den Fokusfunktionsschalter auf AF-ON.
c Stellen Sie scharf. Drcken Sie irgendeine der Fokusfunktionstasten, um mit dem Autofokus scharfzustellen. Sie knnen auch mit den Bedienelementen der Kamera die Fokussierung starten.
Zoom Drehen Sie vor dem Fokussieren am Zoomring, um die Brennweite einzustellen und den Bildausschnitt zu whlen.
Tiefenschrfe Die Tiefenschrfe lsst sich mit der Abblendfunktion der Kamera im Voraus beurteilen.
Beachten Sie, dass die Entfernungsskala nur als Orientierungshilfe dient und mglicherweise
nicht den genauen Objektabstand anzeigt. Auerdem zeigt sie wegen der Tiefenschrfe und
anderer Faktoren nicht immer an, wenn auf ein fernes Objekt scharfgestellt wurde.
Blende Die Blende wird mit den Bedienelementen der Kamera eingestellt. Bei einigen Blendeneinstellungen kann die Bildrate geringer ausfallen.
Integrierte Blitzgerte Entfernen Sie bei Kameras mit integriertem Blitzgert vor Aufnahmen mit diesem Blitzgert die Gegenlichtblende, um eine Verschattung zu verhindern (dieser Schattenwurf entsteht, weil die Gegenlichtblende oder die Objektivfassung das Licht des integrierten Blitzgerts behindert).
Bildstabilisator (VR) Der Bildstabilisator (VR) reduziert die aus unruhiger Kamerahaltung resultierende
Verwacklungsunschrfe und ermglicht dadurch um bis zu 4,0 Lichtwertstufen lngere
Belichtungszeiten als normal, wodurch sich der Bereich der nutzbaren Belichtungszeiten
vergrert. Die Wirkung des Bildstabilisators fr die Belichtungszeit wird im Modus
NORMAL gem CIPA-Standards ermittelt (Camera and Imaging Products Association); FX-
Objektive werden an FX-Format-Kameras gemessen, DX-Objektive an DX-Format-Kameras.
Zoomobjektive werden bei der lngsten Brennweiteneinstellung gemessen.
Verwendung des Bildstabilisatorschalters
Whlen Sie OFF, um den Bildstabilisator auszuschalten.
Whlen Sie NORMAL, um die Folgen des Kamerawackelns zu verringern,
wenn Sie ortsfeste Objekte fotogra eren. Die Bildstabilisierung wird
durch das Auslserdrcken bis zum ersten Druckpunkt aktiviert.
Whlen Sie SPORT fr das Fotogra eren von Sportlern und Objekten, die
sich schnell und unvorhersehbar bewegen. Die Bildstabilisierung wird
durch das Auslserdrcken bis zum ersten Druckpunkt aktiviert.
Verwendung des Bildstabilisators: Hinweise
Drcken Sie bei Verwendung des Bildstabilisators den Auslser bis zum ersten Druckpunkt und
warten Sie, bis sich das Bild im Sucher stabilisiert, bevor Sie den Auslser vollstndig drcken.
Bei eingeschaltetem Bildstabilisator zittert das Sucherbild mglicherweise nach dem
Auslsen. Dies stellt keine Fehlfunktion dar. SPORT wird fr Schwenkaufnahmen empfohlen (Mitzieh-E ekt), wenngleich auch
NORMAL dafr anwendbar ist. In den Modi NORMAL und SPORT gleicht der Bildstabilisator nur die Verwacklung aus,
die nicht zur Schwenkbewegung gehrt (wenn die Kamera beispielsweise horizontal geschwenkt wird, wirkt der Bildstabilisator nur auf vertikale Verwacklungen).
Schalten Sie die Kamera nicht ab und entfernen Sie nicht das Objektiv, solange der
Bildstabilisator aktiv ist. Wenn die Stromversorgung des Objektivs unterbrochen wird,
solange der Bildstabilisator aktiv ist, knnte das Objektiv klappern, wenn es geschttelt
wird. Dies stellt keine Fehlfunktion dar und kann dadurch beseitigt werden, dass das
Objektiv wieder angesetzt und die Kamera eingeschaltet wird.
Verfgt die Kamera ber ein eingebautes Blitzgert, wird der Bildstabilisator deaktiviert,
solange das Blitzgert au dt. Die Modi NORMAL und SPORT knnen Verwacklungsunschrfe verringern, wenn die
Kamera auf einem Stativ montiert ist. Mit der Einstellung OFF lassen sich in manchen Fllen je nach Stativtyp und Aufnahmesituation jedoch bessere Ergebnisse erzielen.
Die Modi NORMAL und SPORT sind empfehlenswert, wenn die Kamera auf einem Einbeinstativ montiert ist.
Die Gegenlichtblende Die Gegenlichtblende schtzt das Objektiv und hlt Streulicht ab, das ansonsten zu Kontrastverlust oder Geisterbildern fhren wrde.
Befestigen der Gegenlichtblende
Richten Sie die Markierung fr das Ansetzen der
Gegenlichtblende () an der Markierung fr die Ausrichtung der Gegenlichtblende ( ) aus. Drehen Sie anschlieend die Gegenlichtblende
(w), bis die -Markierung an der Markierung fr
die Arretierung der Gegenlichtblende steht ( ).
Halten Sie die Gegenlichtblende beim Anbringen oder Abnehmen in der Nhe des -Symbols an der Basis fest und umfassen Sie sie nicht zu fest. Mit falsch angebrachter Gegenlichtblende knnen Vignettierungen auftreten. Die Gegenlichtblende kann umgekehrt auf dem Objektiv angebracht werden, wenn sie nicht verwendet wird.
Abnehmen der Gegenlichtblende
Drcken Sie die Taste zur Entriegelung der Gegenlichtblende (q), drehen Sie die Gegenlichtblende in Pfeilrichtung (w) und nehmen Sie sie wie gezeigt ab (e).
Verwenden eines Stativs Wenn das Objektiv an einer Kamera angesetzt ist, mssen Sie das Stativ am Stativring des Objektivs befestigen statt am Stativgewinde der Kamera. Achten Sie darauf, die Sicherungsschraube am Stativadapter festzuziehen, da anderenfalls das Objektiv aus dem Stativadapter rutschen knnte, wodurch die Gefahr fr Beschdigungen und Verletzungen besteht.
Anbringen des Stativadapters (Abbildung 2) Schieben Sie den Befestigungsfu des Stativrings vollstndig in den Stativadapter (q), halten Sie ihn in dieser Position fest und ziehen Sie die Sicherungsschraube am Stativadapter vollstndig an (w).
Drehen der Kamera (Abbildung 3) Lsen Sie die Feststellschraube des Stativrings etwas (q) und drehen Sie die Kamera in die Querformat- oder Hochformat-Position, wobei die Drehindizes als Orientierungshilfe dienen (w). Drehen Sie die Feststellschraube des Stativrings wieder fest (e).
Abnehmen des Stativadapters (Abbildung 4) Lsen Sie die Sicherungsschraube am Stativadapter vollstndig (q), drcken Sie die Stativadapter-Entriegelung (w) und ziehen Sie den Befestigungsfu des Stativrings aus dem Stativadapter heraus (e).
P ege des Objektivs Das Objektiv net die Blende vollstndig, wenn es von der Kamera abgenommen
wird. Um das Innere des Objektivs zu schtzen, bewahren Sie es nicht unter direkter Sonneneinstrahlung auf oder bringen Sie beide Objektivdeckel an.
Sttzen Sie stets das Objektiv, wenn Sie die Kamera mit der Hand halten. Bei Missachtung dieser Vorsichtsmanahme kann der Objektivanschluss beschdigt werden.
Tragen oder heben Sie das Objektiv oder die Kamera nicht an der angesetzten Gegenlichtblende. Halten Sie die CPU-Kontakte sauber. Sollte die Dichtungsmanschette beschdigt sein, benutzen Sie das Objektiv nicht weiter,
sondern bringen Sie es zum Nikon-Kundendienst zur Reparatur. Normalerweise ist das Entfernen von Staub ausreichend fr das Reinigen der Glas chen. Die mit Fluor beschichtete Frontlinse lsst sich leicht durch Abwischen mit einem
trockenen Tuch reinigen. Fingerabdrcke und andere Flecken knnen mit einem weichen, sauberen Baumwolltuch oder einem Objektivreinigungstuch entfernt werden. Reinigen Sie die Linse mit Kreisbewegungen von der Mitte nach auen und achten Sie dabei darauf, dass keine Schmier ecken verbleiben und das Glas nicht mit den Fingern berhrt wird. Um hartnckige Flecken zu beseitigen, verwenden Sie zum sanften Wischen ein weiches Tuch, das leicht mit destilliertem Wasser, Ethanol oder Objektivreiniger angefeuchtet ist. Tropfen ecken auf der wasser- und fettabweisenden, uorbeschichteten Glas che lassen sich mit einem trockenen Tuch abwischen.
Um Schmier ecken und Fingerabdrcke von der Hinterlinse zu entfernen (der Linse auf der Seite des Objektivbajonetts), bringen Sie ein wenig Ethanol oder Objektivreiniger auf ein weiches, sauberes Baumwolltuch oder ein Objektivreinigungstuch auf und reinigen Sie die Linse mit Kreisbewegungen von der Mitte nach auen. Achten Sie dabei darauf, dass keine Schmier ecken zurckbleiben, und berhren Sie das Glas nicht mit den Fingern.
Verwenden Sie niemals organische Lsungsmittel wie Verdnner oder Waschbenzin zur Reinigung des Objektivs.
Zum Schutz der Frontlinse kann die Gegenlichtblende oder ein NC-Klarglas lter verwendet werden. Bringen Sie den vorderen und den hinteren Objektivdeckel an, bevor Sie das Objektiv in
seiner Tasche verstauen. Wenn das Objektiv fr lngere Zeit nicht verwendet wird, lagern Sie es an einem khlen,
trockenen Ort, um Schimmel und Korrosion zu vermeiden. Lagern Sie das Objektiv nicht direkt in der Sonne oder zusammen mit Mottenkugeln aus Naphthalin oder Kampfer.
Halten Sie das Objektiv stets trocken. Die Korrosion innenliegender Teile kann zu irreparablen Schden fhren.
Das Lagern des Objektivs an sehr heien Orten kann Teile aus verstrktem Kunststo beschdigen oder verformen.
Pltzliche Temperaturschwankungen knnen eine schdliche Bildung von Kondenswasser im und auf dem Objektiv verursachen. Bevor Sie es an einen Ort mit deutlich hherer oder niedrigerer Temperatur bringen, sollten Sie das Objektiv in seinen Beutel oder eine Plastiktte packen, um eine