Nikon AF-S Nikkor 180-400mm f/4E TC1.4 FL ED VR v2 Manual
En User's Manual (with Warranty)
De Benutzerhandbuch (inkl. Garantiebeleg)
Fr Manuel d'utilisation (avec garantie)
Nl Gebruikshandleiding (met garantie)
Deutsch
Bitte lesen Sie sorgfltig diese Anleitung und das Kamerahandbuch, bevor
Sie dieses Produkt verwenden.
Hinweis: Dieses Objektiv ist weder mit Spiegelre exkameras fr Film noch
mit den folgenden D-SLR-Kameramodellen kompatibel: D2-Serie, D1-Serie,
D200, D100, D90, D80, D70-Serie, D60, D50, D40-Serie und D3000.
ber dieses Objektiv In dieses Objektiv ist ein Telekonverter integriert. Mit dem Telekonverter-
Schalter kann zwischen den Brennweitenfaktoren 1 und 1,4 umgeschaltet
werden.
Sicherheitshinweise Lesen Sie die Sicherheitshinweise vor der Inbetriebnahme dieses Produkts
vollstndig durch, um Sach- oder Personenschden zu verhten.
Bewahren Sie diese Hinweise gri bereit fr alle Personen auf, die das Produkt
benutzen.
A WARNUNG: Das Missachten der Warnhinweise, die so gekennzeichnet
sind, knnte zu schweren Verletzungen oder zum Tod fhren.
A VORSICHT: Das Missachten der Warnhinweise, die so gekennzeichnet
sind, knnte zu Sach- oder Personenschden fhren.
A WARNUNG Das Produkt nicht auseinandernehmen oder modi zieren.
Berhren Sie keine Teile aus dem Gerteinnern, die infolge eines Sturzes oder eines anderen Unfallereignisses freiliegen. Das Missachten dieser Vorsichtsmanahmen kann einen Stromschlag
oder andere Verletzungen verursachen.
Sollte das Produkt qualmen, sich berhitzen oder ungewhnliche Gerche absondern, trennen Sie sofort die Kamera-Stromversorgung. Die fortgesetzte Verwendung kann Brandgefahr, Verbrennungen oder
andere Verletzungen zur Folge haben.
Vor Nsse schtzen. Nicht mit nassen Hnden anfassen. Das Missachten dieser Vorsichtsmanahmen kann einen Brand oder
Stromschlag verursachen.
Verwenden Sie dieses Produkt nicht in der Gegenwart von ent ammbarem Staub oder Gas (wie z. B. Propangas, Benzin oder Aerosole). Das Missachten dieser Vorsichtsmanahme kann eine Explosion oder
einen Brand verursachen.
Blicken Sie nicht durch das Objektiv oder den Kamerasucher direkt in die Sonne oder eine andere sehr helle Lichtquelle. Das Missachten dieser Vorsichtsmanahme kann bleibende Schden
am Auge verursachen.
Das Produkt von Kindern fernhalten. Das Missachten dieser Vorsichtsmanahme kann zu Verletzungen oder
zur Beschdigung des Produkts fhren. Beachten Sie auerdem, dass
Kleinteile ein Erstickungsrisiko darstellen. Sollte ein Kind irgendein Teil
dieses Produkts verschlucken, konsultieren Sie sofort einen Arzt.
Die Riemen nicht um den Hals wickeln oder schlingen. Das Missachten dieser Vorsichtsmanahme kann zu einem Unglcksfall
fhren.
An Orten mit extrem hohen oder niedrigen Temperaturen nicht mit bloen Hnden handhaben. Das Missachten dieser Vorsichtsmanahme kann zu Verbrennungen
oder Erfrierungen fhren.
A VORSICHT Das Objektiv nicht auf die Sonne oder andere sehr helle Lichtquellen
richten. Das vom Objektiv gebndelte Licht kann eine Brandursache darstellen
oder innere Teile des Produkts beschdigen.
Bewahren Sie das Produkt nicht lngere Zeit an Orten auf, an denen es extrem hohen Temperaturen ausgesetzt ist, wie in einem geschlossenen Auto oder direkt in der Sonne. Das Missachten dieser Vorsichtsmanahme kann einen Brand oder
Produktschden verursachen.
Tragen Sie Kameras oder Objektive nicht mit montierten Stativen oder hnlichem Zubehr umher. Das Missachten dieser Vorsichtsmanahme kann zu Verletzungen oder zur
Beschdigung des Produkts fhren.
Hinweise fr Kunden in Europa Durch dieses Symbol wird angezeigt, dass elektrische bzw.
elektronische Gerte getrennt entsorgt werden mssen.
Folgendes gilt fr Verbraucher in europischen Lndern:
Dieses Produkt muss an einer geeigneten Sammelstelle separat
entsorgt werden. Eine Entsorgung ber den Hausmll ist unzulssig.
Durch getrennte Entsorgung und Recycling knnen natrliche Rohstoffe
bewahrt und die durch falsche Entsorgung verursachten, schdlichen
Folgen fr die menschliche Gesundheit und Umwelt verhindert werden.
Weitere Informationen erhalten Sie bei Ihrem Fachhndler oder bei den
fr die Abfallentsorgung zustndigen Behrden bzw. Unternehmen.
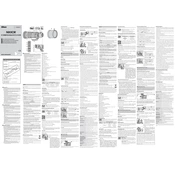
Objektivteile q Gummigri
w Zoomring
e Brennweitenskala
r Markierung fr Brennweitenskala
t Entfernungsskala
y Markierung fr Entfernungseinstellung
u Positionsmarkierung fr Objektivdrehung
i Drehindex des Stativrings
o Fokussierring
!0 Stativring
!1 se fr Trageriemen
!2 Einsteck lterhalter
!3 Feststellschraube fr Einsteck lterhalter
!4 Markierung fr die Ausrichtung des Objektivs
!5 Dichtungsmanschette
!6 CPU-Kontakte
!7 Fokusfunktionstaste (Fokus spei chern/Speicher abrufen/AF-Start)
!8 Feststellschraube fr Stativring
!9 Integrierte drehbare Stativschelle
@0 Fokusmodusschalter
@1 Fokusbegrenzungsschalter
@2 Bildstabilisatorschalter
@3 Fokusfunktionsschalter (AF-L/MEMORY RECALL/AF-ON)
@4 Ein-/Ausschalter fr Tonsignal
@5 Telekonverter-Schalter
@6 Entriegelung des Telekonverter-Schalters
@7 Speichertaste
@8 Sicherungs nung (fr abschliebares Sicherungsseil)
@9 Feststellschraube fr Gegenlicht blende
#0 Gegenlichtblende
Scharfeinstellung Untersttzte Fokusmodi werden in der folgenden Tabelle
aufgefhrt (beachten Sie das Handbuch der Kamera fr
Informationen zu den Fokusmodi der Kamera).
Kamera- Fokusmodus
Objektiv-Fokusmodusschalter
A/M M/A M
AF Autofokus mit
AF-Prioritt
Autofokus mit
Prioritt der
manuellen
Scharfstellung
Manuelle
Fokussierung mit
elektronischer
Einstellhilfe
MF Manuelle Fokussierung mit elektronischer Einstellhilfe
A/M- und M/A-Modus
M/A (Vorrang der manuellen Scharfeinstellung): Die automatische
Scharfeinstellung (Autofokus) kann augenblicklich durch Drehen des
Objektiv-Fokussierrings auer Kraft gesetzt werden.
A/M (Vorrang der automatischen Scharfeinstellung): Wie oben, nur muss der
Fokussierring weiter gedreht werden, bevor der Autofokus auer Kraft
gesetzt wird. Whlen Sie diese Option, um greres Gewicht auf den
Autofokus zu legen.
Autofokus mit Prioritt der manuellen Scharfeinstellung
So knnen Sie im Autofokusmodus manuell fokussieren:
z Schieben Sie den Fokusmodusschalter des Objektivs in die Position
A/M oder M/A.
x Stellen Sie scharf.
Be ndet sich die Kamera im Autofokusmodus, kann durch
Drehen des Objektiv-Fokussierrings in den Autofokus
eingegri en werden, whrend der Auslser bis zum ersten
Druckpunkt gedrckt oder eine AF-ON-Taste bettigt wird
(entweder die gegebenenfalls an der Kamera vorhandene
AF-ON-Taste oder eine Fokusfunktionstaste des Objektivs,
sofern der Fokusfunktionsschalter auf AF-ON steht). Um mit
dem Autofokus neu zu fokussieren, drcken Sie erneut den
Auslser bis zum ersten Druckpunkt bzw. die AF-ON-Taste.
Der Fokusbegrenzungsschalter
Dieser Schalter bestimmt die Begrenzung der Entfernungseinstellung fr den
Autofokus.
FULL: Whlen Sie diese Einstellung, um den kompletten
Fokusbereich nutzen zu knnen.
6m: Whlen Sie diese Option fr schnelleres
Scharfstellen, wenn sich Ihr Hauptobjekt stets in einer
Entfernung von mindestens 6 Metern be ndet.
Die Fokusfunktionstasten und der Fokusfunktionsschalter Mit dem Fokusfunktionsschalter knnen Sie den Fokusfunktionstasten eine
Funktion zuordnen.
Fokusfunktionsschalter Fokusfunktionstaste
AF-L Fokusspeicher
MEMORY RECALL Speicher abrufen
AF-ON Autofokus aktivieren
Die zugewiesene Funktion kann ausgefhrt werden,
indem eine der vier Fokusfunktionstasten gedrckt wird.
Die Fokusfunktionstasten knnen in eine andere Position
gedreht werden. Weitere Informationen erhalten Sie von den
Mitarbeitern des Nikon-Kundendienstes.
Fokusspeicher (AF-L)
Steht der Fokusfunktionsschalter auf Position AF-L, wird die Scharfeinstellung
gespeichert, solange eine Fokusfunktionstaste gedrckt wird. Verwenden
Sie den Fokusspeicher, um den Bildausschnitt nach dem Fokussieren zu
verndern; beispielsweise nach dem Fokussieren auf ein Ersatzobjekt in
der gleichen Entfernung des Hauptobjekts, falls der Autofokus mit dem
Hauptobjekt Probleme hat.
z Schieben Sie den Fokusmodusschalter des Objektivs auf A/M oder
M/A.
x Schieben Sie den Fokusfunktionsschalter auf AF-L.
c Speichern Sie die Scharfeinstellung.
Mit einer beliebigen Fokusfunktionstaste knnen Sie die
Scharfeinstellung speichern. Die Scharfeinstellung bleibt
gespeichert, solange die Taste gedrckt gehalten wird. Die
Scharfeinstellung kann auch mithilfe der entsprechenden
Bedienelemente der Kamera gespeichert werden.
Speicher abrufen
Diese Funktion dient zum Speichern und Abrufen von hu g benutzten
Fokussierentfernungen. Stellen Sie vor dem Abrufen einer gespeicherten
Entfernungseinstellung bitte das Objektiv auf die Brennweite, die zum
Zeitpunkt des Speicherns gewhlt war.
Entfernungseinstellung speichern
z Schieben Sie den Ein-/Ausschalter fr das
Tonsignal auf .
x Fokussieren Sie.
c Drcken Sie die Speichertaste.
Dieser Vorgang kann in jedem Fokusmodus
durchgefhrt werden, unabhngig von
der Stellung des Fokusfunktionsschalters.
Ist die Aktion erfolgreich verlaufen, erklingt
ein Tonsignal. Schlgt die Aktion jedoch
fehl, dreht sich die Entfernungsskala etwa
zehnmal vor und zurck und es ertnt ein
kurzes Tonsignal, gefolgt von drei langen
Signalen. Stellen Sie scharf und drcken Sie
die Speichertaste erneut. Die gespeicherte
Entfernungseinstellung wird nicht
gelscht, wenn die Kamera ausgeschaltet
oder das Objektiv abgenommen wird.
Gespeicherte Entfernungseinstellung benutzen
z Stellen Sie den Fokusfunktionsschalter auf die Position MEMORY RECALL.
x Rufen Sie die gespeicherte Entfernungseinstellung ab.
Drcken Sie eine der Fokusfunktionstasten, um auf die gespeicherte
Entfernungseinstellung zu fokussieren. Die Kamera fokussiert
auch dann auf die gespeicherte Entfernungseinstellung, wenn
der Auslser bis zum ersten Druckpunkt gedrckt gehalten
wird. Sobald die Fokusfunktionstaste losgelassen wird, wird die
normale Scharfeinstellung wiederhergestellt. Halten Sie die
Fokusfunktionstaste gedrckt, bis das Bild aufgenom men worden ist.
Beachten Sie, dass der Fokussierabstand leicht von der
gespeicherten Entfernungseinstellung abweichen kann, falls die
aktuell eingestellte Brennweite sich von der Brennweitenwahl zum
Zeitpunkt des Speicherns unterscheidet (es erklingt ein Warnton,
wenn der Ein-/Ausschalter fr das Tonsignal auf der Position
steht). Besondere Sorgfalt ist ntig, wenn die aktuelle Brennweite
lnger als diejenige beim Speichern ist.
Der Ein-/Ausschalter fr das Tonsignal
Mit dem Ein-/Ausschalter fr das Tonsignal knnen Sie whlen, ob das
Tonsignal beim Speichern und Abrufen der Scharfeinstellung ertnt.
: Tonsignal aktiviert.
: Kein Tonsignal.
Autofokus aktivieren (AF-ON)
Steht der Fokusfunktionsschalter auf der Position AF-ON, lsst sich durch
Drcken einer Fokusfunktionstaste am Objektiv die automatische
Scharfeinstellung starten.
z Stellen Sie den Fokusmodusschalter des Objektivs auf A/M oder M/A.
x Stellen Sie den Fokusfunktionsschalter auf die Position AF-ON.
c Stellen Sie scharf.
Drcken Sie eine der Fokusfunktionstasten, um mit dem Autofokus
zu fokussieren. Alternativ knnen Sie mit den Bedienelementen der
Kamera fokussieren.
A Den Fokusfunktionstasten eine Funktion zuweisen Bevor Sie mit den Bedienelementen der Kamera die Belegung der
Fokusfunktionstasten whlen, schieben Sie bitte den Fokusfunktionsschalter auf
AF-L. Nhere Angaben zur Funktionszuweisung nden Sie im Kamera-Handbuch.
Zoom Drehen Sie vor dem Fokussieren am Zoomring, um die Brennweite einzustellen
und den Bildausschnitt zu whlen.
Brennweite Die auf der Brennweitenskala angegebenen Brennweiten gelten fr die
Entfernungseinstellung auf Unendlich. Die Brennweite ndert sich beim
Verkrzen der Entfernungseinstellung.
Tiefenschrfe Die Tiefenschrfe lsst sich mit der Abblendfunktion der Kamera im Voraus
beurteilen.
Entfernungsskala Beachten Sie, dass die Entfernungsskala nur als Orientierungshilfe dient
und mglicherweise nicht den genauen Objektabstand anzeigt. Auerdem
zeigt sie wegen der Tiefenschrfe und anderer Faktoren nicht immer an,
wenn auf ein fernes Objekt scharfgestellt wurde.
Blende Die Blende wird mit den Bedienelementen der Kamera eingestellt. Bei
einigen Blendeneinstellungen kann die Bildrate geringer ausfallen.
Bildstabilisator (VR) Der Bildstabilisator (VR) reduziert die aus unruhiger Kamerahaltung resultierende Verwacklungsunschrfe und ermglicht dadurch um bis zu 4,0 Lichtwertstufen lngere Belichtungszeiten als normal (4,0 Lichtwertstufen beim Benutzen des integrierten Telekonverters), wodurch sich der Bereich der nutzbaren Belichtungszeiten vergrert. Die Wirkung des Bildstabilisators fr die Belichtungszeit wird im Modus NORMAL gem CIPA-Standards ermittelt (Camera and Imaging Products Association); FX-Objektive werden an FX-Format-Kameras gemessen, DX-Objektive an DX-Format-Kameras. Zoomobjektive werden bei der lngsten Brennweiteneinstellung gemessen.
Verwendung des Bildstabilisatorschalters Whlen Sie OFF, um den Bildstabilisator auszuschalten.
Whlen Sie NORMAL, um die Folgen des Kamerawackelns zu
verringern, wenn Sie ortsfeste Objekte fotogra eren. Die
Bildstabilisierung wird durch das Auslserdrcken bis zum
ersten Druckpunkt aktiviert.
Whlen Sie SPORT fr das Fotogra eren von Sportlern und
Objekten, die sich schnell und unvorhersehbar bewegen.
Die Bildstabilisierung wird durch das Auslserdrcken bis
zum ersten Druckpunkt aktiviert.
AF-S NIKKOR 180-400mm f/4E TC1.4 FL ED VR
@0
@5
@6
@7
@8
@1
@2
@3
@4
!7
!9
!8
r t u iy
ewq !2!1o !0 !3
!4 !5 !6
@9#0
English
Before using this product, please carefully read both these instructions and
the camera manual.
Note: This lens does not support D2-series, D1-series, D200, D100, D90, D80,
D70-series, D60, D50, D40-series, or D3000 digital SLR cameras or lm SLR
cameras.
About This Lens This lens features a built-in teleconverter. Use the teleconverter switch to
switch between focal length multipliers of 1 and 1.4.
For Your Safety To prevent damage to property or injury to yourself or to others, read For
Your Safety in its entirety before using this product.
Keep these safety instructions where all those who use this product will read them.
A WARNING: Failure to observe the precautions marked with this
icon could result in death or severe injury.
A CAUTION: Failure to observe the precautions marked with this icon
could result in injury or property damage.
A WARNING
Do not disassemble or modify this product. Do not touch internal parts that become exposed as the result of a fall or other accident. Failure to observe these precautions could result in electric shock or other injury.
Should you notice any abnormalities such as the product producing smoke, heat, or unusual odors, immediately disconnect the camera power source. Continued operation could result in re, burns or other injury.
Keep dry. Do not handle with wet hands. Failure to observe these precautions could result in re or electric shock.
Do not use this product in the presence of ammable dust or gas such as propane, gasoline or aerosols. Failure to observe this precaution could result in explosion or re.
Do not directly view the sun or other bright light source through the lens or camera. Failure to observe this precaution could result in visual impairment.
Keep this product out of reach of children. Failure to observe this precaution could result in injury or product malfunction.
In addition, note that small parts constitute a choking hazard. Should a child
swallow any part of this product, seek immediate medical attention.
Do not entangle, wrap or twist the straps around your neck. Failure to observe this precaution could result in accidents.
Do not handle with bare hands in locations exposed to extremely high or low temperatures. Failure to observe this precaution could result in burns or frostbite.
A CAUTION
Do not leave the lens pointed at the sun or other strong light sources. Light focused by the lens is a source of re and damage to the products internal parts.
Do not leave the product where it will be exposed to extremely high temperatures, for an extended period such as in an enclosed automobile or in direct sunlight. Failure to observe this precaution could result in re or product malfunction.
Do not transport cameras or lenses with tripods or similar accessories attached. Failure to observe this precaution could result in injury or product
malfunction.
Notices for Customers in Europe This symbol indicates that electrical and electronic equipment is
to be collected separately.
The following apply only to users in European countries:
This product is designated for separate collection at an appro-
priate collection point. Do not dispose of as household waste.
Separate collection and recycling helps conserve natural resources and
prevent negative consequences for human health and the environment
that might result from incorrect disposal.
For more information, contact the retailer or the local authorities in charge
of waste management.
Parts of the Lens q Rubber grip
w Zoom ring
e Focal length scale
r Focal length mark
t Focus distance indicator
y Focus distance mark
u Lens rotation index
i Tripod collar ring rotation index
o Focus ring
!0 Tripod collar ring
!1 Strap eyelet
!2 Slip-in lter holder
!3 Slip-in lter holder screw
!4 Lens mounting mark
!5 Rubber lens-mount gasket
!6 CPU contacts
!7 Focus function button (focus lock/memory recall/AF start)
!8 Tripod collar ring attachment screw
!9 Built-in rotating tripod collar
@0 Focus-mode switch
@1 Focus limit switch
@2 Vibration reduction switch
@3 Focus function selector (AF-L/MEMORY RECALL/AF-ON)
@4 Beep on/o switch
@5 Teleconverter switch
@6 Teleconverter switch lock
@7 Memory set button
@8 Security slot (for security cable lock)
@9 Lens hood screw
#0 Lens hood
Focus
Supported focus modes are shown in the following table
(for information on camera focus modes, see the camera
manual).
Camera focus mode
Lens focus-mode switch
A/M M/A M
AF
Autofocus with
manual override
(AF priority)
Autofocus with
manual override
(manual priority)
Manual focus
with electronic
range nder
MF Manual focus with electronic range nder
A/M and M/A Modes
M/A (manual priority): Autofocus can be instantly over-ridden by rotating
the lens focus ring.
A/M (AF priority): As above, except that the focus ring must be rotated far-
ther before autofocus is over-ridden. Choose this option to place greater
dependence on autofocus.
Autofocus with Manual Override
To use manual focus in autofocus mode:
z Slide the lens focus-mode switch to A/M or M/A.
x Focus.
When the camera is in autofocus mode, autofocus can be over-
ridden by rotating the lens focus ring while the shutter-release
button is pressed halfway or an AF-ON button (either the AF-ON
button on the camera, if any, or if the focus function selector is in
the AF-ON position, a lens focus function button) is pressed. To re-
focus using autofocus, press the shutter-release button halfway
or press the AF-ON button again.
The Focus Limit Switch
This switch determines the focus distance limits for autofocus.
FULL: Select this option to use the entire focus range.
6m: If your subject will always be at distance of at least
6 m (19.7 ft), select this option for faster focusing.
The Focus Function Buttons and Selector The function assigned to the focus function buttons can be selected using
the focus function selector.
Focus function selector Focus function button
AF-L Focus lock
MEMORY RECALL Memory recall
AF-ON Lens AF start
The assigned function can be performed by pressing any of
the four function buttons. The focus buttons can be rotated
to a new position; for more information, contact Nikon-au-
thorized service personnel.
Focus Lock (AF-L)
When AF-L is selected with the focus function selector, focus will lock while
a focus function button is pressed. Use focus lock to recompose shots after
focusing or, if autofocus is unable to focus on the selected subject, after
focusing on another object at the same distance.
z Slide the lens focus-mode switch to A/M or M/A.
x Slide the focus function selector to AF-L.
c Lock focus.
Focus can be locked by pressing any of the focus function but-
tons and remains locked while the button is pressed. Focus
can also be locked using camera controls.
Memory Recall
Save and recall frequently-used lens focus positions. Before recalling a
saved focus position, set the lens to the focal length in e ect when the
position was saved.
Saving Focus Positions
z Slide the beep on/o switch to .
x Focus.
c Press the memory set button.
This operation can be performed in
any focus mode regardless of the po-
sition of the focus function selector. A
beep will sound if the operation is suc-
cessful. If the operation fails, the focus
distance indicator will revolve back
and forth some ten times and the lens
will sound a short beep followed by
three long beeps; focus and press the
memory set button again. The stored
distance is not deleted if the camera is
turned o or the lens is detached.
Using Stored Focus Positions
z Slide the focus function selector to MEMORY RECALL.
x Recall the stored focus distance.
Press any of the focus function buttons to focus at the stored
distance. The camera will refocus at the stored distance even
when the shutter-release button is pressed halfway; normal fo-
cus is restored when the focus function button is released. Keep
the focus function button pressed until the photograph is taken.
Note that if the current focal length di ers from that selected
when the focus position was saved, the focus position will dif-
fer slightly from the saved value (a warning beep will sound if
the beep on/o switch is in the position). Special attention
is required at focal lengths longer than that selected when the
focus position was saved.
The Beep on/o Switch
The beep on/o switch can be used to enable or mute the beep that
sounds during memory set and recall operations.
: Beep enabled.
: Beep muted.
AF Start (AF-ON)
When the focus function selector is in the AF-ON position, you can press a
lens focus function button to focus using autofocus.
z Slide the lens focus-mode switch to A/M or M/A.
x Slide the focus function selector to AF-ON.
c Focus.
Press any of the focus function buttons to focus using autofo-
cus. You can also focus using camera controls.
A Assigning Roles to the Focus Function Buttons
Before using camera controls to assign a role to the focus function but-
tons, slide the focus function selector to AF-L. For information on button
assignment, see the camera manual.
Zoom Before focusing, rotate the zoom ring to adjust the focal length and frame
the photograph.
Focal Length The focal lengths shown on the focal length scale are for a focus distance of
in nity. The focal length changes as the focus distance shortens.
Depth of Field Depth of eld can be previewed using the cameras depth-of- eld preview feature.
The Focus Distance Indicator Note that the focus distance indicator is intended only as a guide and may not
accurately show the distance to the subject and may, due to depth of eld or
other factors, not show when the camera is focused on a distant object.
Aperture Aperture is adjusted using camera controls. The frame rate may drop at
some apertures.
Vibration Reduction (VR) Vibration reduction (VR) reduces blur caused by camera shake, allowing shutter
speeds up to 4.0 stops (or, if the built-in teleconverter is used, 4.0 stops) slower
than would otherwise be the case, increasing the range of shutter speeds
available. The e ects of VR on shutter speed are measured in NORMAL mode
according to Camera and Imaging Products Association (CIPA) standards; FX-
format lenses are measured using FX-format digital cameras, DX-format lenses
using DX-format cameras. Zoom lenses are measured at maximum zoom.
Using the Vibration Reduction Switch
Select OFF to turn vibration reduction o .
Select NORMAL for enhanced vibration reduction when
photographing stationary subjects. Vibration reduction
takes e ect when the shutter-release button is pressed
halfway.
Select SPORT for photographing athletes and other sub-
jects that are moving rapidly and unpredictably. Vibration
reduction takes e ect when the shutter-release button is
pressed halfway.
Using Vibration Reduction: Notes
When using vibration reduction, press the shutter-release button halfway
and wait for the image in the view nder to stabilize before pressing the
shutter-release button the rest of the way down.
When vibration reduction is active, the image in the view nder may jiggle
after the shutter is released. This does not indicate a malfunction.
SPORT is recommended for panning shots, although NORMAL is also supported.
In NORMAL and SPORT modes, vibration reduction applies only to motion
that is not part of a pan (if the camera is panned horizontally, for example,
vibration reduction will be applied only to vertical shake).
Do not turn the camera o or remove the lens while vibration reduction is
in e ect. If power to the lens is cut while vibration reduction is on, the lens
may rattle when shaken. This is not a malfunction, and can be corrected
by reattaching the lens and turning the camera on.
If the camera is equipped with a built-in ash, vibration reduction will be
disabled while the ash charges.
NORMAL and SPORT vibration reduction can reduce blur when the camera
is mounted on a tripod. OFF may however produce better results in some
cases depending on the type of tripod and on shooting conditions.
NORMAL and SPORT are recommended if the camera is mounted on a
monopod.
The Built-in Teleconverter The built-in teleconverter increases focal length by 1.4 and can be used
in movie mode and during view nder and live view photography. Before
shooting, use the teleconverter switch to enable or disable the built-in tele-
converter as described below.
z Unlock the teleconverter switch.
Slide the teleconverter switch lock
in the direction shown (q) to unlock
the teleconverter switch.
x Slide the teleconverter switch to 1.4 (w).
c Lock the teleconverter switch.
Slide the teleconverter switch lock in
the direction shown (e) to lock the
teleconverter switch.
To disable the built-in teleconverter, follow the
steps above to set the teleconverter switch to 1.
D The Teleconverter Switch Lock
After changing focal lengths, be sure to latch the teleconverter switch lock
to prevent unintended operation of the teleconverter switch.
Using the Built-in Teleconverter: Notes
Do not use the teleconverter switch while the shutter is open, during autofocus,
vibration reduction, movie recording, or while ne-tuning autofocus. Failure to
observe this precaution could interfere with exposure or produce vignetting or
other unintended results. Note that incorrect focal length data may be recorded
with photographs taken with the built-in or an optional teleconverter.
Focus Position
Using the teleconverter switch after focusing may cause the focus posi-
tion to change. When shooting after using the teleconverter switch, be
sure to refocus before releasing the shutter.
The focus position will also change if you use the teleconverter switch af-
ter recalling a stored focus position (a warning beep will sound if the beep
on/o switch is in the position). Store the focus position after operating
the teleconverter switch.
A Lens Firmware Updates
Before updating the lens rmware, be sure the teleconverter switch is in
the 1 position. Firmware cannot be updated with the switch in the 1.4
position. Do not operate the switch during rmware updates.
The Lens Hood Lens hoods protect the lens and block stray light that would otherwise
cause are or ghosting.
Fully tighten the hood screw
(w).
Vignetting may occur if the hood is not correctly attached. The hood can be
reversed and mounted on the lens when not in use.
Using a Built-in Rotating Tripod Collar Attach tripods to the lens tripod collar, not the camera. Note that your hand
may come into contact with the tripod if you rotate the camera while hold-
ing it by the handgrip.
Repositioning the Camera
Loosen the tripod collar ring at-
tachment screw (q), rotate the
lens to match the camera orien-
tation (w), and then tighten the
screw (e).
The Security Slot The security slot can be used to attach third-party security cable locks. For more
information, see the documentation provided with the security cable lock.
Filters When taking photographs with the slip-in lter holder, be sure a lter is
inserted. The holder comes with a Neutral Color (NC) lter in place.
Inserting Filters
z Unlock the holder.
Press the slip-in lter holder screw
down and rotate counterclockwise
until the white line is at a right angle
to the axis of the lens.
x Remove the slip-in lter holder.
c Remove the supplied lter.
v Screw a 40.5 mm screw-on lter into
the side of the holder marked Nikon
and JAPAN.
The holder can then be reinserted
facing either the subject or camera.
Using an Optional Slip-in C-PL405 Circular Polarizing Filter
The C-PL405 blocks unwanted re ections from glass, water, and other
non-metallic surfaces. The slip-in lter holder is not required; when us-
ing the lter, be sure that it is securely attached and be aware that it is
not dust- or splash-proof. Note that using a C-PL405 slightly increases the
minimum focus distance and shifts the focus distance from that shown by
the focus distance indicator. When using memory recall, be sure to attach
the lter before storing the focus position.
Do not leave the C-PL405 for long periods in direct sunlight or in locations
that are exposed to excessive humidity or high temperatures.
Lens Care The lens returns to maximum aperture when removed from the camera. To pro-
tect the interior of the lens, store it out of direct sunlight or replace the lens caps.
Always support the lens when holding the camera. Failure to observe this
precaution could damage the lens mount.
Do not pick up or hold the lens or camera using only the lens hood.
Keep the CPU contacts clean.
Should the rubber lens-mount gasket be damaged, cease use immedi-
ately and take the lens to a Nikon-authorized service center for repair.
Removing dust is normally su cient to clean the glass surfaces of the lens.
The uorine-coated front element can be cleaned simply by wiping it
with a dry cloth. Smudges and ngerprints can be removed using a soft,
clean cotton cloth or lens cleaning tissue; clean from the center outwards
using a circular motion, taking care not to leave smears or touch the glass
surface with your ngers. To remove stubborn stains, wipe gently using a
soft cloth dampened with a small amount of distilled water, ethanol, or
lens cleaner. Drop-shaped stains on the water- and oil-repellent uorine-
coated element can be removed with a dry cloth.
To remove smudges and ngerprints from the rear element or supplied
Neutral Color (NC) lter, apply a small amount of ethanol or lens cleaner to
a soft, clean cotton cloth or lens-cleaning tissue and clean from the center
outwards using a circular motion, taking care not to leave smears or touch
the glass with your ngers.
Never use organic solvents such as paint thinner or benzene to clean the lens.
Attach the rear and slip-on front caps before placing the lens in its lens case.
If the lens will not be used for an extended period, store it in a cool, dry
location to prevent mold and rust. Do not store in direct sunlight or with
naphtha or camphor moth balls.
Keep the lens dry. Rusting of the internal mechanism can cause irrepa-
rable damage.
Leaving the lens in extremely hot locations could damage or warp parts
made from reinforced plastic.
Rapid changes in temperature may cause damaging condensation inside
and outside the lens. Before taking the lens from a warm to a cold environ-
ment or vice versa, place it in its case or a plastic bag to slow the change
in temperature.
Creases will form if the supplied slip-on front cap is folded, but this does
not prevent the cap from being used.
Nikon does not accept liability for damage to or theft of devices protected
by security cables.
Supplied Accessories LC-K103 slip-on Front Lens Cap
LF-4 Rear Lens Cap
HK-41 Lens Hood
Dedicated slip-in Filter Holder 1
40.5 mm screw-on Neutral Color (NC) lter
LN-2 Strap
CL-L2 Lens Case 2
1 Dedicated accessories are not available for general purchase. Contact a
Nikon-authorized service representative for spares or replacements.
2 Although the protective glass cannot in fact be removed from the lens, the lens
case comes with a container designed for the protective glass. The container
can be used to hold small articles or cushion the lens while it is in the case.
Compatible Accessories 40.5 mm screw-on lters
C-PL405 slip-in circular polarizing lter
AF-I/AF-S Teleconverters TC-14E 1 /TC-14E II 1 /TC-14E III 1 /TC-17E II 2 /
TC-20E 2 /TC-20E II 2 /TC-20E III 2
1 If the teleconverter switch is used to increase focal length by 1.4, autofo-
cus will be available only with cameras that o er f/8 support.
2 Autofocus is not available when the teleconverter switch is used to in-
crease focal length by 1.4. Autofocus is available with cameras that o er
f/8 support when the built-in teleconverter is not in use.
Speci cations Type Type E AF-S lens with built-in CPU, F mount, and
built-in 1.4 teleconverter
Focal length Without built-in teleconverter: 180 400 mm
With built-in teleconverter: 252 560 mm
Maximum aperture Without built-in teleconverter: f/4
With built-in teleconverter: f/5.6
Lens construction 27 elements in 19 groups (including 8 ED lens elements,
1 uorite element, and lens elements with Nano-Crystal coatings)
and 1 protective glass element (with uorine coating);
built-in teleconverter has 8 elements in 5 groups
Angle of view Nikon FX-format D-SLR cameras, without built-in
teleconverter: 13 40 6 10
Nikon FX-format D-SLR cameras, with built-in
teleconverter: 9 50 4 30
Nikon DX-format D-SLR cameras, without built-
in teleconverter: 9 4
Nikon DX-format D-SLR cameras, with built-in
teleconverter: 6 20 2 50
Focal length scale Graduated in millimeters (180, 200, 250, 300, 350, 400)
Zoom Manual zoom using independent zoom ring
Focusing Nikon Internal Focusing (IF) System with autofo-
cus controlled by Silent Wave Motor and separate
focus ring for manual focus
Vibration reduction Lens shift using voice coil motors (VCMs)
Focus distance indicator 2.0 m
Minimum focus distance 2.0 m (6.6 ft) from focal plane at all zoom positions
Diaphragm blades 9 (rounded diaphragm opening)
Diaphragm Automatic electronic aperture control
Aperture range Without built-in teleconverter: f/4 32
With built-in teleconverter: f/5.6 45
Focus limit switch Two positions: FULL ( 2.0 m) and 6.0 m
Dimensions Approx. 128 mm maximum diameter 362.5 mm
(distance from camera lens mount ange)
Weight Approx. 3500 g (7 lb 11.4 oz)
Nikon reserves the right to change the appearance, speci cations, and perfor- mance of this product at any time and without prior notice.
Verwendung des Bildstabilisators: Hinweise Drcken Sie bei Verwendung des Bildstabilisators den Auslser bis zum
ersten Druckpunkt und warten Sie, bis sich das Bild im Sucher stabilisiert, bevor Sie den Auslser vollstndig drcken.
Bei eingeschaltetem Bildstabilisator zittert das Sucherbild mglicherweise nach dem Auslsen. Dies stellt keine Fehlfunktion dar.
SPORT wird fr Schwenkaufnahmen empfohlen (Mitzieh-E ekt),
wenngleich auch NORMAL dafr anwendbar ist.
In den Modi NORMAL und SPORT gleicht der Bildstabilisator nur die
Verwacklung aus, die nicht zur Schwenkbewegung gehrt (wenn die
Kamera beispielsweise horizontal geschwenkt wird, wirkt der Bildstabilisator
nur auf vertikale Verwacklungen). Schalten Sie die Kamera nicht ab und entfernen Sie nicht das Objektiv,
solange der Bildstabilisator aktiv ist. Wenn die Stromversorgung des Objektivs unterbrochen wird, solange der Bildstabilisator aktiv ist, knnte das Objektiv klappern, wenn es geschttelt wird. Dies stellt keine Fehlfunktion dar und kann dadurch beseitigt werden, dass das Objektiv wieder angesetzt und die Kamera eingeschaltet wird.
Verfgt die Kamera ber ein eingebautes Blitzgert, wird der Bildstabilisator deaktiviert, solange das Blitzgert au dt.
Die Modi NORMAL und SPORT knnen Verwacklungsunschrfe verringern,
wenn die Kamera auf einem Stativ montiert ist. Mit der Einstellung OFF
lassen sich in manchen Fllen je nach Stativtyp und Aufnahmesituation
jedoch bessere Ergebnisse erzielen.
Die Modi NORMAL und SPORT sind empfehlenswert, wenn die Kamera auf
einem Einbeinstativ montiert ist.
Integrierter Telekonverter Der integrierte Telekonverter verlngert die Brennweite um den Faktor
1,4 und kann bei der Fotogra e mit dem Sucher, mit Live-View sowie im
Filmaufnahmemodus benutzt werden. Mit dem Telekonverter-Schalter lsst
sich der Telekonverter vor der Aufnahme wie nachfolgend beschrieben
aktivieren oder deaktivieren.
z Entsperren Sie den Telekonverter-
Schalter.
Schieben Sie die Entriegelung
des Telekonverter-Schalters in die
gezeigte Richtung (q), um den
Telekonverter-Schalter zu entsperren.
x Schieben Sie den Telekonverter-Schalter
auf die Position 1.4 (w).
c Sperren Sie den Telekonverter-Schalter.
Schieben Sie die Entriegelung
des Telekonverter-Schalters in die
gezeigte Richtung (e), um den
Telekonverter-Schalter wieder zu
verriegeln.
Fr das Deaktivieren des integrierten
Telekonverters fhren Sie die obigen Schritte
durch und stellen den Schalter dabei auf die
Position 1.
D Entriegelung des Telekonverter-Schalters
berzeugen Sie sich nach dem Wechsel des Brennweitenfaktors davon,
dass der Telekonverter-Schalter verriegelt ist, um das versehentliche
Bettigen des Schalters zu verhindern.
Verwenden des integrierten Telekonverters: Anmerkungen
Bettigen Sie den Telekonverter-Schalter nicht in folgenden Fllen:
whrend der Kameraverschluss ge net ist, whrend der automatischen
Scharfeinstellung, der Bildstabilisierung, der Filmaufzeichnung oder
whrend der Autofokus-Feinabstimmung. Das Nichtbeachten dieser
Vorsichtsmanahme kann die Belichtung beeintrchtigen, Vignettierungen
verursachen oder andere unerwnschte Folgen haben. Beachten Sie, dass bei
Fotoaufnahmen mit dem integrierten Telekonverter oder einem optionalen
Telekonverter falsche Brennweitendaten aufgezeichnet werden knnen.
Entfernungseinstellung Wird der Telekonverter-Schalter nach dem Fokussieren benutzt, kann sich die
Entfernungseinstellung verndern. Nach dem Bettigen des Telekonverter- Schalters sollten Sie, um sicher zu gehen, vor dem Auslsen der nchsten Aufnahme neu fokussieren.
Die Schrfeposition ndert sich ebenfalls, wenn Sie den Telekonverter- Schalter nach dem Abrufen einer gespeicherten Entfernungseinstellung benutzen (es erklingt ein Warnton, wenn der Ein-/Ausschalter fr das Tonsignal auf der Position steht). Speichern Sie die Entfernungseinstellung
nach Bettigen des Telekonverter-Schalters.
A Update der Objektiv-Firmware
Vor dem Aktualisieren der Objektiv-Firmware mssen Sie sicherstellen,
dass der Telekonverter-Schalter auf der Position 1 steht. Die Firmware-
Aktualisierung ist nicht mglich mit dem Schalter auf der Position 1.4.
Bettigen Sie den Schalter nicht whrend des Update-Vorgangs.
Die Gegenlichtblende Die Gegenlichtblende schtzt das Objektiv und hlt Streulicht ab, das
ansonsten zu Kontrastverlust oder Geisterbildern fhren wrde.
Ziehen Sie die Feststellschraube
fr die Gegenlichtblende (w)
fest an.
Wenn die Gegenlichtblende nicht korrekt angebracht ist, knnen
Vignettierungen auftreten. Wenn die Gegenlichtblende nicht verwendet
wird, kann sie in umgekehrter Position am Objektiv angebracht werden.
Verwendung der integrierten drehbaren Stativschelle Befestigen Sie ein Stativ stets an der Stativschelle, nicht an der Kamera.
Beachten Sie, dass Ihre Hand an das Stativ stoen kann, wenn Sie die
Kamera am Handgri halten und drehen.
Neupositionieren der Kamera
Lsen Sie die Feststellschraube
des Stativrings (q), drehen Sie
das Objektiv, um die Kamera in
die gewnschte Ausrichtung zu
bringen (w), und ziehen Sie die
Feststellschraube wieder an (e).
Die Sicherungs nung Die Sicherungs nung kann benutzt werden, um ein von Drittanbietern
erhltliches, abschliebares Sicherungsseil anzubringen. Nhere
Informationen nden Sie in den Unterlagen zum Sicherungsseil.
Filter Wenn Sie mit Einsteck lterhalter fotogra eren, vergewissern Sie sich,
dass ein Filter in den Halter eingeschraubt ist. Der Halter wird mit einem
eingeschraubten NC-Klarglas lter ausgeliefert.
Filter einsetzen
z Lsen Sie den Halter.
Drcken Sie die Feststellschraube des
Einsteck lterhalters herab und drehen
Sie sie gegen den Uhrzeigersinn, bis
der weie Strich im rechten Winkel zur
Objektivachse steht.
x Nehmen Sie den Einsteckfilterhalter heraus.
c Nehmen Sie das mitgelieferte Filter
heraus.
v Schrauben Sie ein Einschraub lter mit
einem Durchmesser von 40,5 mm auf der
Seite des Halters ein, die mit Nikon und
JAPAN beschriftet ist.
Anschlieend kann der Halter wieder
eingesetzt werden. Die Vorderseite kann
dabei zum Motiv oder zur Kamera zeigen.
Verwenden eines optionalen Einsteck-Zirkularpol lters C-PL405
Das C-PL405 reduziert unerwnschte Re exionen auf Ober chen
aus Glas, Wasser und anderen nichtmetallischen Materialien. Der
Einsteck lterhalter wird nicht bentigt; achten Sie beim Verwenden des
Filters darauf, dass es sicher befestigt ist und denken Sie daran, dass es nicht
vor Staub und Spritzern geschtzt ist. Beachten Sie, dass bei Verwendung
des C-PL405 sich die Naheinstellgrenze geringfgig vergrert und der
Fokussierabstand leicht von dem auf der Entfernungsskala angezeigten
Wert abweicht. Wenn Sie eine Entfernungseinstellung aus dem
Speicher abrufen wollen, sollten Sie das Filter einsetzen, bevor Sie die
Entfernungseinstellung speichern.
Lassen Sie das C-PL405 nicht fr lngere Zeit im direkten Sonnenlicht
liegen oder an Pltzen, an denen es sehr feucht ist oder wo sehr hohe
Temperaturen herrschen.
P ege des Objektivs Das Objektiv net die Blende vollstndig, wenn es von der Kamera
abgenommen wird. Um das Innere des Objektivs zu schtzen, bewahren
Sie es nicht unter direkter Sonneneinstrahlung auf oder bringen Sie beide
Objektivdeckel an.
Sttzen Sie stets das Objektiv, wenn Sie die Kamera mit der Hand halten.
Bei Missachtung dieser Vorsichtsmanahme kann der Objektivanschluss
beschdig