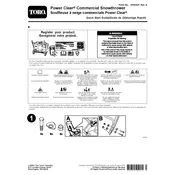
Toro Power Clear 721R-C 38754 Quick Start Guide

Toro Power Clear 721R-C 38754 Snow Thrower manual cover
Pages 8
Year 2020
Language(s)
English en
French fr

Toro Power Clear 721R-C 38754 Snow Thrower Specification

The Toro Power Clear 721R-C 38754 is a robust snow thrower designed for efficient snow removal with an emphasis on performance and ease of use. This model is equipped with a powerful 212cc Toro Premium 4-cycle OHV engine, delivering reliable power that ensures quick and effective clearing of snow from driveways and sidewalks. The snow thrower features a 21-inch clearing width and can handle snow depths of up to 12.5 inches, making it suitable for heavy snowfall conditions.

The Power Clear 721R-C utilizes Toro’s innovative Power Curve® technology, which employs a curved rotor and inverted funnel housing to move more snow in less time, thereby preventing clogging and optimizing the machine’s clearing capabilities. The recoil start system ensures easy startup even in the coldest conditions, while the compact design offers enhanced maneuverability in tight spaces.

This model is also notable for its ergonomic handle design, which improves user comfort during operation, and the Quick Shoot™ control that allows the user to change the chute direction effortlessly, providing precision in directing snow discharge away from walkways and driveways. The auger system, constructed from durable materials, efficiently cuts through compacted snow, ensuring longevity and reliability.

Overall, the Toro Power Clear 721R-C 38754 snow thrower combines power, efficiency, and user-friendly features, making it an excellent choice for homeowners seeking a reliable solution for managing winter snow conditions. Its design and operational features cater to both novice and experienced users, ensuring a balance between functionality and ease of use.

Toro Power Clear 721R-C 38754 Snow Thrower F.A.Q.

How do I start the Toro Power Clear 721R-C 38754 Snow Thrower?

To start the Toro Power Clear 721R-C 38754, ensure the fuel valve is open, the choke is set to 'ON', and the throttle is in the 'FAST' position. Pull the starter handle to start the engine.

What type of fuel should I use for my Toro snow thrower?

Use clean, fresh unleaded gasoline with an octane rating of 87 or higher. Avoid using gasoline with more than 10% ethanol content.

How often should I change the oil in the Toro Power Clear 721R-C 38754?

Change the oil after the first 2 hours of operation, then annually or every 25 operating hours, whichever comes first.

What should I do if the snow thrower does not start?

Check the fuel level, ensure the spark plug is connected, and verify that the choke and throttle are in the correct positions. If it still doesn't start, inspect the spark plug and replace it if necessary.

How do I maintain the auger and impeller for optimal performance?

Regularly check for debris and ice buildup, and ensure the auger and impeller are free-moving. Lubricate moving parts annually or as needed.

How can I prevent the snow thrower from clogging during use?

Clear snow at a steady pace, avoid wet or slushy snow when possible, and use a non-stick spray on the auger and chute to reduce clogging.

What is the best way to store the Toro snow thrower during the off-season?

Drain the fuel tank, change the oil, and clean the snow thrower thoroughly. Store it in a dry, covered area to protect it from moisture and dust.

How can I adjust the drive belt tension on the Toro Power Clear 721R-C 38754?

Consult the owner’s manual for specific instructions, but generally, you will need to access the belt cover, inspect the belt for wear, and adjust the tension using the tensioning bolt provided.

What safety precautions should I take when operating the snow thrower?

Wear appropriate winter clothing, keep hands and feet away from moving parts, and never attempt to clear clogs with your hands. Always turn off the engine before performing maintenance.

How do I replace the scraper and paddles on my Toro snow thrower?

Remove the screws holding the scraper and paddles in place. Replace with new parts, ensuring they are securely fastened. Refer to the user manual for detailed instructions and compatible part numbers.