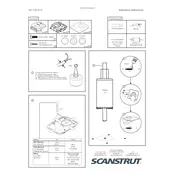
Scanstrut DS-HD6-BLK Installation Instructions

Scanstrut DS-HD6-BLK Seal manual cover
Pages 2
Year 2022
Language(s)
German de
English en
French fr
Italian it
Spanish sp

Scanstrut DS-HD6-BLK Seal Specification

The Scanstrut DS-HD6-BLK Seal is an advanced cable sealing solution designed for marine and outdoor environments where robust protection against water ingress is critical. It accommodates multiple cables, ranging from 6mm to 12mm in diameter, ensuring versatility for various installation requirements. Engineered to provide a secure and watertight seal, the DS-HD6-BLK employs a high-quality, UV-stable, and impact-resistant plastic construction, making it suitable for prolonged exposure to harsh environmental conditions. The seal's design allows for easy installation without the need for specific tools, facilitating a quick setup process. Its low-profile form factor enhances aesthetic integration with marine vessels' surfaces, minimizing any potential snagging hazards. The unit is pre-drilled, allowing for straightforward cable management and routing, while the innovative split-seal design enables the installation of pre-terminated cables without the need to remove connectors. This feature is particularly advantageous in maintaining the integrity of factory-fitted terminations. Furthermore, the DS-HD6-BLK Seal is compliant with international standards, ensuring reliable performance and safety. Its black color provides a sleek appearance that complements various equipment and vessel designs. Overall, the Scanstrut DS-HD6-BLK Seal stands out as a durable and efficient solution for marine cable management, offering exceptional protection, ease of use, and adaptability to different cable sizes and configurations.

Scanstrut DS-HD6-BLK Seal F.A.Q.

What is the recommended method for installing the Scanstrut DS-HD6-BLK Seal?

To install the Scanstrut DS-HD6-BLK Seal, first ensure that the surface is clean and dry. Use the appropriate drill bit to create holes for mounting. Apply a marine-grade sealant around the base to ensure a watertight fit and secure the seal with the provided screws.

How do I maintain the Scanstrut DS-HD6-BLK Seal to ensure longevity?

Regularly inspect the seal for any signs of wear or damage. Clean the seal with fresh water and a non-abrasive cloth to remove any salt deposits or dirt. Avoid using harsh chemicals that may degrade the material.

What should I do if the seal is leaking?

If the seal is leaking, first check for any visible damage or cracks. Ensure that the seal is properly tightened and that the marine-grade sealant is intact. Reapply sealant if necessary, and replace the seal if the damage is significant.

Can I use the Scanstrut DS-HD6-BLK Seal in extreme weather conditions?

Yes, the Scanstrut DS-HD6-BLK Seal is designed to withstand harsh marine environments, including extreme weather conditions. However, regular maintenance checks are recommended to ensure optimal performance.

Is the Scanstrut DS-HD6-BLK Seal compatible with cables of all sizes?

The Scanstrut DS-HD6-BLK Seal accommodates cables with a diameter of up to 6mm. Ensure that the cable size does not exceed this limit for a proper seal.

How do I troubleshoot if the seal is not fitting correctly?

Check if the mounting surface is uneven or if there is debris preventing a proper fit. Ensure that the correct hole size was drilled and that the screws are not overtightened, which can warp the seal.

What materials are used in the construction of the Scanstrut DS-HD6-BLK Seal?

The Scanstrut DS-HD6-BLK Seal is made from UV-stabilized plastic and marine-grade stainless steel, designed to resist corrosion and UV damage in marine environments.

Can the Scanstrut DS-HD6-BLK Seal be used for through-deck installations?

Yes, the Scanstrut DS-HD6-BLK Seal is suitable for through-deck installations, providing a watertight solution for routing cables on boats and marine vessels.

How do I know if the Scanstrut DS-HD6-BLK Seal is securely installed?

A properly installed seal will not move or shift when cables are inserted. Additionally, there should be no visible gaps or spaces between the seal and the mounting surface.

What precautions should I take when removing the seal for replacement?

Carefully remove any screws and gently pry the seal away from the surface to avoid damaging the mounting area. Clean off any old sealant residue before installing a new seal to ensure a clean and effective fit.