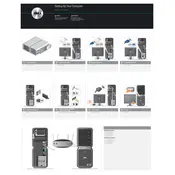
Dell XPS 700 Jet Black Setup Guide
![Dell XPS 700 Jet Black Desktop manual cover](/images/RacKgVGOZUkwRacRCCjlJlMv/thumbs/thumb175x175.webp)
To update the BIOS, visit the Dell Support website, download the latest BIOS update for the XPS 700, and follow the on-screen instructions to install it. Ensure that your desktop is connected to a reliable power source during the update process.
Check the power cable connections, ensure the power outlet is functional, and try using a different power cable. If the issue persists, perform a power drain by unplugging the power cable, holding the power button for 15 seconds, and then reconnecting the power cable.
First, power off your desktop and unplug it. Open the side panel and locate the RAM slots on the motherboard. Remove the existing RAM sticks if necessary, and insert the new RAM modules, ensuring they are securely seated. Close the panel and power on the system to ensure the RAM is recognized.
Your system may be running slow due to multiple factors, such as insufficient RAM, too many startup programs, or a fragmented hard drive. Consider upgrading hardware components, disabling unnecessary startup apps, and performing regular disk cleanup and defragmentation.
To perform a factory reset, restart your computer and press F8 repeatedly until the Advanced Boot Options menu appears. Select "Repair Your Computer," then choose "Dell Factory Image Restore" and follow the prompts to complete the reset.
Yes, you can upgrade the graphics card. Ensure that the new card is compatible with your system's power supply and available slots. After powering off the desktop, open the side panel, remove the existing card, and install the new one. Secure it and connect any necessary power cables.
Turn off and unplug the computer. Open the side panel and use compressed air to gently remove dust from fans, vents, and components. Ensure proper ventilation around the desktop and avoid blocking air vents. Regular cleaning helps maintain optimal cooling performance.
Check your graphics card ports and connect each monitor to a suitable port. Use the Display Settings in Windows to configure the display arrangement, resolution, and orientation. Ensure your graphics card supports dual monitor output.
Noises could indicate a failing fan or hard drive. Open the case and identify the source of the noise. Clean the fans and check for any loose components. If the noise persists, consider replacing the faulty hardware.
Restart your computer and enter the BIOS setup by pressing the appropriate key (often F2 or Delete). Navigate to the CPU configuration section and enable the virtualization technology option (e.g., Intel VT-x). Save changes and exit the BIOS.