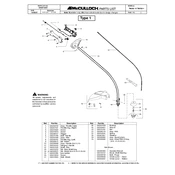
McCulloch TM252 Spare Parts List
![McCulloch TM252 manual cover](/images/ZJeDiFlQSVVqvclqHgEAqkbw/thumbs/thumb175x175.webp)
To start the McCulloch TM252 Trimmer, ensure it has fuel and oil. Set the choke lever to the closed position, press the primer bulb several times, and pull the starter rope until the engine fires. Once the engine starts, move the choke lever to the open position.
The McCulloch TM252 Trimmer requires a fuel mixture of 40:1, which means 40 parts gasoline to 1 part two-stroke engine oil.
To replace the trimmer line, remove the spool from the trimmer head, cut a length of line, and wind it evenly onto the spool. Then, secure the line ends in the holding slots and reattach the spool to the trimmer head.
If the trimmer won't start, check the fuel level, ensure the spark plug is clean and properly connected, and verify that the air filter is not clogged. Also, make sure the choke is set correctly.
The air filter should be checked before each use and cleaned if it appears dirty. Replace the air filter every 25 hours of operation or more frequently if operating in dusty conditions.
Regular maintenance includes cleaning or replacing the air filter, checking and replacing the spark plug, inspecting the trimmer line, and ensuring all nuts and bolts are tight.
To adjust the idle speed, locate the idle speed screw on the carburetor and turn it clockwise to increase the idle speed or counterclockwise to decrease it, ensuring the trimmer head does not rotate at idle.
For long-term storage, empty the fuel tank and run the engine until it stops to clear the carburetor. Clean the trimmer, lubricate metal parts to prevent rust, and store it in a dry place away from direct sunlight.
Frequent line breakage can result from using the wrong line size or type, hitting hard objects, or incorrect trimming techniques. Ensure you use the recommended line and avoid contact with hard surfaces.
Excessive vibration can be caused by an unbalanced trimmer head, damaged components, or loose parts. Inspect the trimmer head and replace damaged parts, and ensure all components are securely fastened.