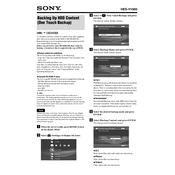
g Select the desired backup content and press ENTER.
h Select [OK] and press ENTER. Data size calculation starts, which may take two to three minutes when the data is large. Then the disc selection display appears with a list of usable BD- REs/BD-Rs in the disc changer (BD-REs/BD-Rs not listed in Unusable BD-RE/BD-R discs overleaf).
If no discs appear in the list The display shows no listings if no usable BD-REs/ BD-Rs are present in the disc changer. You will need to insert discs before proceeding to step 9 (see Inserting Discs of the Operating Instructions).
When previous backup discs appear in the list Be careful not to select them as the previous backup content will be overwritten and lost. Backup discs are labeled as Backup /date and time / backup mode / sequence number as shown above.
i Select destination discs and press ENTER. A checkmark appears next to the selected disc. Select as many discs as the number indicated in the top right of the display. To remove the checkmark, press ENTER again. To remove all checkmarks, select [Clear All].
j Select [OK] and press ENTER. When recorded BD-REs are selected The display asks if you want to continue as the previous recordings will be lost. To continue, select [Yes].
When additional discs are required The display asks if you want to continue as some content will not be backed up.
To continue, select [Yes]. A mail will be issued after the Backup is finished notifying that the disc capacity was insufficient (to read mails, press HOME and select
[Settings] [Messages]). You will need to perform Incremental Backup for the remaining content.
To insert more recordable BD-REs/BD-Rs, select [No] and see Inserting Discs of the Operating Instructions.
Backup starts, and the following displays appear in turn indicating progress for photo and video backup.
During photo backup
During video backup
Backup operation continues even after the server is turned off.
To check if the backup operation was successful Repeat from step 1 and select [Incremental] in step 5. When the previous backup was completed without fail and no data is left for further backup, a message appears after step 8, indicating no data is found.
To restore HDD data using the backup discs In the event of data loss, you can manually import video titles and photo files from the backup discs. See Importing Videos and Importing Photos of the Operating Instructions, and import starting with the latest Full Backup disc(s), and then the subsequent Incremental Backup disc(s) (from the smallest backup sequence number in the disc name).
Note You will be notified if a backup has failed. Press HOME, select [Settings] [Messages], and read the recent mail. When the cause is referred to simply as a problem or disc capacity, check if the disc is clean, and retry.
0.0GB
Clear All
RETURN Return
BD-RE
Backup 11/14/2007 15:47 FULL 01 BD-RE
Blank Disc 2
OK
One Touch Backup - Disc Selection 0/1
This operation requires 1 disc(s). Select disc(s) for backup.
Cancel
Backup 11/14/2007 15:52 INCR 01 BD-RE
Number of required discs/direction of copy
Disc name/disc type Content type
One Touch Backup
The selected disc(s) has already been recorded. If you backup, the recorded video titles, photos, and other data will be entirely erased. Do you want to continue?
NoYes
One Touch Backup
Selected discs are not suffcient for backup. If you start, some of the content will not be backed up. Do you want to continue?
NoYes
RETURN FinishOPTIONS Function
Backing up data... To cancel, select [Stop].
Backup Disc(s): 0/1
Backup File(s): 474/1853 25%
Album Name: 100MSDCF(14)
Media: BD-RE
Stop
One Touch Backup
RETURN FinishOPTIONS Function
Backing up data... To cancel, select [Stop].
Disc(s) backed up: 0/1
Title(s) backed up: 1/2 40%
Title: 100MSDCF(14)
Date/Duration: 6/28/2007 6:35PM( 0H04M) DVD CAM
Rec Mode: 0.5GB
Stop
XR
One Touch Backup
 en
en