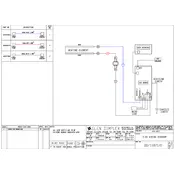
Dimplex PLX050E Wiring Diagram

To set the desired temperature, press the '+' or '-' buttons on the control panel until the display shows the temperature you wish to maintain. The heater will automatically adjust to maintain this setting.
Ensure that the heater is plugged into a working electrical outlet and the power switch is turned on. Check the circuit breaker and fuse box to ensure power is being supplied to the outlet. If the problem persists, consult the user manual or contact customer support.
To clean the heater, ensure it is switched off and unplugged. Use a soft, dry cloth to wipe the exterior. Avoid using water or cleaning agents. Regularly check for dust accumulation and clean as needed to ensure efficient operation.
Yes, the Dimplex PLX050E Heater can be wall-mounted. Follow the instructions provided in the installation guide, ensuring that it is securely mounted and that there is adequate clearance around the heater for safe operation.
The Dimplex PLX050E Heater includes a thermal safety cut-out feature that prevents overheating. It also has a frost protection setting that activates the heater if the room temperature drops below a certain level.
The clicking noise is typically the sound of the heater's thermostat adjusting. This is normal operation as the heater cycles on and off to maintain the desired temperature.
To reset the heater, switch it off and unplug it from the power source. Wait for a few minutes, then plug it back in and switch it on. If the fault persists, refer to the troubleshooting section of the user manual.
Yes, the Dimplex PLX050E Heater is designed to be energy efficient, with features like electronic climate control and programmable timers to optimize power usage and reduce energy consumption.
It is not recommended to use an extension cord with the Dimplex PLX050E Heater. For safety reasons, the heater should be plugged directly into a wall outlet.
To set the timer, access the program mode on the control panel and use the '+' and '-' buttons to adjust the time settings. Refer to the user manual for detailed instructions on programming the timer.