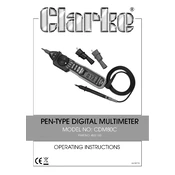
Clarke 4501160 CDM80C Pen-Type Digital Instructions
![Clarke 4501160 CDM80C Pen-Type Digital Multimeter manual cover](/images/fzSwBtnDzXNhUHBtkgeftvMK/thumbs/thumb175x175.webp)
To turn on the multimeter, press the power button located on the front of the device. Ensure that the battery is properly inserted and has sufficient charge.
Check if the multimeter is powered on and the battery is installed correctly. If the problem persists, replace the battery with a new one and ensure the test leads are properly connected.
Turn the dial to the AC voltage measurement setting. Insert the black test lead into the COM terminal and the red test lead into the VΩ terminal. Touch the test leads to the circuit points and read the value on the display.
Regularly check the test leads for damage and replace if necessary. Keep the device clean and store it in a dry place. Replace the battery annually or when the low battery indicator appears.
Set the multimeter to the continuity test mode. Connect the test leads to the circuit or component to be tested. A continuous beep indicates continuity.
Ensure the device is set to the correct measurement mode and range. Check the test leads for any damage or loose connections. Replace the battery if the problem continues.
Yes, the Clarke CDM80C can measure DC current. Set the dial to the DC current measurement setting, connect the test leads in series with the circuit, and read the current value on the display.
To replace the battery, remove the back cover by unscrewing it. Take out the old battery and insert a new one, ensuring correct polarity. Reattach the cover securely.
Always ensure the multimeter is in the correct mode for the measurement being taken. Do not exceed the maximum rated input of the device. Wear appropriate protective gear when working with high voltage.
Switch the multimeter to the resistance measurement mode. Connect the test leads to the component or circuit. The resistance value will be displayed on the screen.