John Deere W235 Operator's Manual V2
W235 Rotary (S.N. 400001-) Self-Propelled Windrower
(N.A. Edition) * O M F H 3 2 1 0 9 7 *
OPERATOR'S MANUAL W235 Rotary Self-Propelled Windrower
OMFH321097 ISSUE H4 (ENGLISH)
CALIFORNIA Proposition 65 Warning
Diesel engine exhaust and some of its constituents are known to the State of California to cause cancer,
birth defects, and other reproductive harm.
If this product contains a gasoline engine:
WARNING
The engine exhaust from this product contains chemicals known to the State of California to cause cancer, birth defects or other reproductive harm.
The State of California requires the above two warnings.
Additional Proposition 65 Warnings can be found in this manual.
John Deere Ottumwa Works North American PRINTED IN U.S.A.
*D CY *
*o mf h3 21 09 7*
Introduction
PP98408,000004F -19-22OCT13-1/1
Foreword
E 69 60 8 U N 17 JU
L1 3
W235 Rotary Self-Propelled Windrower, 995 Rotary Platform
READ THIS MANUAL carefully to learn how to operate and service your machine correctly. Failure to do so could result in personal injury or equipment damage. This manual and safety signs on your machine may also be available in other languages. (See your John Deere dealer to order.)
THIS MANUAL SHOULD BE CONSIDERED a permanent part of your machine and should remain with the machine when you sell it.
MEASUREMENTS in this manual are given in both metric and customary U.S. unit equivalents. Use only correct replacement parts and fasteners. Metric and inch fasteners may require a specific metric or inch wrench.
RIGHT-HAND AND LEFT-HAND sides are determined by facing in the direction of forward travel.
WRITE PRODUCT IDENTIFICATION NUMBERS (P.I.N.) in the Specification or Identification Numbers section. Accurately record all the numbers to help in tracing the machine should it be stolen. Your dealer also needs these numbers when you order parts. File the identification numbers in a secure place off the machine.
WARRANTY is provided as part of John Deere's support program for customers who operate and maintain their equipment as described in this manual. The warranty is explained on the warranty certificate which you should have received from your dealer.
This warranty provides you the assurance that John Deere will back its products where defects appear within the warranty period. In some circumstances, John Deere
also provides field improvements, often without charge to the customer, even if the product is out of warranty. Should the equipment be abused, or modified to change its performance beyond the original factory specifications, the warranty will become void and field improvements may be denied. Setting fuel delivery above specifications or otherwise overpowering machines will result in such action.
THE TIRE MANUFACTURER'S warranty supplied with your machine may not apply outside the U.S.
If you are not the original owner of this machine, it is in your interest to contact your local John Deere dealer to inform them of this unit's serial number. This will help John Deere notify you of any issues or product improvements.
REGISTER USED PRODUCTS. If you purchased used John Deere products from an authorized John Deere dealer, the warranty registration information was updated by the dealer and requires no further information on your part.
If you purchased any used John Deere product from an auction, through a trader or from a farmer, please register it now. John Deere and John Deere dealers value their customers safety and satisfaction. Your local John Deere dealer is best equipped and anxious to provide you superior levels of support for your machine. Please enter your product details and your address online, using the John Deere website corresponding to your country. Then select the dealer of your choice and you will receive a voucher for a discount towards a qualifying purchase of John Deere parts.
082914
PN=2
Contents
Page
Safety Features Machine Safety Features....................................05-1
Safety Recognize Safety Information ............................10-1 Understand Signal Words...................................10-1 Follow Safety Instructions...................................10-1 Handle Fluids SafelyAvoid Fires .....................10-2 Prevent Battery Explosions ................................10-2 Replace Safety Signs .........................................10-2 Use Proper Lifting Equipment.............................10-3 Keep Riders and Children Off Machine ..............10-3 Ballast for Safe Ground Contact.........................10-3 Park Machine Safely...........................................10-4 Work In Ventilated Area......................................10-4 Illuminate Work Area Safely ...............................10-4 Handle Fuel SafelyAvoid Fires........................10-5 Prepare for Emergencies....................................10-5 In Case of Fire ....................................................10-6 Avoid Static Electricity Risk When Refueling......10-6 Wear Protective Clothing....................................10-7 Work in Clean Area ............................................10-7 Service Machines Safely ....................................10-7 Stay Clear of Platform ........................................10-8 Use Safety Lights and Devices...........................10-8 Use Seat Belts....................................................10-8 Transport Machine with Platform or
Weight Box Attached......................................10-9 Prevent Machine Runaway.................................10-9 Practice Safe Maintenance...............................10-10 Servicing Electronic Control Units ....................10-10 Welding Near Electronic Control Units ............. 10-11 Keep Electronic Control Unit
Connectors Clean ........................................ 10-11 Precautions for Welding ...................................10-12 Remove Paint Before Welding or Heating........10-12 Avoid Heating Near Pressurized Fluid Lines ....10-13 Stay Clear of Rotating Drivelines......................10-13 Install All Shields and Guards...........................10-13 Avoid High-Pressure Fluids ..............................10-14 Wait Before Opening High-Pressure
Fuel System .................................................10-14 Service Accumulator Systems Safely...............10-14 Protect Against High Pressure Spray ...............10-15 Service Tires Safely..........................................10-15 Avoid Harmful Asbestos Dust...........................10-15 Dispose of Waste Properly ...............................10-16
Page
Service Cooling System Safely ........................10-16 Remove Accumulated Crop Debris ..................10-16 Support Machine Properly ................................10-17 Store Attachments Safely .................................10-17 Service Drive Belts Safely ................................10-17 Handle Electronic Components and
Brackets Safely ............................................10-18 Avoid Backover Accidents ................................10-18 Handling Batteries Safely .................................10-19 Park Machine Safely.........................................10-19 Clean Exhaust Filter Safely ..............................10-20 Avoid Hot Exhaust ............................................10-21 Exhaust Filter Cleaning ....................................10-21 Freeing a Mired Machine..................................10-21 Remove a Machine From Mud .........................10-22 Before Operating ..............................................10-22 Use Proper Tools ..............................................10-22 Construct Dealer-Made Tools Safely ................10-22 Practice Safe Service Procedures....................10-23 Emergency Exit ................................................10-23
Safety Sign Location Replace Safety Signs .........................................15-1 Safety Signs .......................................................15-1
Controls and Instruments General View of Controls and Instruments.........20-1
Overhead Control Panel Overhead Control Panel .....................................25-1 Microphone (If Equipped) ...................................25-1 Mirror Heater Switch (If Equipped) .....................25-1 Mirror Control Switch ..........................................25-2 Radio Types (If Equipped) ..................................25-2 Aftermarket Radios.............................................25-3 Program Radio for Local Area Frequency ..........25-3 Radio Controls....................................................25-3 Antenna ..............................................................25-3 Communications or CB Radio Mounting ............25-4
CommandCenter Display Screens Armrest Display Navigation
(GreenStar 3 CommandCenter Non-Touchscreen)..........................................30-1
Continued on next page
Original Instructions. All information, illustrations and specifications in this manual are based on the latest information available at the time of publication.
The right is reserved to make changes at any time without notice. COPYRIGHT 2014 DEERE & COMPANY
Moline, Illinois All rights reserved.
A John Deere ILLUSTRUCTION Manual
i 082914
PN=1
Contents
Page
Armrest Display Navigation (GreenStar 3 CommandCenter Touchscreen)..................................................30-2
Armrest Display Navigation (GreenStar 3 2630 Display)........................30-3
Display Navigation Layouts ................................30-4 Display Icon Identification...................................30-9 Display Region Layouts.................................... 30-11 WindrowerMain Screen.................................30-12 Windrower Setup Screen..................................30-12 Header Setup Screen.......................................30-13 Engine Information Screen...............................30-13 Exhaust Filter Cleaning ....................................30-14 Machine Performance Screen..........................30-14 Diagnostic Screen ............................................30-15 Radio Source Select.........................................30-16 AM/FM/WX Home Page ...................................30-17 XM Radio Services Home
Page (Premium Radio) (United States/Canada Only)....................................30-19
CD/MP3 Home Page........................................30-21 USB Home Page (Premium Radio) ..................30-23 Auxilary (AUX) Home Page..............................30-25 Bluetooth Audio .............................................30-25 Radio Settings ..................................................30-26 Operate the Phone (Premium Radio) ...............30-27 Phone Book (Premium Radio)..........................30-28 Phone Directories (Premium Radio).................30-29 Phone Settings (Premium Radio) .....................30-30 Signal Strength and Battery Indicator
(Premium Radio) ..........................................30-31 Brightness Level and Boundary Box Color.......30-32 Regional Settings, Languages,
Time/Date Settings, Units of Measurement ..30-35 Diagnostic Readings, About, Display Tests ......30-38 Connect Multiple Displays and Auxiliary
Controls........................................................30-40 Message Center Application.............................30-41 Layout Manager Application.............................30-43 Access Manager Application ............................30-44
CommandTouch Armrest Console Armrest Console Controls ..................................35-1 Platform Drive Engage Switch............................35-2 Ground Drive and Engine Speed Controls .........35-2 Dial-A-Speed Dial ...............................................35-3 CommandARM Controls .................................35-4 Float Pressure Adjust Switch..............................35-5 Operator Interface Controls ................................35-5 Setpoint Modes (Manual or Automatic) ..............35-6 ClimaTrak Automatic Temperature Control .....35-7 Light Switches ....................................................35-8 Radio Function Switches (If Equipped) ..............35-9 Multi-Function Lever .........................................35-10 Multi-Function Lever and Palm Adjustment...... 35-11 Platform Speed Setpoint Increase Switch ........ 35-11 Platform Speed Setpoint Decrease Switch.......35-12
Page
Platform Tilt Forward and Backward Switch.....35-12 Platform Raise and Lower Switch.....................35-13 Independent Float.............................................35-14 Platform Activation Buttons ..............................35-16 AutoTrac .......................................................35-17
CommandTouch Cab Cornerpost CommandTouch Cab Cornerpost .......................40-1 Aftertreatment Indicators Overview ....................40-3
Calibration Procedures Calibration Procedures - When to Calibrate .......45-1 Calibration Procedures.......................................45-1 Calibration Error Codes......................................45-2
Operators Station Manual Storage Location....................................50-1 ComfortCommand Operator's Seat
(Basic Seat)....................................................50-2 ComfortCommand Operator's Seat
(Premium Seat) ..............................................50-3 Adjust Left-Hand Armrest and Seat
Back (Basic Seat)...........................................50-4 Adjust Left-Hand Armrest and Seat
Back (Premium Seat) .....................................50-4 Instructional Seat................................................50-5 Refrigerator (If Equipped) ...................................50-5 Seat Belts ...........................................................50-6 Armrest Control Console ....................................50-6 Armrest Display ..................................................50-6 Auxiliary Power Outlet Strip................................50-7 Fire Extinguisher Location..................................50-7 Steering Column.................................................50-8 Windshield Wiper Switch ....................................50-8 Handrails and Right-Hand Landing Access........50-9 GreenStar Display...........................................50-9
Lights and Signals Light Switches ....................................................55-1 Lighting Locations...............................................55-2 Lighting Delay/Timeout.......................................55-4 Turn Signals .......................................................55-4 Cab Interior Light ................................................55-5 Map Light............................................................55-5
Prestarting Checks Daily Prestarting Checks ....................................60-1 Check Engine Oil Level ......................................60-1 Check Coolant Level ..........................................60-2 Check Water Separator ......................................60-2 Check Air Cleaner Dust Unloader Valve.............60-2 Check Engine Compartment for
Accumulated Trash and Debris ......................60-3 Check Hydrostat Oil Level ..................................60-3 Check Hydraulic Pump Gear Case.....................60-4
Continued on next page
ii 082914
PN=2
Contents
Page
Check Tires Daily for Damage and Correct Inflation Pressure ..............................60-4
Fill Fuel Tank ......................................................60-5 Fill Diesel Exhaust Fluid (DEF) Tank..................60-6
Operating the Engine Exhaust Filter Cleaning ......................................65-1 Exhaust Filter System Overview.........................65-1 When to Disable Exhaust Cleaning System.......65-2 Exhaust Filter AUTO Mode.................................65-2 Parked Exhaust Filter Cleaning..........................65-3 Start the Engine..................................................65-4 Warm the Engine................................................65-5 Normal Engine Operation ...................................65-6 Operate the Engine ............................................65-6 Idle Engine..........................................................65-6 Hot Weather Operation.......................................65-7 Use a Booster Battery or Charger ......................65-7 Selective Catalytic Reduction (SCR)
System Overview ...........................................65-8
Attaching and Detaching Platform Attach 994/995 Platform.....................................70-1 Attach 500R Platform .........................................70-7 Adjust Header Setup ........................................70-12 Balance 994/995 Platform ................................70-13 Balance 500R Platform.....................................70-16 Detach 994/995 Platform..................................70-19 Detach 500R Platform ......................................70-25
Operating Machine Raise and Lower Platform ..................................75-1 Adjust Platform Raise Speed..............................75-2 Adjust Platform Cutterbar Angle .........................75-3 Adjust Platform Float ..........................................75-4 Adjust Platform Cutterbar Speed........................75-5 Adjust Area Counter Display ..............................75-6 Engage Platform Drive .......................................75-8 Park Machine......................................................75-9 Add Ballast to Machine.......................................75-9 Exhaust Filter System.......................................75-13 Selective Catalytic Reduction (SCR) System...75-17 Rear Steer Assist..............................................75-18 Adjust Rear Steer Sensitivity ............................75-19 Remove Machine From Mud ............................75-20
Attachments Flexible Fourth Step ...........................................80-1 Auxiliary Side Lighting Kit ...................................80-1 Tool Box..............................................................80-1 Fire Extinguisher.................................................80-2 Allied Equipment.................................................80-2
Transporting Transport Safety Precautions .............................85-1 Drive Machine on Roads ....................................85-2
Page
Transport Machine on a Trailer...........................85-4 Tow Machine.......................................................85-5
Fire Prevention Recommended Fire Prevention..........................90-1 Handle Fuel SafelyAvoid Fires........................90-1 Avoid Static Electricity Risk When Refueling......90-2 Prepare for Emergencies....................................90-2 Remove Accumulated Crop Debris ....................90-2 Fire Extinguisher Operation................................90-3 Fire Extinguisher Location..................................90-3 In Case of Fire ....................................................90-4 Clean Engine Compartment ...............................90-4
Fuel, Coolant, and Lubricants Diesel Exhaust Fluid (DEF) Use in
Selective Catalytic Reduction (SCR) Equipped Engines ..........................................95-1
Storing Diesel Exhaust Fluid (DEF)....................95-1 Refilling Diesel Exhaust Fluid (DEF) Tank..........95-2 Testing Diesel Exhaust Fluid (DEF)....................95-3 Disposal of Diesel Exhaust Fluid (DEF) .............95-3 Diesel Fuel..........................................................95-3 Supplemental Diesel Fuel Additives ...................95-4 Lubricity of Diesel Fuel .......................................95-4 Handling and Storing Diesel Fuel .......................95-4 BioDiesel Fuel ....................................................95-5 Testing Diesel Fuel .............................................95-6 Fuel Filters..........................................................95-6 Minimizing the Effect of Cold Weather
on Diesel Engines ..........................................95-7 John Deere Break-In Plus Engine Oil
Interim Tier 4, Final Tier 4, Stage IIIB, and Stage IV ...........................................95-8
Oil Filters ............................................................95-8 Diesel Engine Oil ................................................95-9 Engine Oil and Filter Service Intervals ...............95-9 Mixing of Lubricants..........................................95-10 Oilscan and CoolScan...............................95-10 Alternative and Synthetic Lubricants ................95-10 Lubricant Storage ............................................. 95-11 Diesel Engine Coolant (engine with
wet sleeve cylinder liners) ............................ 95-11 Operating in Warm Temperature Climates .......95-12 Testing Coolant Freeze Point ...........................95-12 John Deere COOL-GARD II Coolant
Extender.......................................................95-13 Water Quality for Mixing with Coolant
Concentrate..................................................95-13 Disposing of Coolant ........................................95-14 Avoid Static Electricity Risk When Refueling....95-14 Fill Fuel Tank ....................................................95-15 Diesel Fuel Storage..........................................95-15 Final Drive Oil ...................................................95-16 Pump Drive Gear Case, Hydrostatic
Drive, and Main Hydraulic Systems Oil........95-17 Grease..............................................................95-17
Continued on next page
iii 082914
PN=3
Contents
Page
Lubrication and Maintenance Service IntervalsClearing or Delaying...........100-1 Lubrication and Maintenance Decal Location...100-2 Hydraulic Hose Replacement ...........................100-2 Hydraulic System Cleanliness ..........................100-3 Lubrication Symbols .........................................100-3 Use Correct Fuel, Coolant, and Lubricants ......100-3 Service Intervals ...............................................100-4 Break-In Service...............................................100-6 As Required Service....................................... 100-11 Every 10 Hours Service..................................100-22 Every 50 Hours Service..................................100-26 Every 100 Hours Service................................100-30 Every 250 Hours or Each Season Service .....100-32 Every 400 Hours or Each Season Service .....100-36 Every 500 Hours or Each Season Service .....100-38 Every 800 Hours or Each Season Service .....100-45 Each Season Service .....................................100-45 Every 1500 Hours Service..............................100-50 Every 2000 Hours or Every Other
Season Service ..........................................100-51 Every 3200 Hours Service..............................100-54 Every 4500 Hours or 3 Years Service ............100-55 Every 4500 Hours or 5 Years Service ............100-56 Every 5500 Hours Service..............................100-57
Service - Engine Practice Safe Service Procedures....................105-1 Gull-Wing Doors ...............................................105-2 Clean Engine Compartment .............................105-3 Fuel Tank Cap ..................................................105-3 Drain Fuel Tank ................................................105-4 Do Not Modify Fuel System..............................105-4 Drain Water Separator......................................105-5 Replace Primary Fuel Filter ..............................105-6 Replace Final Fuel Filter...................................105-7 Bleed Fuel System ...........................................105-7 Check Fuel Injection Nozzles ...........................105-7 Check Engine Oil Level on Dipstick..................105-8 Replace Engine Oil and Filter...........................105-8 Replace Engine Air Filters ..............................105-10 Clean and Inspect Primary Air Filter............... 105-11 Pressure Testing Cooling System...................105-12 Fill Radiator Through Coolant Surge Tank .....105-13 Winterize Cooling System ..............................105-14 Flush Cooling System and Replace Coolant ..105-14 DEF Coolant Filter ..........................................105-16 Clean Debris from Radiator, Charge Air
Cooler, Oil Cooler, A/C Condenser, and Fuel Cooler Fins..................................105-16
Reset Engine Valve Lash Clearance ..............105-20 Check Belt Wear.............................................105-20 Check Tensioner Spring Tension....................105-20 Replace AC Compressor Belt.........................105-21 Replace Serpentine Belt.................................105-21 Replace DEF Filter Kit ....................................105-23
Page
Clean Diesel Exhaust Fluid (DEF) Tank .........105-24
Service - Electrical System Practice Safe Service Procedures....................106-1 Servicing Electronic Control Units ....................106-2 Welding Near Electronic Control Units .............106-2 Keep Electronic Control Unit
Connectors Clean ........................................106-2 Observe Electrical Precautions ........................106-3 Basic Electrical Component Handling /
Precautions For Vehicles Equipped With Computer Controlled Systems .............106-3
Handling Batteries Safely .................................106-4 Connect Battery Cables....................................106-5 Disconnect Battery ...........................................106-5 Charge Battery .................................................106-6 Check Specific Gravity .....................................106-7 Use Remote Terminals .....................................106-7 Remove and Install Battery ..............................106-8 Fuse Center......................................................106-9 Safety Rules When Replacing Halogen
Bulbs ..........................................................106-10 Replace Cab Headlight Bulb ..........................106-10 Adjust Cab Headlights .................................... 106-11 Replace Cab Halogen Light Bulb ................... 106-11 Adjust Cab Halogen Lights .............................106-12 Safety Rules When Replacing High
Intensity Discharge (HID) Xenon Lights .....106-12 Replace High Intensity Discharge
(Xenon) Light Bulb (Optional).....................106-13 Adjust High Intensity Discharge
(Xenon) Lights (Optional) ...........................106-14 Replace Beacon Light Bulb ............................106-14 Replace Auxiliary Side Light and Flood
Lamp Bulbs ................................................106-15 Replace Rear Hazard Lights and
Marker Lights .............................................106-15 Replace Cab Interior Light..............................106-15 Replace Map Light..........................................106-16
Service - Hydraulic System Practice Safe Service Procedures....................107-1 Hydraulic System (General Information) ..........107-2 Hydraulic Hose Replacement ...........................107-2 Hydraulic System Cleanliness ..........................107-2 Hydraulic Valve Function and Location Decal ..107-3 Hydraulic AccumulatorFloat System.............107-3 Snap-To-Connect (STC) Fittings ......................107-5 Release Float Pressure ....................................107-7 Check Hydrostat Oil Level at Tank
Sight Gauge .................................................107-8 Replace Hydrostat Filter ...................................107-9 Replace Hydrostat Oil and Clean Strainer......107-10 Replace Hydraulic Reservoir Vent Filter......... 107-11
Continued on next page
iv 082914
PN=4
Contents
Page
Wheels, Brakes, and Rear Axle Check Tires Daily for Damage and
Correct Inflation Pressure ............................108-1 Check Wheel Nut Torque..................................108-2 Internal Park Brakes.........................................108-2 Adjust Caster Wheel Width...............................108-3 Remove Caster Wheel .....................................108-3 Adjust Rear Suspension...................................108-5 Discarded Tires ................................................108-5
Diagnostic Trouble Codes Access Diagnostic Trouble Code (DTC) Menu .. 110-1 Diagnostic Trouble Code (DTC) Priorities ........ 110-3
Troubleshooting Engine .............................................................. 111-1 Air Conditioner.................................................111-11 Heater..............................................................111-11 Drive System .................................................. 111-12 Lift and Float System...................................... 111-15 Electrical ......................................................... 111-16 Power Screen Cleaner (Rear Door Air
Screen)....................................................... 111-18 Steering and Ground Speed Controls ............ 111-19 Throttle ........................................................... 111-19 Tires................................................................ 111-20 Internal Park Brakes....................................... 111-20 Seat ................................................................ 111-20 Digital Display and Speed Monitoring
System ....................................................... 111-21 Radio .............................................................. 111-22 GreenStar Display (If Equipped)..................... 111-22
Storage Prepare Machine for Storage ........................... 115-1 Remove Machine from Storage........................ 115-2
Specifications Machine Specifications ....................................120-1 Machine Dimensions ........................................120-4 Metric Bolt and Screw Torque Values...............120-6 Unified Inch Bolt and Screw Torque Values......120-7 Limited Battery Warranty ..................................120-8
Machine Identification Numbers Serial Number Plate .........................................125-1 Serial Number Plate Description ......................125-1 Record Machine Product Identification
Number ........................................................125-1 Record Engine Serial Number..........................125-2 Record Engine Control Unit Serial Number......125-2 Record Vehicle Control Unit Serial Number .....125-3 Record Electronic Control Unit Serial Number ..125-3 Record Monitor Serial Number .........................125-3 Record Steering System Control Unit
Serial Number ..............................................125-4 Record Final Drive Serial Number....................125-4
Page
Record Ground Drive Pump Serial Number .....125-4 Record Platform Drive Serial Number ..............125-5 Record Platform Drive Pump Serial Number....125-5 Record Wheel Motor Serial Number.................125-5 Record Gear Box Serial Number......................125-6 Record Platform Serial Number........................125-6 Keep Proof of Ownership .................................125-6 Keep Machines Secure ....................................125-7
v 082914
PN=5
Contents
vi 082914
PN=6
Safety Features
Continued on next page PP98408,0000207 -19-09SEP13-1/2
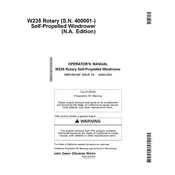
Machine Safety Features
HI
J
B
CK
K
A
E 70 56 4 U N 12 A U G 13
C
I
ED
L
E
D
E
GH
F
E 70 56 5 U N 12 A U G 13
05-1 082914
PN=9
Safety Features
PP98408,0000207 -19-09SEP13-2/2
In addition to safety features shown here, other components and systems, safety signs on machine, and safety messages and instructions in Operator's Manual contribute to safe operation of this machine when combined with care and concern of a capable operator.
Construction of this machine may not meet all local or national requirements for operation on a public roadway. In regions or countries that have national certification requirements for roadway operation, it may be impossible for this machine to be approved for such roadway operation. Customer is responsible for understanding and complying with all local, regional, and national requirements regarding roadway operation.
(A) Cab Safety Features:
Beacon Lights Emergency Exit Window Handhold Headlights Horn Neutral Start Interlock Operator Presence System Pressurized Cab
Rear View Mirrors Seat Belts Steering Interlock Turn Signals Work Lights
(B) Handrails
(C) Platform Lift Lockout Lever
(D) Turn Signals and Warning Lights
(E) Slow Moving Vehicle (SMV) Emblem and Reflectors
(F) Bypass Start Protection
(G) Fire Extinguisher (if equipped)
(H) Skid-Resistant Steps
(I) Large Cab Landing
(J) Parking Brake
(K) Cab-Mount Step
(L) Flood Lamps
05-2 082914
PN=10
Safety
DX,ALERT -19-29SEP98-1/1
DX,SIGNAL -19-03MAR93-1/1
DX,READ -19-16JUN09-1/1
Recognize Safety Information This is a safety-alert symbol. When you see this symbol on your machine or in this manual, be alert to the potential for personal injury.
Follow recommended precautions and safe operating practices.
T8 13 89
U N 28 JU
N 13
Understand Signal Words A signal wordDANGER, WARNING, or CAUTIONis used with the safety-alert symbol. DANGER identifies the most serious hazards.
DANGER or WARNING safety signs are located near specific hazards. General precautions are listed on CAUTION safety signs. CAUTION also calls attention to safety messages in this manual.
TS 18 7 19 30 S E P 88
Follow Safety Instructions Carefully read all safety messages in this manual and on your machine safety signs. Keep safety signs in good condition. Replace missing or damaged safety signs. Be sure new equipment components and repair parts include the current safety signs. Replacement safety signs are available from your John Deere dealer.
There can be additional safety information contained on parts and components sourced from suppliers that is not reproduced in this operator's manual.
Learn how to operate the machine and how to use controls properly. Do not let anyone operate without instruction.
Keep your machine in proper working condition. Unauthorized modifications to the machine may impair the function and/or safety and affect machine life.
TS 20 1 U N 15 A P R 13
If you do not understand any part of this manual and need assistance, contact your John Deere dealer.
10-1 082914
PN=11
Safety
DX,FLAME -19-29SEP98-1/1
DX,SPARKS -19-03MAR93-1/1
DX,SIGNS1 -19-04JUN90-1/1
Handle Fluids SafelyAvoid Fires When you work around fuel, do not smoke or work near heaters or other fire hazards.
Store flammable fluids away from fire hazards. Do not incinerate or puncture pressurized containers.
Make sure machine is clean of trash, grease, and debris.
Do not store oily rags; they can ignite and burn spontaneously.
TS 22 7 U N 15 A P R 13
Prevent Battery Explosions Keep sparks, lighted matches, and open flame away from the top of battery. Battery gas can explode.
Never check battery charge by placing a metal object across the posts. Use a volt-meter or hydrometer.
Do not charge a frozen battery; it may explode. Warm battery to 16C (60F).
TS 20 4 U N 15 A P R 13
Replace Safety Signs Replace missing or damaged safety signs. See the machine operators manual for correct safety sign placement.
TS 20 1 U N 15 A P R 13
10-2 082914
PN=12
Safety
DX,LIFT -19-04JUN90-1/1
PP98408,0000053 -19-26AUG13-1/1
PP98408,0000734 -19-09DEC13-1/1
Use Proper Lifting Equipment Lifting heavy components incorrectly can cause severe injury or machine damage.
Follow recommended procedure for removal and installation of components in the manual.
TS 22 6 U N 23 A U G 88
Keep Riders and Children Off Machine Only allow operator on machine. Keep riders off machine except for periods of training or short periods of observation.
Riders are subject to injury such as being thrown off machine. Riders also obstruct operators view resulting in machine being operated in an unsafe manner.
Children should never be allowed on machine or in machine cab when engine is running.
Instructional seat should only be used for instruction or short periods of machine observation, and not for accommodation of children.
TS 25 3 U N 23 A U G 88
Ballast for Safe Ground Contact Operating, steering, and braking performance of windrower can be considerably affected by size of platform used which alters center of gravity of machine.
To maintain proper ground contact, add ballast to rear of machine as recommended for platform in use.
E 72 40 3 U N 10 D E C 13
10-3 082914
PN=13
Safety
PP98408,0000950 -19-11JUN14-1/1
DX,AIR -19-17FEB99-1/1
DX,LIGHT -19-04JUN90-1/1
Park Machine Safely Before leaving the operators station:
1. Park machine on level surface. 2. Disengage platform drive. 3. Wait until all moving parts have stopped. 4. Place multi-function lever in park position. 5. Lower platform to ground. 6. Idle hot engine for 2 minutes before shut down. 7. Turn off engine and remove key. 8. Allow monitor to shut down before restarting. 9. Lock operators station door. E
70 24 4 U N 20 JU
N 13
E 50 09 3 U N 08 A U G 01
Work In Ventilated Area Engine exhaust fumes can cause sickness or death. If it is necessary to run an engine in an enclosed area, remove the exhaust fumes from the area with an exhaust pipe extension.
If you do not have an exhaust pipe extension, open the doors and get outside air into the area.
TS 22 0 U N 15 A P R 13
Illuminate Work Area Safely Illuminate your work area adequately but safely. Use a portable safety light for working inside or under the machine. Make sure the bulb is enclosed by a wire cage. The hot filament of an accidentally broken bulb can ignite spilled fuel or oil.
TS 22 3 U N 23 A U G 88
10-4 082914
PN=14
Safety
DX,FIRE1 -19-12OCT11-1/1
DX,FIRE2 -19-03MAR93-1/1
Handle Fuel SafelyAvoid Fires Handle fuel with care: it is highly flammable. Do not refuel the machine while smoking or when near open flame or sparks.
Always stop engine before refueling machine. Fill fuel tank outdoors.
Prevent fires by keeping machine clean of accumulated trash, grease, and debris. Always clean up spilled fuel.
Use only an approved fuel container for transporting flammable liquids.
Never fill fuel container in pickup truck with plastic bed liner. Always place fuel container on ground before refueling. Touch fuel container with fuel dispenser nozzle before removing can lid. Keep fuel dispenser nozzle in contact with fuel container inlet when filling.
TS 20 2 U N 23 A U G 88
Do not store fuel container where there is an open flame, spark, or pilot light such as within a water heater or other appliance.
Prepare for Emergencies Be prepared if a fire starts.
Keep a first aid kit and fire extinguisher handy.
Keep emergency numbers for doctors, ambulance service, hospital, and fire department near your telephone.
TS 29 1 U N 15 A P R 13
10-5 082914
PN=15
Safety
DX,FIRE4 -19-22AUG13-1/1
DX,FUEL,STATIC,ELEC -19-12JUL13-1/1
In Case of Fire
CAUTION: Avoid personal injury.
Stop machine immediately at the first sign of fire. Fire may be identified by the smell of smoke or sight of flames. Because fire grows and spreads rapidly, get off the machine immediately and move safely away from the fire. Do not return to the machine! The number one priority is safety.
Call the fire department. A portable fire extinguisher can put out a small fire or contain it until the fire department arrives; but portable extinguishers have limitations. Always put the safety of the operator and bystanders first. If attempting to extinguish a fire, keep your back to the wind with an unobstructed escape path so you can move away quickly if the fire cannot be extinguished.
Read the fire extinguisher instructions and become familiar with their location, parts, and operation before a fire starts. Local fire departments or fire equipment distributors may offer fire extinguisher training and recommendations.
If your extinguisher does not have instructions, follow these general guidelines:
TS 22 7 U N 15 A P R 13
1. Pull the pin. Hold the extinguisher with the nozzle pointing away from you, and release the locking mechanism.
2. Aim low. Point the extinguisher at the base of the fire.
3. Squeeze the lever slowly and evenly.
4. Sweep the nozzle from side-to-side.
Avoid Static Electricity Risk When Refueling The removal of sulfur and other compounds in Ultra-Low Sulfur Diesel (ULSD) fuel decreases its conductivity and increases its ability to store a static charge.
Refineries may have treated the fuel with a static dissipating additive. However, there are many factors that can reduce the effectiveness of the additive over time.
Static charges can build up in ULSD fuel while it is flowing through fuel delivery systems. Static electricity discharge when combustible vapors are present could result in a fire or explosion.
Therefore, it is important to ensure that the entire system used to refuel your machine (fuel supply tank, transfer pump, transfer hose, nozzle, and others) is properly grounded and bonded. Consult with your fuel or fuel system supplier to ensure that the delivery system is in compliance with fueling standards for proper grounding and bonding practices.
R G 22 14 2 U N 17 M A R 14
R G 21 99 2 U N 21 A U G 13
10-6 082914
PN=16
Safety
DX,WEAR -19-10SEP90-1/1
DX,CLEAN -19-04JUN90-1/1
DX,LOOSE -19-04JUN90-1/1
Wear Protective Clothing Wear close fitting clothing and safety equipment appropriate to the job.
Prolonged exposure to loud noise can cause impairment or loss of hearing.
Wear a suitable hearing protective device such as earmuffs or earplugs to protect against objectionable or uncomfortable loud noises.
Operating equipment safely requires the full attention of the operator. Do not wear radio or music headphones while operating machine.
TS 20 6 U N 15 A P R 13
Work in Clean Area Before starting a job:
Clean work area and machine. Make sure you have all necessary tools to do your job. Have the right parts on hand. Read all instructions thoroughly; do not attempt shortcuts.
T6 64 2E
J U N 18 O C T8
8
Service Machines Safely Tie long hair behind your head. Do not wear a necktie, scarf, loose clothing, or necklace when you work near machine tools or moving parts. If these items were to get caught, severe injury could result.
Remove rings and other jewelry to prevent electrical shorts and entanglement in moving parts.
TS 22 8 U N 23 A U G 88
10-7 082914
PN=17
Safety
PP98408,0000951 -19-11JUN14-1/1
DX,FLASH -19-07JUL99-1/1
PP98408,0000059 -19-26AUG13-1/1
Stay Clear of Platform Many moving parts such as cutterbar and conditioner rolls cannot be shielded due to their function.
Stay clear of moving parts during operation.
Before servicing or manually unplugging platform:
1. Park machine on level surface. 2. Place multi-function lever in park position. 3. Always disengage platform drive. 4. Wait until all moving parts have stopped. 5. Lower platform to ground, or raise platform fully and
engage platform lift lockout lever to prevent accidental lower