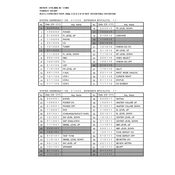
Denon AVR-4806 IR Codes
![Denon AVR-4806 manual cover](/images/1bf1b0982e5d7d094bc3147c/thumbs/thumb175x175.webp)
To perform a factory reset on the Denon AVR-4806, turn off the unit using the power button. Then, while holding the 'Speaker A' and 'Speaker B' buttons, press the power button. Continue holding the speaker buttons until you see the display flash. The receiver will then reset to factory settings.
First, ensure that all cables are securely connected. Check that the correct input source is selected and that the volume is not muted. Verify that speaker connections are secure. If the issue persists, try performing a factory reset.
The Denon AVR-4806 requires a service center to update the firmware, as it does not support user updates via the internet or USB. Contact an authorized Denon service center for assistance.
Regularly dust the unit with a soft, dry cloth. Ensure the receiver is well-ventilated to prevent overheating. Avoid placing it near heat sources. It's advisable to have your receiver professionally serviced every 2-3 years.
The Denon AVR-4806 does not have built-in network streaming capabilities. Consider using an external streaming device connected via the available audio inputs.
Ensure that there is adequate ventilation around the unit. Check that the vents are not blocked by dust. Consider using a cooling fan if the receiver is in an enclosed space. Avoid stacking other devices on top of it.
Use the built-in Auto Setup feature by connecting the provided calibration microphone to the front panel jack. Follow the on-screen instructions to complete the calibration process for optimal sound.
The Denon AVR-4806 does not support control via smartphone apps as it lacks built-in network capabilities. Consider using a universal remote that offers app support as an alternative.
The Denon AVR-4806 includes a variety of inputs and outputs: HDMI, component video, composite video, S-Video, digital optical and coaxial audio inputs, and multiple analog audio inputs. It also has pre-outs for all channels and speaker outputs.
Check that the HDMI cables are securely connected and are high-speed rated. Verify the correct HDMI input is selected on the receiver. If problems persist, try using a different HDMI cable or input port.