Carrier Aquazone 50PCH v2 Installation Instructions
Manufacturer reserves the right to discontinue, or change at any time, specifications or designs without notice and without incurring obligations. Catalog No. 04-53500286-01 Printed in U.S.A. Form 50PC-C4SI Pg 1 4-21 Replaces: 50PC-C3SI
Installation, Start-Up, and Service Instructions
CONTENTS Page
SAFETY CONSIDERATIONS . . . . . . . . . . . . . . . . . . . 1 GENERAL . . . . . . . . . . . . . . . . . . . . . . . . . . . . . . . . . . . 2 GREENHOUSE GAS REGULATION . . . . . . . . . . . . . . 2 F-Gas Regulation (517/2014) . . . . . . . . . . . . . . . . . . . 2 PRE-INSTALLATION . . . . . . . . . . . . . . . . . . . . . . . . . . 2 Inspection . . . . . . . . . . . . . . . . . . . . . . . . . . . . . . . . . . 2 Storage . . . . . . . . . . . . . . . . . . . . . . . . . . . . . . . . . . . . . 2 Handling . . . . . . . . . . . . . . . . . . . . . . . . . . . . . . . . . . . . 2 INSTALLATION . . . . . . . . . . . . . . . . . . . . . . . . . . . . . . 2 Step 1 Check Jobsite . . . . . . . . . . . . . . . . . . . . . . . 2 Installation Guidelines (All Units) . . . . . . . . . . . . . . . 3 Step 2 Check Unit . . . . . . . . . . . . . . . . . . . . . . . . . . 3 Step 3 Locate Unit . . . . . . . . . . . . . . . . . . . . . . . . . 7 Step 4 Mount the Unit . . . . . . . . . . . . . . . . . . . . . . . 7 Step 5 Check Duct System . . . . . . . . . . . . . . . . . . 8 Step 6 Install Condensate Drain . . . . . . . . . . . . . . 9 Step 7 Pipe Connections . . . . . . . . . . . . . . . . . . . . 9 Step 8 Wire Field Power Supply . . . . . . . . . . . . . 13 Step 9 Wire Control Connections . . . . . . . . . . . . 13 Step 10 Wire Field Controls . . . . . . . . . . . . . . . . . 19 PRE-START-UP . . . . . . . . . . . . . . . . . . . . . . . . . . . . . 23 System Checkout . . . . . . . . . . . . . . . . . . . . . . . . . . . 23 Fan Motor Speeds/Changing Speeds . . . . . . . . . . . 23 START-UP . . . . . . . . . . . . . . . . . . . . . . . . . . . . . . . . . 24 Operating Limits . . . . . . . . . . . . . . . . . . . . . . . . . . . . 24 Scroll Compressor Rotation . . . . . . . . . . . . . . . . . . 25 Unit Start-Up . . . . . . . . . . . . . . . . . . . . . . . . . . . . . . . 25 Flow Regulation . . . . . . . . . . . . . . . . . . . . . . . . . . . . 30 Flushing . . . . . . . . . . . . . . . . . . . . . . . . . . . . . . . . . . . 30 Antifreeze . . . . . . . . . . . . . . . . . . . . . . . . . . . . . . . . . . 31 Cooling Tower/Boiler Systems . . . . . . . . . . . . . . . . 32 OPERATION . . . . . . . . . . . . . . . . . . . . . . . . . . . . . . . . 32 Power Up Mode . . . . . . . . . . . . . . . . . . . . . . . . . . . . . 32 SERVICE . . . . . . . . . . . . . . . . . . . . . . . . . . . . . . . . . . 32 Filters . . . . . . . . . . . . . . . . . . . . . . . . . . . . . . . . . . . . . 32 Condensate Drain Pans . . . . . . . . . . . . . . . . . . . . . . 32 Refrigerant System . . . . . . . . . . . . . . . . . . . . . . . . . . 32 Compressor . . . . . . . . . . . . . . . . . . . . . . . . . . . . . . . . 32 Fan Motors . . . . . . . . . . . . . . . . . . . . . . . . . . . . . . . . . 32 Condensate Drain Cleaning . . . . . . . . . . . . . . . . . . . 33 Air Coil Cleaning . . . . . . . . . . . . . . . . . . . . . . . . . . . . 33 Condenser Cleaning . . . . . . . . . . . . . . . . . . . . . . . . . 33 Checking System Charge . . . . . . . . . . . . . . . . . . . . . 34 Refrigerant Charging . . . . . . . . . . . . . . . . . . . . . . . . 34
TROUBLESHOOTING . . . . . . . . . . . . . . . . . . . . . . . .35 Thermistor . . . . . . . . . . . . . . . . . . . . . . . . . . . . . . . . .35 Control Sensors . . . . . . . . . . . . . . . . . . . . . . . . . . . . .35 Thermostatic Expansion Valves . . . . . . . . . . . . . . . .35 Disposal of Unit . . . . . . . . . . . . . . . . . . . . . . . . . . . . .37 50PCH START-UP CHECKLIST . . . . . . . . . . . . . .. CL-1
SAFETY CONSIDERATIONS Installation and servicing of air-conditioning equipment can be hazardous due to system pressure and electrical components. Only trained and qualified service personnel should install, repair, or service air-conditioning equipment. Untrained personnel can perform basic maintenance functions of cleaning coils and filters and replacing filters. All other operations should be performed by trained service personnel. When working on air-conditioning equipment, observe precautions in the litera- ture, tags and labels attached to the unit, and other safety precau- tions that may apply. Improper installation, adjustment, alteration, service, mainte- nance, or use can cause explosion, fire, electrical shock or other conditions which may cause personal injury or property damage. Consult a qualified installer, service agency, or your distributor or branch for information or assistance. The qualified installer or agency must use factory-authorized kits or accessories when mod- ifying this product. Refer to the individual instructions packaged with the kits or accessories when installing. Follow all safety codes. Wear safety glasses and work gloves. Use quenching cloth for brazing operations. Have fire extinguisher available. Read these instructions thoroughly and follow all warn- ings or cautions attached to the unit. Consult local building codes and the National Electrical Code (NEC, U.S.A.) for special instal- lation requirements. Understand the signal words DANGER, WARNING, and CAUTION. DANGER identifies the most serious hazards which will result in severe personal injury or death. WARNING signifies hazards that could result in personal injury or death. CAUTION is used to identify unsafe practices, which would result in minor per- sonal injury or product and property damage. Recognize safety information. This is the safety-alert symbol ( ). When you see this symbol on the unit and in instructions or manuals, be alert to the potential for personal injury.
IMPORTANT: Read the entire instruction manual before starting installation.
WARNING
Electrical shock can cause personal injury or death. Before installing or servicing system, always turn off main power to system. There may be more than one disconnect switch. Turn off accessory heater power if applicable.
Aquazone 50PCH 009-070
Compact Water Source Heat Pumps with Puron Refrigerant (R-410A) 50 Hz
2
GENERAL This Installation and Start-Up Instructions literature is for Aquazone 50PC compact water source heat pump systems. Water source heat pumps (WSHPs) are single-package horizontal- ly and vertically mounted units with electronic controls designed for year-round cooling and heating.
Carrier Aquazone WSHPS are manufactured at: FHP Manufacturing, a Carrier Joint Venture 601 North West 65th Court, Ft. Lauderdale 33309 USA
GREENHOUSE GAS REGULATION
F-Gas Regulation (517/2014) This device utilizes a fluorinated greenhouse gas (F-gas), which is regulated under the EU F-Gas Regulation (517/2014). The her- metically sealed refrigerant circuit is factory charged with HFC- 410A refrigerant. Refrigerant charge amounts by unit size, global warming potential (GWP), and equivalent CO2 tonnage (t) can be found in Table 1 and on the unit label. The installer, building oper- ator, and service provider must conform to usage, handling, and record-keeping requirements as stated in the regulation.
PRE-INSTALLATION
Inspection Upon receipt of shipment, carefully check the shipment against the bill of lading. Make sure all units have been received. Inspect the carton or crating of each unit, and inspect each unit for damage on both the interior and exterior. Ensure the shipping company makes proper notation of any shortages or damage on all copies of the freight bill. Concealed damage not discovered during unloading must be re- ported to the shipping company within 5 days of receipt of ship- ment. NOTE: It is the responsibility of the purchaser to file all necessary claims with the shipping company.
Storage If the equipment is not needed for immediate installation upon its arrival at the job site, it should be left in its shipping carton and stored in a clean, dry area between 10C and 35C. Units must only be stored or moved in the normal upright position as indicat- ed by the UP arrows on each carton at all times. If unit stacking is re- quired, stack units as follows: vertical units less than 6 tons, no more than two high; horizontal units less than 6 tons, no more than three high. Do not stack units larger than 6 tons.
Handling All units are shipped secured to a wooden pallet with hardware. It is recommended to leave the unit secured to the wooden pallet un- til installation. Units secured to a pallet can be handled using a fork lift, pallet jack, material lift, hand truck, or other approved transportation method. Due to the weight of the WSHP units, it's recommended to have two or more people to assist with maneuvering the units. Units that are not secured to a pallet should only be maneuvered by a material lift with two or more people to assist with maneuver- ing the equipment.
INSTALLATION
Step 1 Check Jobsite Installation, operation and maintenance instructions are provided with each unit. Before unit start-up, read all manuals and become familiar with the unit and its operation. Thoroughly check out the system before operation. Complete the inspections and instruc- tions listed below to prepare a unit for installation. See Tables 2 and 3 for unit physical data.
WARNING
DO NOT USE TORCH to remove any component. System contains oil and refrigerant under pressure. To remove a component, wear protective gloves and goggles and proceed as follows:
a. Shut off electrical power to unit. b. Recover refrigerant to relieve all pressure from system
using both high-pressure and low pressure ports. c. Traces of vapor should be displaced with nitrogen and
the work area should be well ventilated. Refrigerant in contact with an open flame produces toxic gases.
d. Cut component connection tubing with tubing cutter and remove component from unit. Use a pan to catch any oil that may come out of the lines and as a gage for how much oil to add to the system.
e. Carefully unsweat remaining tubing stubs when neces- sary. Oil can ignite when exposed to torch flame.
Failure to follow these procedures may result in personal injury and death.
CAUTION
DO NOT re-use compressor oil or any oil that has been exposed to the atmosphere. Dispose of oil per local codes and regulations. DO NOT leave refrigerant system open to air any longer than the actual time required to service the equipment. Seal circuits being serviced and charge with dry nitrogen to prevent oil contamination when timely repairs cannot be completed. Failure to follow these procedures may result in damage to the equipment.
IMPORTANT: The installation of water source heat pump units and all associated components, parts, and accessories which make up the installation shall be in accordance with the regulations of ALL authorities having jurisdiction and MUST conform to all applicable codes. It is the responsibility of the installing contractor to determine and comply with ALL applicable codes and regulations.
Table 1 Refrigerant Charge and CO2 Equivalent
GLOBAL WARMING
POTENTIAL (GWP)
[kgCO2eq]
Model Refrigerant Charge (kg)
CO2 equivalent tonnage (t)
of refrigerant charge
2088
50PCH009 0.454 0.947 50PCH012 0.539 1.125 50PCH015 0.539 1.125 50PCH018 0.624 1.302 50PCH024 0.992 2.072 50PCH030 0.992 2.072 50PCH036 1.134 2.368 50PCH042 1.219 2.545 50PCH048 1.446 3.019 50PCH060 1.758 3.670 50PCH070 1.729 3.611
3
The WSHP units are designed for indoor installation only. Be sure to allow adequate space around the unit for servicing. See Fig. 1 for overall unit dimensions. See Table 5 for corner weights information.
Installation Guidelines (All Units) 1. Be sure that the location chosen for unit installation provides
ambient temperatures maintained above freezing. 2. Be sure the installation location is isolated from sleeping
areas, private offices and other acoustically sensitive spaces.
3. Be sure unit is mounted at a height sufficient to provide an adequate slope of the condensate lines. If an appropriate slope cannot be achieved, a field-supplied condensate pump may be required.
4. On horizontal units, allow adequate room below the unit for condensate drain trap and do not locate the unit above supply piping.
5. Provide sufficient space for duct connection. Do not allow the weight of the ductwork to rest on the unit.
6. Provide adequate clearance for filter replacement and drain pan cleaning. Do not allow piping, conduit, etc. to block filter access.
7. Provide sufficient access to allow maintenance and servicing of the blow and blower motor, compressor and coils. Removal of the entire unit from the closet should not be nec- essary.
8. Provide an unobstructed path to the unit within the closet or mechanical room. Space should be sufficient to allow return air to freely enter the space.
9. Provide ready access to water valves and fittings, and screw- driver access to unit side panels, discharge collar, and all elec- trical connections.
10. Where access to side panels is limited, pre-removal of the control box side mounting screws may be necessary for future servicing.
Step 2 Check Unit Upon receipt of equipment at the jobsite, inspect the carton or crating of each unit, and inspect each unit for damage on both the interior and exterior. Note any damage and contact your local equipment sales office.
INSPECT UNIT
To prepare the unit for installation, complete the procedures listed below: 1. Verify that the correct unit has been received. Check the unit
capacity (tonnage), voltage, orientation, and configuration. 2. Compare the electrical data on the unit nameplate with to ver-
ify the jobsite power feed (voltage, amperage, MCA) and power protection (MOCP).
3. Verify that the unit is the correct model for the entering water temperature of the job (standard or extended range)
4. Remove the unit packaging, keeping the unit attached to the shipping pallet. Do not destroy packaging. Save for re-instal- lation on the unit if the unit will not be fully installed.
5. Open a unit access panel. Verify that the refrigerant tubing is free of kinks or dents, and that it does not touch other unit components.
6. Check the water piping and piping connections to make sure they are free from defects, kinks, dents, and appear to be water tight. Verify system operating water pressure.
7. Inspect the blower assembly. Verify that the blower has not come lose during shipping. Verify clearance between the blower wheel and the blower housing. Verify free blower rotation.
8. Inspect all electrical connections. Be sure connections are clean and tight at the terminals.
9. Check unit controls. If Better B, Complete C, or Deluxe D, verify field provided thermostat is available. If WSHP Open, verify proper sensor has been provided and a commissioning interface will be available.
10. 50PCH Only - Locate the hanging bracket kit located in the compressor compartment.
11. Remove the foam blower shipping support from underneath the blower section.
12. Remove any shipping brackets from the unit.
If the refrigerant charge is adjusted from the factory charge levels, it must be noted on the unit label and in related documentation as required by EU Regulation (517/2014).
CAUTION
To avoid equipment damage, do not use these units as a source of heating or cooling during the construction pro- cess. The mechanical components and filters used in these units quickly become clogged with construction dirt and debris which may cause system damage.
CAUTION
DO NOT store or install units in corrosive environments or in locations subject to temperature or humidity extremes (e.g., attics, garages, rooftops, etc.). Corrosive conditions and high temperature or humidity can significantly reduce performance, reliability, and service life. Always move units in an upright position. Tilting units on their sides may cause equipment damage.
4
Table 2 Physical Data 50PCH (009-070) Units ETL Rated
LEGEND
50PCH UNIT 009 012 015 018 024 030 COMPRESSOR (1 each) Rotary Rotary Rotary Rotary Scroll Scroll Maximum Water Working Pressure (kPa) 2758 2758 2758 2758 2758 2758 FAN MOTOR AND BLOWER
Fan Motor Type/Speeds PSC/3 PSC/3 PSC/3 PSC/3 PSC/3 PSC/3 Fan Motor (W) 75 75 124 186 186 186 Blower Wheel Size (Dia x W) (mm) 114.3 x 114.3 139.7 x 114.3 228.6 x 177.8 228.6 x 177.8 228.6 x 177.8 228.6 x 177.8
WATER CONNECTION SIZE FPT (mm) 19.05 19.05 19.05 19.05 19.05 19.05 Coaxial Coil Volume (L) 0.30 0.30 0.34 0.54 0.91 0.91
HORIZONTAL CABINET Refrigeration Charge (kg) 0.54 0.54 0.54 0.62 0.99 0.99 Air Coil Dimensions (cm) (H x W) 254 x 356 254 x 356 305 x 419 406 x 419 406 x 521 406.4 x 521 Standard Filter - 1 in. Throwaway (cm)
(L x H) 254 x 406 x 25.4 254 x 406 x 25.4 406 x 508 x 25.4 406 x 508 x 25.4 406 x 635 x 25.4 406 x 635 x 25.4
Weight - Operating (kg) 48 48 62 79 82 86 Weight - Shipping (kg) 61 61 72 94 96 102
50PCH UNIT 036 042 048 060 070 COMPRESSOR (1 each) Scroll Scroll Scroll Scroll Scroll Maximum Water Working Pressure (kPa) 2758 2758 2758 2758 2758 FAN MOTOR AND BLOWER
Fan Motor Type/Speeds PSC/3 PSC/3 PSC/3 PSC/3 PSC/3 Fan Motor (W) 373 373 559 559 559 Blower Wheel Size (Dia x W) (mm) 228.6 x 177.8 254 x 203.2 254 x 203.2 254 x 228.6 279.4 x 228.6
WATER CONNECTION SIZE FPT (mm) 19.05 19.05 25.4 25.4 25.4 Coaxial Coil Volume (L) 1.04 1.04 1.85 2.33 2.33
HORIZONTAL CABINET Refrigeration Charge (kg) 1.13 1.22 1.45 1.76 1.73 Air Coil Dimensions (cm) (H x W) 457 x 699 457 x 699 508 x 813 508 x 813 508 x 1067 Standard Filter - 1 in. Throwaway (cm)
(L x H) 457.2 x 762 x 25.4 457 x 762 x 25.4 508 x 876 x 25.4 508 x 876 x 25.4 508 x 610 x 25.4 (2)
Weight - Operating (kg) 103 105 124 131 143 Weight - Shipping (kg) 123 120 136 144 166
FPT Female Pipe Thread PSC Permanent Split Capacitor
5
Table 3 Physical Data 50PCH (009-070) Units CE Rated
LEGEND
* A-weighted [<80dB(A)] casing radiated sound power level, cooling mode.
50PCH UNIT 009 012 015 018 024 030 COMPRESSOR (1 each) Rotary Rotary Rotary Rotary Scroll Scroll Maximum Water Working Pressure (kPa) 2758 2758 2758 2758 2758 2758 PSC FAN MOTOR AND BLOWER
Fan Motor Type/Speeds PSC/3 PSC/3 ECM ECM ECM ECM Fan Motor (W) 75 75 249 249 249 249 Blower Wheel Size (Dia x W) (mm) 114.3 x 114.3 139.7 x 114.3 228.6 x 177.8 228.6 x 177.8 228.6 x 177.8 228.6 x 177.8
WATER CONNECTION SIZE FPT (mm) 19.05 19.05 19.05 19.05 19.05 19.05 Coaxial Coil Volume (L) 0.30 0.30 0.34 0.54 0.91 0.91
HORIZONTAL CABINET Refrigeration Charge (kg) 0.54 0.54 0.54 0.62 0.99 0.99 Air Coil Dimensions (H x W) 254 x 356 254 x 356 305 x 419 406 x 419 406 x 521 406.4 x 521 Standard Filter - 1 in. Throwaway
(L x H) 254 x 406 x 25.4 254 x 406 x 25.4 406 x 508 x 25.4 406 x 508 x 25.4 406 x 635 x 25.4 406 x 635 x 25.4
Weight - Operating (kg) 48 48 62 79 82 86 Weight - Shipping (kg) 61 61 72 94 96 102
50PCH UNIT 036 042 048 060 070 COMPRESSOR (1 each) Scroll Scroll Scroll Scroll Scroll Maximum Water Working Pressure (kPa) 2758 2758 2758 2758 2758 PSC FAN MOTOR AND BLOWER
Fan Motor Type/Speeds ECM ECM ECM ECM ECM Fan Motor (W) 373 559 559 746 746 Blower Wheel Size (Dia x W) (mm) 228.6 x 177.8 254 x 203.2 254 x 203.2 254 x 228.6 279.4 x 228.6
WATER CONNECTION SIZE FPT (mm) 19.05 19.05 25.4 25.4 25.4 Coaxial Coil Volume (L) 1.04 1.04 1.85 2.33 2.33
HORIZONTAL CABINET Refrigeration Charge (kg) 1.13 1.22 1.45 1.76 1.73 Air Coil Dimensions (H x W) 457 x 699 457 x 699 508 x 813 508 x 813 508 x 1067 Standard Filter - 1 in. Throwaway
(L x H) 457.2 x 762 x 25.4 457 x 762 x 25.4 508 x 876 x 25.4 508 x 876 x 25.4 508 x 610 x 25.4 (2)
Weight - Operating (kg) 103 105 124 131 143 Weight - Shipping (kg) 123 120 136 144 166
ECM Electronically Commutated Motor FPT Female Pipe Thread PSC Permanent Split Capacitor
Table 4 Sound Power (A-Weight) - All Units
50PCH UNIT 009 012 015 018 024 030 036 042 048 060 070 Sound Power* 60.0 59.0 60.2 58.0 59.0 61.0 60.0 63.0 59.0 61.0 68.7
6
Fig. 1 50PCH009-070 Unit Dimensions
Electrical Knock-Outs
Compressor Access
D Return Air Opening
Return Air Opening
Condensate Drain
E
R F T
H G
A
N
Q
B
C
N
A
M
K J
B
C
P K
Condensate Drain
Left Hand Return End Blow Left Hand Return NOTE: Models 048 and 060 Left Hand Return units have condenser Straight Through water connections on the front right and electrical knockouts on the front left.
AIR COIL
Blower
Blower Access 457.2 mm Minimum 609.6 mm Optimum
Compressor Access and Control Access
Compressor
Electrical Control
Box
Right Hand Return End Blow Right Hand Return Straight Through
Service Clearances
Return Air Opening
Condensate Drain
Return Air Opening
F RT
D
E Q
N K
J
A B
C
N
B
M K
P
A
C
Condenser Water In
Condenser Water Out
Condensate Drain
457.2 mm Minimum 914.4 mm Optimum
NOTES: 1. All dimensions are metric (mm) unless stated otherwise. 2. All condensate drain connections are 3/4 in. FPT. 3. Specifications subject to change without notice.
4. The 25.4 mm filter rack extends 31.24 mm beyond the side of the unit. The 50.8 mm filter rack extends 73.4 mm beyond the side of the unit. The 50.8 mm filter rack is 4-sided with a filter access door on one end and can accept either a 25.4 mm or 50.8 mm filter.
50PCH UNIT SIZE
A B C D E F G H J K M N P Q R T CONDENSER
WATER CONNECTIONS
FPT (in.)
RECOMMENDED REPLACEMENT NOM-
INAL FILTER SIZEWIDTH DEPTH HEIGHT
CAB END TO FILTER RACK
R/A DUCT WIDTH
CAB FRONT
TO FILTER RACK
WATER INLET
WATER OUTLET
SIDE TO
DISC. (END)
DISC. WIDTH
TOP TO
DISC. (FLE & FRS)
DISC. HEIGHT
END TO
DISC.
TOP TO
DISC. (FRE & FLS)
FILTER RACK
HEIGHT
R/A DUCT
FLANGE HEIGHT
009 482.6 838.2 292.1 38.1 410.21 389.89 60.45 241.30 136.53 160.02 151.64 104.14 123.83 35.81 287.0 218.4 3/4 FPT 254 x 406.4 x 25.4 012 482.6 838.2 292.1 38.1 410.21 389.89 60.45 241.30 133.35 163.32 160.27 104.14 120.65 28.96 287.0 218.4 3/4 FPT 254 x 406.4 x 25.4 015 558.8 1092.2 431.8 38.1 511.81 542.29 72.64 381.00 207.01 163.32 242.57 104.14 194.31 86.36 426.7 381.0 3/4 FPT 406.4 x 508 x 25.4 018 558.8 1092.2 431.8 38.1 511.81 542.29 72.64 358.90 137.67 231.90 155.19 245.11 124.97 31.24 426.7 381.0 3/4 FPT 406.4 x 508 x 25.4 024 558.8 1092.2 457.2 38.1 635.00 419.10 72.64 358.90 137.67 231.90 155.19 245.11 124.97 31.24 426.7 381.0 3/4 FPT 406.4 x 635 x 25.4 030 558.8 1092.2 457.2 38.1 635.00 419.10 62.74 381.00 137.67 231.90 155.19 245.11 124.97 31.24 426.7 381.0 3/4 FPT 406.4 x 635 x 25.4 036 558.8 1384.3 482.6 38.1 765.81 580.39 72.64 409.70 164.34 231.90 190.50 261.11 151.64 30.73 477.5 431.8 3/4 FPT 457.2 x 762 x 25.4 042 558.8 1384.3 482.6 38.1 765.81 580.39 72.64 409.70 133.86 265.43 164.08 287.02 121.16 30.99 477.5 431.8 3/4 FPT 457.2 x 762 x 25.4 048 635.0 1384.3 533.4 38.1 878.84 467.36 72.64 470.41 184.15 265.43 189.48 288.54 171.45 54.86 528.3 482.6 1 FPT 508 x 876.3 x 25.4 060 635.0 1384.3 533.4 38.1 878.84 467.36 72.64 470.41 160.53 298.70 172.97 317.50 147.83 42.67 528.3 482.6 1 FPT 508 x 876.3 x 25.4 070 635.0 1651.0 533.4 38.1 1221.74 391.16 72.64 470.41 160.53 298.70 172.97 317.50 147.83 42.67 528.3 482.6 1 FPT 508 x 609.6 x 25.4 (2)
LEGEND R/A Return Air
7
Table 5 50PCH009-070 Corner Weights (kg)
* Front is counter box end.
Step 3 Locate Unit Locate the unit in an indoor area that allows easy removal of the filter and access panels, and has enough room for service person- nel to perform maintenance or repair. Provide sufficient room to make fluid, electrical, and duct connection(s). If the unit is located in a confined space such as a closet, provisions must be made for return air to freely enter the space. Unit condensate drains are not internally trapped. Allow room be- low the unit base for horizontal and counterflow models for an ad- equate condensate trap. These units are not approved for outdoor installation; therefore, they must be installed inside the structure being conditioned. Do not locate units in areas that are subject to freezing. Units must be installed in conditioned space that is not subject to extremes of temperature or humidity to avoid cabinet sweating and/or equip- ment damage. Do not use units for temporary heating, air conditioning or ventila- tion during construction, especially when plastering, sanding or painting. Care should be taken to avoid introduction of dust, paint or debris into the air coil.
PROTECTION
Once the units are properly positioned on the jobsite, cover them with either a shipping carton, vinyl film, or an equivalent protec- tive covering. Cap open ends of pipes stored on the jobsite. This precaution is especially important in areas where painting, plaster- ing, or spraying of fireproof material, etc. is not yet complete. For- eign material that accumulates within the units can prevent proper start-up and require costly clean-up operations. Before installing any of the system components, be sure to examine each pipe, fit- ting, and valve, and remove any dirt or foreign material found in or on these components.
Step 4 Mount the Unit DUCT FLANGES
The 50PC heat pumps feature fold-out return and supply air duct flanges. These fold-out flanges allow the heat pumps to more easi- ly fit through doorways and other tight spaces, and also prevent damage in shipping and handling. It is recommended that all fold-out flanges be folded out once the heat pump is installed to ensure that return and supply airflow is not obstructed. These flanges can be easily folded using standard or duckbill pliers. Once folded out these flanges can be used to support light ductwork loads. To reduce sound transmission, units should be installed using flex- ible electrical conduit and hose kits. Care should be taken to
ensure that no part of the unit cabinet is touching part of the build- ing structure. For ducted return applications, a flexible duct con- nection should be used.
HORIZONTAL UNITS
While horizontal units may be installed on any level surface strong enough to hold their weight, they are typically suspended above a ceiling by threaded rods. The rods are usually attached to the unit corners by hanging bracket kits. See Fig. 2. The rods must be se- curely anchored to the ceiling.
Fig. 2 Hanger Bracket
Horizontal units installed above the ceiling must conform to all lo- cal codes. An auxiliary drain pan if required by code, should be at least 102 mm larger than the bottom of the heat pump. Plumbing connected to the heat pump must not come in direct contact with joists, trusses, walls, etc. Some applications require an attic floor installation of the horizontal unit. In this case the unit should be set in a full size secondary drain pan on top of a vibra- tion absorbing mesh. The secondary drain pan prevents possible condensate overflow or water leakage damage to the ceiling. The secondary drain pan is usually placed on a plywood base isolated from the ceiling joists by additional layers of vibration absorbing mesh. In both cases, a 19 mm drain connected to this secondary pan should be run to an eave at a location that will be noticeable.
UNIT SIZE TOTAL (kg)
LEFT HAND EVAPORATOR RIGHT HAND EVAPORATOR
LEFT FRONT* RIGHT FRONT* LEFT BACK RIGHT BACK LEFT FRONT* RIGHT FRONT* LEFT BACK RIGHT BACK
009 47 13 11 12 12 11 13 12 12
012 48 13 11 12 12 11 13 12 12
015 58 16 13 15 13 13 16 13 15
018 80 26 16 22 17 16 26 17 22
024 82 26 17 22 17 17 26 17 22
030 88 28 18 23 19 18 28 19 23
036 108 32 22 30 24 22 32 24 30
042 105 32 21 29 23 21 32 23 29
048 122 39 27 28 27 27 39 27 28
060 131 40 29 31 30 29 40 30 31
070 143 44 32 35 32 32 44 32 35
8
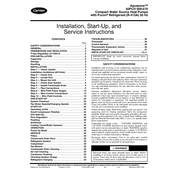
Hanging Bracket Assembly All horizontal units come with a hanging bracket kit to facilitate suspended unit mounting using threaded rod. Hanging brackets are to be installed as shown in Fig. 3.
Fig. 3 Hanging Bracket Locations
This kit includes the following: (5) Brackets (5) Rubber vibration isolators (8) Screws #10 x 1/2 in. (10) Bolts 1/4 - 28 x 1/2 in. hex bolt (not used on this model)
The following are needed and are to be field provided: Threaded rod (3/8 in. max dia) Hex Nuts Washers (13/4 in. min OD)
1. Remove and discard factory-provided screws from location where hanging brackets will be installed as shown in Fig. 4.
Fig. 4 Remove Factory-Provided Screws
2. Mount four brackets to unit corner post using the bolts pro- vided in the kit as shown in Fig. 5.
Fig. 5 Bracket Mounting
3. Install rubber grommet on the bracket as shown in Fig. 6.
4. Hang the unit and assemble the field provided thread rod, nuts and washers on to the brackets as shown in Fig. 6.
Fig. 6 Unit Hanging
To reduce sound transmission, units should be installed using flex- ible electrical conduit and hose kits. Care should be taken to en- sure that no part of the unit cabinet is touching part of the building structure. For ducted return applications, a flexible duct connec- tion should be used.
Step 5 Check Duct System All units are provided with a return air duct flange and supply air duct connections. Refer to unit dimensional drawings (Fig. 1) for physical dimensions of the collar and flange. A flexible connector is recommended for supply and return air duct connections on metal duct systems. All metal ducting should be insulated with a minimum of 25 mm duct insulation to avoid heat loss or gain and prevent condensate from forming during the cooling operation. Application of the unit to uninsulated ductwork is not recommended as the units performance will be adversely affected. If the unit will be installed in a new installation with new ductwork, the installation should be designed using current ASHRAE (American Society of Heating, Refrigerating, and Air- Conditioning Engineers) procedures for duct sizing. If the unit will be connected to an existing duct system, a check should be made to assure that the duct system has the capacity to handle the air required for the unit application. If the duct system is too small,
CAUTION
If the unit is located in a crawl space, the bottom of the unit must be at least 101.6 mm above grade to prevent flooding of the electrical parts due to heavy rains.
WARNING To avoid possible injury or death due to faulty installation do not reuse screws removed from the unit on Step 1 to mount the hanging brackets to the unit.
Hanging Brackets Locations WARNING
To avoid possible injury or death due to faulty installation fol- low all applicable code requirements when hanging this unit.
WARNING
To avoid possible injury or death due to faulty installation rods must be securely anchored to the ceiling.
9
larger ductwork must be installed. Be certain to check for and repair existing leaks and repair. The duct system and all diffusers should be sized to handle the designed airflow quietly. To maximize sound attenuation of the unit blower, the supply and return air plenums should be insulated. There should be no direct straight air path through the air grille into the heat pump. The return air inlet to the heat pump must have at least one 90-degree turn away from the space return air grille. If air noise or excessive airflow are a problem, the blower speed can be changed to a lower speed to reduce airflow.
HORIZONTAL SUPPLY AIR CONFIGURATION CONVERSION
The supply air location on horizontal units can be quickly field converted from end blow to straight through or vice-versa. To con- vert the supply air direction, follow the steps below: 1. If connected to power, shut off the unit and disconnect switch
or circuit breaker. 2. Unscrew and remove the blower access panel.
3. Disconnect the wires from the unit electrical box to the blower motor. Note which speed taps are wired for units.
4. Unscrew and carefully remove the blower panel with the blower and motor attached. Be careful not to damage the refrigerant coils or any other internal unit components.
5. Remove the blower support brackets from the bottom of the blower housing and relocate them to the top of the blower housing.
6. Turn the blower panel 180 degrees so that the blower support brackets are now at the bottom of the blower.
7. Insert the blower panel with the blower and motor into the desired location. Be careful not to damage the refrigerant coils or any other internal unit components. Screw the panel into place.
8. Replace the wires between the blower motor and electrical box. Make sure to connect wires to the proper speed taps.
9. Replace the blower access panel.
10. Reconnect power to the unit.
Step 6 Install Condensate Drain A drain line must be connected to the heat pump and pitched away from the unit a minimum of 2 cm/m to allow the condensate to flow away from the unit. This connection must be in conformance with local plumbing codes. A trap must be installed in the condensate line to ensure free condensate flow. (Heat pumps are not internally trapped.) A vertical air vent is sometimes required to avoid air pockets. See Fig. 7.
Fig. 7 Condensate Drain
The depth of the trap depends on the amount of positive or nega- tive pressure on the drain pan. A second trap must not be included. The horizontal unit should be pitched approximately 6 mm to- wards the drain in both directions, to facilitate condensate remov- al. (See Fig. 8.)
Fig. 8 Pitched Unit
Step 7 Pipe Connections Depending on the application, there are 3 types of WSHP piping systems to choose from: water loop, ground-water and ground loop. Refer to Piping Section of Carrier System Design Manual for additional information. All WSHP units use low temperature soldered female pipe thread fittings for water connections to prevent annealing and out-of- round leak problems which are typically associated with high temperature brazed connections. Refer to Tables 2 and 3 for connection sizes. When making piping connections, consider the following: Use a backup wrench when making screw connections to
unit to prevent internal damage to piping. Insulation may be required on piping to avoid condensa-
tion in the case where fluid in loop piping operates at tem- peratures below dew point of adjacent air.
Piping systems that contain steel pipes or fittings may be subject to galvanic corrosion. Dielectric fittings may be used to isolate the steel parts of the system to avoid galvanic corrosion.
PIPING
Supply and return piping must be as large as the unit connections on the heat pump (larger on long runs). Never use flexible hoses of a smaller inside diameter than that of the water connections on the unit. The 50PC units are supplied with either a copper or optional cupro-nickel condenser. Copper is adequate for ground water that is not high in mineral content. Refer to water quality guidelines. In conditions anticipating moderate scale formation or in brackish water a cupro-nickel heat exchanger is recommended. Both the supply and discharge water lines will sweat if subjected to low wa- ter temperature. These lines should be insulated to prevent damage from condensation. All manual flow valves used in the system must be ball valves. Globe and gate valves must not be used due to high pressure drop and poor throttling characteristics. Always check carefully for wa- ter leaks and repair appropriately. Units are equipped with female pipe thread fittings. Consult the specification sheets for sizes. Teflon1 tape sealer should be used when connecting water piping connections to the units to ensure against leaks and possible heat exchanger fouling. Do not overtighten the connections. Flexible hoses should be used between the unit and the rigid system to avoid possible vibration. Ball valves should be installed in theTRAP DOWN
50.8 mm MIN.
SLOPE DOWN MIN. 2 cm/m
CONDENSATE DRAIN CONNECTION
VENT (OPTIONAL)
1. Teflon is a registered trademarks of DuPont.
ELEVATION LINE
WHEN MOUNTED LEVEL 6.35 mm
10
supply and return lines for unit isolation and unit water flow balancing. Pressure/temperature ports are recommended in both the supply and return lines for system flow balancing. The water flow can be accurately set by measuring the water-to-refrigerant heat ex- changers water side pressure drop. See the unit specification sheets for the water flow and pressure drop information.
WATER LOOP APPLICATIONS
Water loop applications usually include a number of units plumbed to a common piping system. Maintenance to any of these units can introduce air into the piping system. Therefore, air elimination equipment comprises a major portion of the me- chanical room plumbing. For proper maintenance and servicing, pressure-temperature (P/ T) ports are necessary for temperature and flow verification. In addition to complying with any applicable codes, consider the following for system piping: Piping systems using water temperatures below 10C re-
quire 12.7 mm closed cell insulation on all piping sur- faces to eliminate condensation.
Avoid all plastic to metal threaded fittings due to the po- tential to leak. Use a flange fitted substitute.
Teflon tape thread sealant is recommended to minimize internal fouling of the heat exchanger.
Use backup wrench. Do not overtighten connections. Route piping to avoid service access areas to unit. Flush the piping system prior to operation to remove dirt
and foreign materials from the system. To assure adequate cooling and heating performance, the cool- ing tower and boiler water loop temperature should be main- tained between 10C and 23.9C in the heating mode and 15.6C and 43.3C in the cooling mode. In the cooling mode, heat is rejected from the unit into the water loop. A cooling tow- er provides evaporative cooling to the loop fluid, thus maintain- ing a constant supply temperature to the unit. When utilizing an open cooling tower, chemical water treatment is mandatory to ensure the water is free of corrosive materials. A secondary heat exchanger (plate frame between the unit and the open cooling tower) may also be used. In the heating mode, heat is absorbed from the water loop to the unit. A boiler can be utilized to maintain the loop within the proper temperature range. No unit should be connected to the supply or return piping until the water system has been completely cleaned and flushed to re- move dirt, piping chips or other foreign material. Supply and
return hoses should be connected together during this process to ensure the entire system is properly flushed. After the cleaning and flushing has taken place the unit may be connected to the water loop and should have all valves wide open. See Fig. 9. NOTE: It is imperative that all air is eliminated from the closed loop side of the heat exchanger to prevent condenser fouling.
GROUND-LOOP APPLICATIONS
In addition to complying with any applicable codes, consider the following for system piping: Limit piping materials to only polyethylene fusion in the
buried sections of the loop. Do not use galvanized or steel fittings at any time due to
corrosion. Avoid all plastic to metal threaded fittings due to the po-
tential to leak. Use a flange fitted substitute. Do not overtighten connections. Route piping to avoid service access areas to unit. Use pressure-temperature (P/T) plugs to measure flow
of pressure drop.
GEOTHERMAL CLOSED LOOP SYSTEMS
Operation of a 50PC Series unit on a closed loop application re- quires the extended range option. NOTE: Closed loop and pond applications require specialized design knowledge. No attempt at these installations should be made unless the dealer has received specialized training. Utilizing Ground Loop Pumping Package (GLP) makes the in- stallation easy. Anti-freeze solutions must be utilized when low loop temperatures are expected to occur. Refer to the installa- tion manuals for more specific instructions. See Fig. 10.
OPEN WELL WATER SYSTEMS
When a water well is used exclusively for supplying water to the heat pump, the pump should operate only when the heat pump operates. A 24-volt, double pole single throw (DP/ST) contactor can be used to operate the well pump with the heat pump. When two or more units are supplied from one well, the pump can be wired to operate independently from either unit. Two 24-volt double pole single throw relays wired in parallel are required. The discharge water from the heat pump is not contaminated in any manner and can be disposed of in various ways depending on local codes (i.e., discharge well, dry well, storm sewer, drain field, stream, pond, etc.). See Fig. 11.
11
Fig. 9 Cooling/Boiler Application
Fig. 10 Earth Coupled Application
9
2
1
3
4
8
5
7
6
COOLING TOWER/BOILER APPLICATION
LINE VOLTAGE DISCONNECT LOW VOLTAGE CONTROL CONNECTION P/T PLUGS (Optional) HOSE KITS BALL VALVES SUPPLY AND RETURN LINES OF CENTRAL SYSTEM FLEX DUCT CONNECTION HANGING BRACKETS ASSEMBLY THREADED ROD
1. 2. 3. 4. 5. 6. 7. 8. 9.
12
Fig. 11 Well Water Applications
INSTALLATION OF SUPPLY AND RETURN HOSE KIT
Follow these piping guidelines: 1. Install a drain valve at the base of each supply and return riser
to facilitate system flushing. 2. Install shutoff/balancing valves and unions at each unit to per-
mit unit removal for servicing.
3. Place strainers at the inlet of each system circulating pump.
4. Select the proper hose length to allow slack between connec- tion points. Hoses may vary in length by +2% to 4% under pressure.
5. Refer to Table 6. Do not exceed the minimum bend radius for the hose selected. Exceeding the minimum bend radius may cause the hose to collapse, which reduces water flow rate. Install an angle adapter to avoid sharp bends in the hose when the radius falls below the required minimum.
NOTE: Piping must comply with all applicable codes.
Table 6 Metal Hose Minimum Bend Radii
Insulation is not required on loop water piping except where the piping runs through unheated areas or outside the building or when the loop water temperature is below the minimum expected
dew point of the pipe ambient. Insulation is required if loop water temperature drops below the dew point.
Pipe joint compound is not necessary when Teflon threaded tape is pre-applied to hose assemblies or when flared-end connections are used. If pipe joint compound is preferred, use compound only in small amounts on the male pipe threads of the fitting adapters. Prevent sealant from reaching the flared surfaces of the joint. NOTE: When anti-freeze is used in the loop, assure that it is com- patible with Teflon tape or pipe joint compound employed. Maximum allowable torque for brass fittings is 40.1 Nm. If a torque wrench is not available, tighten finger-tight plus one quar- ter turn. Tighten steel fittings as necessary. Optional pressure-rated hose assemblies designed specifically for use with Carrier units are available. Similar hoses can be obtained from alternate suppliers. Supply and return hoses are fitted with swivel-joint fittings at one end to prevent kinking during installation.
HOSE DIAMETER (mm) MINIMUM BEND RADII (mm) 12.7 63.5 19.1 101.6 25.4 139.7
IMPORTANT: Do not bend or kink supply lines or hoses.
CAUTION
Backup wrench is required when tightening water connections to prevent water line damage. Failure to use a backup wrench could result in equipment damage.