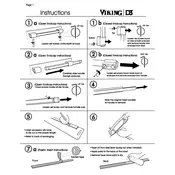
Viking One-Pack Insert Installation Instructions
![Viking One-Pack Handle Insert Handle manual cover](/images/onTtWcpdNhfugePrrNuNrDCL/thumbs/thumb175x175.webp)
To install the Viking One-Pack Handle Insert Handle, first ensure that the old handle is completely removed. Align the new handle insert with the existing holes on the door, then screw it in firmly using the appropriate tools. Ensure that all screws are tight to prevent any wobbly movement.
If the handle feels loose after installation, check all screws to ensure they are tightened properly. If the issue persists, remove the handle and inspect for any stripped screws or damaged mounting holes. Replace any faulty components and reinstall the handle.
Yes, the Viking One-Pack Handle Insert is designed to be universal and can be installed on both left-handed and right-handed doors. Simply adjust the orientation during installation to fit your door type.
To maintain the finish of the handle, regularly clean it with a damp cloth and mild detergent. Avoid using abrasive cleaners or materials that could scratch the surface. Dry the handle thoroughly after cleaning to prevent water spots.
If the handle is squeaking, apply a small amount of lubricant such as WD-40 to the joints and moving parts. Operate the handle multiple times to ensure the lubricant is evenly distributed. Avoid excessive application to prevent residue buildup.
The Viking One-Pack Handle Insert is designed to be compatible with most Viking door hardware. However, it is recommended to check the specifications of your current setup to ensure compatibility before purchasing.
To prevent damage over time, avoid slamming the door or using the handle as a support. Regularly tighten any loose screws and inspect for wear and tear. Implementing these practices will help extend the life of the handle.
For the installation of the Viking One-Pack Handle Insert, you will typically need a screwdriver, a drill (if new holes are required), and a measuring tape to ensure proper alignment.
Yes, the handle insert can be painted to match your door color. It is recommended to use a paint that is suitable for metal surfaces and to follow the manufacturer's instructions for the best results.
If the handle insert does not align with the door holes, you may need to drill new holes. Carefully measure the required positions and use a drill to create the holes. Ensure the new holes allow for a secure and aligned fit.