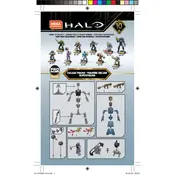
Mega Construx Halo Didact GFT44 Instructions

Mega Construx Mattel Halo Didact GFT44 Construction Set manual cover
Pages 2
Year 2019
Language(s)
Arabic ar
German de
English en
French fr
Italian it
Russian ru
Turkmen tk
Spanish sp
Dutch; Flemish nl
Greek el
Portuguese pt

Mega Construx Mattel Halo Didact GFT44 Construction Set Specification

The Mega Construx Mattel Halo Didact GFT44 Construction Set is a detailed and immersive building kit designed for fans of the Halo franchise. This set captures the imposing presence of the Didact, a central character from the series, with intricate design elements that reflect his iconic armor and regal stature. The construction set includes a highly detailed figure of the Didact, allowing builders to recreate scenes from the Halo universe with authenticity and precision. The set features premium decoration and articulation, enabling dynamic posing and display options that appeal to collectors and enthusiasts alike.

The construction elements are compatible with other Mega Construx sets, allowing for creative integration and expanded play possibilities. This enhances the set’s versatility, providing builders with the opportunity to blend different elements and create unique scenarios. The pieces are designed for easy assembly, ensuring a satisfying building experience that balances complexity with accessibility. High-quality materials are used to ensure durability and stability once the model is completed.

The GFT44 Construction Set is part of the Mega Construx Signature Series, which is known for its attention to detail and commitment to capturing the essence of beloved characters and themes from popular culture. This set is suitable for builders aged 8 and up, providing an engaging experience that combines the joy of building with the excitement of the Halo universe. Whether for display or imaginative play, the Mega Construx Mattel Halo Didact GFT44 Construction Set offers a rewarding challenge that celebrates the legacy of Halo with style and precision.

Mega Construx Mattel Halo Didact GFT44 Construction Set F.A.Q.

How do I start assembling the Mega Construx Mattel Halo Didact GFT44 Construction Set?

Begin by organizing all the pieces and referring to the instruction manual. Start with the base structures as indicated in the initial steps of the manual.

What should I do if I find a missing piece in the set?

Contact Mega Construx customer support with your purchase details. They usually provide replacement parts for missing or damaged pieces.

How can I ensure that the pieces are securely connected during assembly?

Ensure each piece clicks into place firmly. If a connection seems loose, double-check the alignment and try reconnecting.

What is the best way to disassemble the set for storage?

Carefully separate each piece by gently pulling them apart. Use a brick separator tool if needed to avoid damaging the pieces. Store them in labeled bags or containers.

How can I clean the pieces of this construction set?

Use a soft cloth or brush to remove dust. For deeper cleaning, wash pieces gently with mild soap and water, then air dry completely.

Are there any safety precautions I should be aware of when using this set?

Ensure that children using the set are above the recommended age and supervise them to prevent ingestion of small parts.

Can I combine this set with other Mega Construx Halo sets?

Yes, the set is compatible with other Mega Construx Halo sets, allowing for expanded play and more complex builds.

What should I do if a piece does not fit as shown in the instructions?

Verify that you are using the correct piece and check the orientation against the manual. If it still doesn't fit, refer to the troubleshooting section or contact support.

Is there a digital version of the instruction manual available?

Yes, you can often find a digital version of the instruction manual on the Mega Construx website under the product support section.

How do I display the completed Halo Didact set securely?

Place the completed set on a stable, flat surface away from edges. Consider using non-permanent adhesive putty for additional stability if needed.