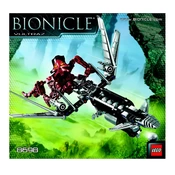
LEGO 8698 Building Instructions

LEGO 8698 manual cover
Pages 48
Year 2008
Language(s)
English en

LEGO 8698 Specification

The LEGO 8698 Construction Set is designed as a part of the Power Miners series, offering a robust and engaging building experience tailored for enthusiasts of intricate construction sets. This set features an array of detailed components, allowing builders to assemble a technologically advanced subterranean drilling machine. It includes a variety of pieces that form the core structure of the drilling vehicle, complete with rotating drill bits and articulated mechanical arms, which enhance the playability and realism of the set.

The set is equipped with several mini-figures, each representing a miner with unique accessories such as helmets and tools, contributing to the immersive experience. Additionally, the construction set incorporates elements such as a rock monster figure, adding an element of adventure and interaction. The color scheme of the set primarily consists of vibrant greens and grays, reflective of its mining theme, which is consistent with the aesthetic design of the Power Miners series.

The LEGO 8698 set is engineered to be compatible with other sets in the Power Miners series, enabling builders to expand their mining operations by combining different models for a more comprehensive play environment. This compatibility supports creative play and encourages extended engagement through the customization of mining scenarios. The set is recommended for builders aged 8 and above, providing an ideal balance of complexity and accessibility. Overall, the LEGO 8698 Construction Set stands out for its detailed components, interactive features, and seamless integration with other sets, making it a compelling addition to any LEGO collection.

LEGO 8698 F.A.Q.

How do I assemble the LEGO 8698 Construction Set correctly?

To assemble the LEGO 8698 Construction Set, follow the step-by-step instructions provided in the manual. Start by sorting the pieces by color and type, and then proceed with the assembly as outlined in the booklet.

What should I do if I am missing a piece from the LEGO 8698 set?

If you are missing a piece, contact LEGO customer service with the set number and missing piece details. You can also order replacement parts directly from their website.

How can I ensure the LEGO 8698 set remains stable during play?

Ensure all pieces are firmly connected and follow the instructions precisely. If stability issues persist, reinforce critical joints and connections with additional LEGO bricks if available.

What is the recommended way to clean LEGO 8698 bricks?

Clean LEGO bricks using a soft cloth or sponge with mild soap and water. Avoid using harsh chemicals or submerging electronic components if any. Rinse thoroughly and air dry before reassembly.

How can I troubleshoot if a part of the LEGO 8698 set does not fit as expected?

Check to ensure you are using the correct piece as per the instruction manual. Misalignment or incorrect piece usage is common. Re-examine the steps to ensure accuracy.

Are there any special tools required for the LEGO 8698 set assembly?

No special tools are required for assembling the LEGO 8698 set. All pieces are designed to fit together by hand. A brick separator tool can be helpful for disassembling tight connections.

How should I store the LEGO 8698 set to maintain its condition?

Store the LEGO set in a cool, dry place, preferably in a plastic container with a lid to avoid dust and exposure to sunlight which can fade colors.

What should I do if the instructions for the LEGO 8698 set are lost?

You can download a PDF version of the instructions from the official LEGO website by searching the set number 8698.

Can I combine the LEGO 8698 set with other LEGO sets?

Yes, LEGO sets are designed to be compatible with each other. You can creatively combine the LEGO 8698 set with other sets to create unique models.

What is the best practice for disassembling the LEGO 8698 set?

Use a LEGO brick separator to gently pry apart connected pieces to avoid damaging them. Start from the top of the model and work your way down to efficiently disassemble the set.